What's New

My Brand New Sentimentally Yours 2017 Xmas Stencils are now available at www.honeypotcrafts.co.uk!
Showing posts with label Designed by Phill. Show all posts

Saturday, 20 June 2015

It all starts with,... plain white cardstock!

Good Afternoon Everyone

It's just started to rain (again), so, I've mashed myself a cuppa and thought I'd shock you all by writing a blog post :-)

If I'm honest, it's this weeks class project that has reminded me "I should use my blog more", as I absolutely loved making this card,.. so much so, that I made the same card in 3 different colour ways (Denim version is still drying at the shop... those pesky Pearl PVA glues,.. making me wait for drying time) ha ha

So, as you'd expect from me,. I start with plain white cardstock, then I decide which of my lovely Cosmic Shimmer sets to 'play' with, then it all goes from there,..

I always have a 'vague idea' of what I want to achieve, but (as most of us do), I change those ideas as I go!

I decided on Chic Pumpkin.. which is a lovely, burnt orange colour..

Here's what I used:

White Cardstock :-)
Decadent Damask Inspirational Phrases Stamp Set by, erm, me lol
Chic Pumpkin Ink Mister
Chic Pumpkin Gilding Wax
Chic Pumpkin Twinkles
Delicate Daisies Dies by Sue
French Collection Corner, Border and Tag Die Set by Sue
A4 Wild Roses Embossing Folder
St Kitts Die Set by Sue

And here's what I did:

This is an 8x8 card.
I cut two layers for the base of this card (one 19.5cm square, which I then pierced all the way around, then another, 18.5cm square, which I gave a light'ish misting with the Chic Pumpkin Ink Mister)

The narrowest piece of white card that was left over from the 19.5cm piece I cut was embossed with the beautiful Wild Roses embossing folder.

I cut two borders from the French Collection dies and these were stuck underneath the embossed piece and attached to the card using foam tape for dimension.

I cut the centre piece from the St Kitts die set, using the two larger dies together and then the larger die on its' own (this one was given the light'ish dusting of the Chic Pumpkin Ink Mister) and the two were stuck together with Cosmic Shimmer glue, I also cut the extra centre for the sentiment with the ST Kitts die set.

I stamped my sentiment from my lovely Damask Inspirational Phrases Stamp Set, using my Black Soot distress ink pad.

The edges of the sentiment area were inked using the Chic Pumpkin Ink Mister (just spray onto your craft sheet and pick some ink up with your Cut n Dry foam), this centre was attached to the topper with foam tape and the topper was attached to the card with a double layer of foam tape, for extra dimension.

The flowers were created using Sues' Delicate Daisies dies (complete petal), each flower was finished in the centre using the Chic Pumpkin Gilding Wax and a teeny drop of the Chic Pumpkin Twinkles.

I finished off by adding a couple of pearls using teh Chic Pumpkin Pearl PVA glue on the centre topper and on the four corners of the card.


I hope you like this card,.. I really enjoyed making it and, here's one of the other colour ways I did,..

This is the Decadent Bamboo version.. :-)


Happy Crafting!

Remember: you can 'Pin' any of these photos to your own Pinterest Boards (or Facebook etc),.. just hover your mouse over the photo's and it gives you little buttons with various options of places to share the photos etc 
:-)


Sunday, 8 February 2015

Graceful Mustard... Just For You! :-)

Good Afternoon Everyone

It's a lovely, sunny, Sunday afternoon so I thought I would share this lovely, sunny card with you :-)
This is the card we did at my workshops this week,.. it was also re-created in other colours from my Graceful collection of Cosmic Shimmer products by some of the class and, I have to say, they all looked equally beautiful!

What I Used:
A4 White Cardstock
My Graceful Mustard Ink Mister
My Graceful Mustard Pearl PVA
My Graceful Mustard Mica Powder
Sentimentally Yours Baroque Sentiments Stamps
Sentimentally Yours Leafy Background Stamp
Sea Garden A4 Embossing Folder by Sue Wilson
Scandinavian Collection Corner, Border & Tag Die Set by Sue Wilson
Large, Big and Super Daisy Punches by Woodware
Cosmic Shimmer Sparkle Star Twinkles


The card was created using 1 sheet of A4, cut in half, scored at 2.5cm and glued at the top, using the fold as a guide,.. this is one of my favourite shapes as you can add the little fancy decoration above the score line :-)

The top half of the main part was misted (lightly) with the mustard mister, left to dry and then embossed with the beautiful Sea Garden embossing folder... it creates a lovely, tonal effect and the embossing brings some texture.

The bottom half was stamped using my Leafy Background stamp, the 'ink' was created using a few mists from the mustard ink mister, then a tiny amount of the mustard mica powder mixed into the ink, this gives you a beautiful, pearlescent, mustard 'ink' that you can apply direct to the stamp with a piece of cut and dry foam. (you can't tell from the photo, but the pattern is pearlescent when the light catches it)
I also used the 'ink' that was left on the foam to finish off the very edge of the top of the card too :-)

The flowers were created using the varying sizes of daisy punches, some misted with the mustard
mister, some left white,.. each was finished with a good squeeze of the mustard pearl pva glue, which, once it dries, gives you a really pretty centre to your flowers,.. in (as you'd expect from me) a completely co-ordinated colour scheme :-)

The sentiment was stamped in black soot distress ink (must have!) using my Baroque Sentiments Stamps and by masking off the detailed designs on the stamp with removable tape.
Anyhoo,.. I hope you like it,..
If you have any of my Graceful Cosmic Shimmer products, have a go at this card,.. :-)

Happy Crafting!


Tuesday, 25 November 2014

Mintylicious......

Good Morning Everyone

It's a little nippy outside so, I've made myself a cuppa and thought I'd show you one of my sample cards that I made using my latest range of stamps and cosmic shimmer products in more detail.

Ingredient List (with links to go get them from my wesbite :-)
8x8 Card Blank
Graceful Butterflies & Dragonflies 8x8 Paper Pad
Graceful Mint Embossing Powder
Graceful Mint Twinkles
Graceful Mint Pearl PVA Glue
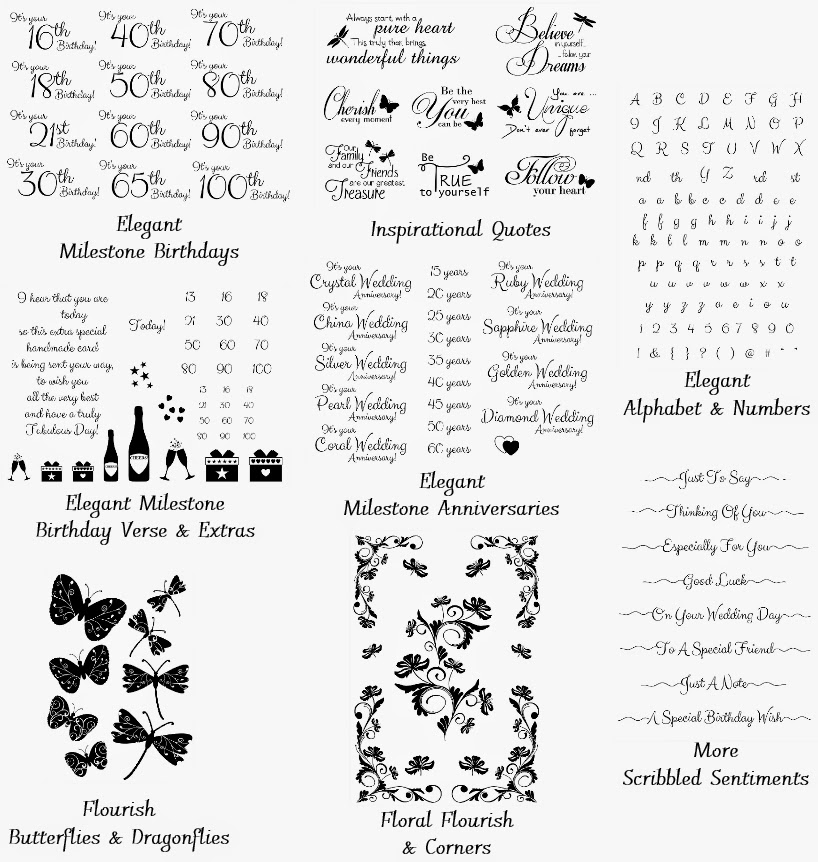
Elegant Milestone Birthdays Stamps
More Scribbled Sentiments Stamps
A4 Climbing Vines Embossing Folder
Dies by Sue Wilson French Collection - Provence
Dies by Sue Wilson Finishing Touches - Delicate Daisies (Full Petals)


This is quite an easy card to put together,.. there are just lots of components to create before assembly, but, the pleasure is in the creation of the components and then, when you see it all together, you think,... yep,.. it was worth it! lol

8x8 cards are a great size to work with,.. plenty of space to decorate without being overpowering and not too expensive to post (if you use the right adhesives!.. I try to stick to Cosmic Shimmer acrylic glue and foam pads where possible as some of the glue gels can be heavy if you use lots on your card)

I started, as I always do, by deciding which colour scheme I wanted, with 6 lovely new colours in my Cosmic Shimmer range, that wasn't as easy as I thought! I opted for the Graceful Mint :-)

I die cut several of the delicate daisies from the reverse of a couple of sheets of the mint papers from the Graceful Butterflies & Dragonflies paper pad, ensuring I got two different shades of mint. The tips of some of the flowers were then pushed onto my perfect medium pad, then embossed with the Graceful Mint Lustre Embossing Powder. I didn't pay much attention to how neat they were, as the overall effect was to be random, but how lovely does the pearlescent finish of the embossing powder look on those petals? It was worth the time!


I then cut a piece of white card to 16cm x 16cm and cut an aperture in the centre, the 'frame' was then embossed with the beautiful Climbing Vines embossing folder.

I cut one of the plain shapes from the Provence dies, stamped the sentiment from the Elegany Milestone Birthdays Stamps (black soot distress ink) and then decorated the top, bottom and corners with the Graceful Mint Pearl PVA Glue and put this to one side to allow them to dry.

I created two smaller layers than the card, one with a sheet from the Graceful Butterflies & Dragonflies paper pad and one from plain white card.
I stamped the sentiment from the More Scribbled Sentiments Stamps on all four sides and added a cheeky '50' in each corner lol
The two layers were then stuck onto my card blank.

I cut another piece of paper from the pad, the beautiful lacy mint one, to 16cm x 16cm then, using foam pads, I stuck this together with the embossed frame,.. this is a great way to create interest to frames/apertures too,.. the pretty paper makes a lovely backdrop to the frame. This was then stuck onto the centre of the card.


Now, the fun (and easiest) part, the assembly!
Once the frame and layers are on your card, it really is just a matter of popping the die cut shape with the sentiment onto some foam pads and putting it in the centre of the frame (make sure your pearls have dried, we don't want flat pearls lol)
Then, just arrange your flowers as you wish, I used Cosmic Shimmer Acrylic glue to fix them as it dries quickly and doesn't leave a mess!
The centre of the smaller flowers was then filled with the Graceful Mint Twinkles and the larger ones had a mini dazzler :-)

It probably took me about an hour to do this card, the embossing of the flower petals takes a while to do, but the lustre and pearly finish create a beautiful effect once it's all together.

Anyhoo, I hope you like this card,.. why not try it in one of the other lovely colours in the paper pad and co-ordinating Cosmic Shimmer products :-)

All the goodies I've used are available on my website, just use the links on the ingredient list to take you there and if you treat yourself to one of the paper pads and you'd like me to sign it for you, just email me, I'm happy to! :-)

Happy Crafting!


Sunday, 23 November 2014

I'm feeling....... good! :-)

Good Afternoon Everyone,..

OK, I'm the worst blogger ever! lol

It's only because I'm busy designing new crafty loveliness for you :-)

I have to just say thank you to you all too,.. my latest range of Stamps, Paper Pad and Cosmic Shimmer products have been flying off shelves everywhere, to the point that even I have struggled to keep my stock maintained in my own shop! lol

If you've bought your goodies already, I hope you have been making fabulous things with them!

My aim is to bring you great quality products that work well on their own, together, or with all the crafty stash you already have,..

This is why I always give you the Cosmic Shimmer Range in co-ordinating colours to the paper pads,.. and stamp sets that work well on their own or when combined with others (like the Elegant Alphabet & Numbers set,.. perfect on its' own or with the Scribbled Sentiments as it's the same font!) the hard work is done, which means you get to have the fun part, creating great cards and crafty projects without worrying about matching colours and products etc

If you haven't seen the latest range yet (or treated yourself to any), here are a couple of photos with links to the relevant section on my website for you to get them :-)

The Stamps


The Paper Pad & Cosmic Shimmer Range


Anyhoo, enough rattling on,..

I wanted to give you something,.. a freebie,.. a 'Thank You' of sorts, for all your support and for trusting me and my designs enough to spend your hard earned crafty cash on them!

So, here's a lovely 8x8 paper, designed by myself,.. it was meant to be a part of the new Graceful Butterflies & Dragonflies Paper Pad that I launched a few weeks ago, but I decided on a softer colour scheme... but, I also love monochrome so didn't want to waste it!
Feel free to save this paper, print it and use it as much as you want (all I ask is that you don't sell is as a printed sheet and please tell people it's my design (if they ask!)


Happy Crafting!


Sunday, 3 August 2014

Christmas Show Card Samples - One day at a time - Day 5!

Good Morning Everyone

It's a bit of a breezy day here in Nottingham!, but the sun is shining so it's ok :-)

I've got lot's to do between today and tomorrow!

I'm back on Create & Craft on Tuesday at 8am and 2pm, with 'Best Sellers' shows,.. this is a great way for me to bring back some of the stamps we've had on previously, that sold out so quickly I didn't get chance to demo them properly!
It's also a great opportunity for you to grab them whilst they are back :-)

It's also the Great British Craft Festival at Stoneleigh Park in Warwick next weekend, so I'm restocking and making sure I have lot's of lovely stamps and my new Vintage Christmas Paper Pad ready for you!
If last years event is anything to go by, this year will be even better!

I'm on stand A2 'Sentimentally Yours Stamps by Phill Martin' and I will have my sister (Karen) and my friends Lorraine and Tanya helping me out,.. my Auntie Sue will also be helping me on the Sunday so I'm really looking forward to a busy weekend!

Anyway,.. we are on day 5 (already!) of my Christmas Show Card Samples - One day at a time posts,.. I hope you're not bored with them and you are getting some ideas on how to use my new Christmas stamps and papers :-)

So, here is card no.5, a lovely 8x8 card in beautiful deep red tones..

As always, I've popped a list of what I used with links to them on my www if you 'need' to purchase them :-)

8x8 Vintage Christmas Premium Paper Pad
Christmas Sentiments Stamps
Marvellous Squares Dies
Layered Poinsettia Dies
Stardust Stickles
Red Dazzlers
Aged Mahogany Distress Ink Pad
A4 Quilted Flower Embossing Folder


One of the things I love most about my new Vintage Christmas Paper Pad is that it works so well with the distress inks (anybody would think I planned that!) lol

Aged Mahogany and Festive Berries Distress Ink Pads are perfect for the red toned papers!

I hope you like this card,.. It's one of my faves, the detail of the Quilted Flower Embossing Folder really stands out 'in real life'.

Anyhoo, off to get some work done!

Happy Crafting!


Wednesday, 30 July 2014

Christmas Show Card Samples - One day at a time!


Good Afternoon Everyone

What a wonderful day I had at Create & Craft yesterday!
I'm so pleased you all love my new Christmas Stamps and Vintage Christmas Paper Pad :-)
So, a big thank you from me! I can't wait to see what fabulous cards you all come up with using the stamps and papers :-)

Over the next 3 or 4 days, I'm going to pop one of my sample cards from my shows on here and let you know what I used, I'm more than happy to share my ideas with you and flattered if you copy!

So, here's card no.1,.. a lovely 8x8 in lilac and purple shades.

Here's what I used: (I've linked them all to the relevant section of my website, in case you need to purchase any of the items :-) 

Acrylic Circle (you may have seen me using this on air)


Hope you like it!

Happy Crafting!


Wednesday, 8 May 2013

Monochrome Fancy Box and Note Cards

Good Morning Everyone

Just a quick post this morning as I've got a list of jobs as long as my leg to be getting on with!

I wanted to show you my latest Fancy Note Card Box... I absolutely love making these so thought, after the last 'batch' proved so popular, that I would make a monochrome version in Black & White..

Just so you know, the stamp I have used is the Indigo Blu Vintage Flourish, which you can get here .. It's one of my personal faves and sells out every time I get it in the shop!

The punches I've used to create the flowers are by Woodware and Tonic..
Tonic Ones are here..
Woodware ones are here ...

Anyhoo... Here are the photos!

Remember it's my Demo Day in the shop this Sunday, 12th May... details are here 

Happy Crafting!


Sunday, 31 March 2013

A5 Fancy Note Card Box

Good Afternoon Everyone

I hope you are having a great Easter weekend :o)

I thought I'd pop a couple of photos on of a project we made at our March Craftathon at my shop yesterday ... I love this project so much, I made another one in a different colour scheme! :o)

This is a fabulous idea (I cannot take credit for the idea as I saw it on another blog months ago, I can't remember whose though, i t was months ago), but I have added my own style to it :o)

This is a fancy A5 sized box, with a box inside that houses note cards and envelopes... I love it and can see me making lots of variations of this when I get half an hour free :o)

But, for now, I will show you the blue one and the pink one that I have done so far...

Here's the blue one :o)

Front


Inside


Close Up Of Embellishments


Here's the pink one :o)

Front


 Inside
 

Close Up Of Embellishments


Hope you like them..!

Happy Crafting!


Wednesday, 30 January 2013

DL Tag Card Workshop

Good Afternoon Everyone!

It's a bit breezy here in Nottingham today, but I'm not complaining.... at least the snow has gone and 'normal' life has resumed!

OK, I have had quite a few requests from people asking me to put photos on my Facebook and Twitter of the cards we have made at my classes...
It's actually easier for me to pop them on my blog (and quicker) so here you go... 
This is our project from this week...

This is a DL Tag card in Cream & Black, using one of the fabulous Saturated Canary images..

Most of you know by now that I adore my Pro Markers, I very rarely make a card where I haven't coloured in and distressed something! And if you look closely, you will see that (as you'd expect) my edges are inked! :o)

I also love my punches and use them all the time... the little butterflies, the heart, the tags and the flowers have all been made using my punches.... 
They are all on my website too, so if you like them... here's a link 

Hope you like this project... I love it and I'm in the middle of a pink and cream version now :-)

Happy Crafting!


Sunday, 16 December 2012

Kraft Florals & Butterflies


Good Evening Everyone

You asked for them.... you got them! :-)

Following the huge success that was my First Kraft Collection of Digital Papers (Kraft Kisses) and the feedback from everyone that you wanted more.... here they are!

Kraft Flowers & Butterflies

adore working with Kraft cardstock and papers so it was only a matter of time before I designed my own :-)

This is a collection of 10 designs, some butterflies and some florals... 

Of course, this collection will also work perfectly with the Kraft Kisses collection :-)

Kraft is a natural, neutral colour which is probably why I like using it... it's so versatile! 

So, I have created the same 10 designs in 5 finishes! White, Black, Beige, Grey and Brown.... all of them are (in my opinion) beautiful so good luck choosing which to use first! lol

I have also included a free, bonus design in the same 5 colours, but you will need to treat yourself to the collection to see it ;-)

That's a whopping 55 sheets in total!

The whole collection is available for only £5 from my online store.. 
Click the pack shot below to take you straight to them :-)

These are high resolution, 300dpi pdf files and I have tested every sheet and they print beautifully onto cardstock or paper!

Once checkout is completed, you will receive and email with your download links so you can save them on your computer and print them whenever you want them :-)

Happy Crafting!

Here's a little snapshot -- 


Wednesday, 21 November 2012

Kraft Kisses....

Good Afternoon Everyone

You asked for them.... you got them! :-)

I adore working with Kraft cardstock and papers so it was only a matter of time before I designed my own :-)

This is a collection of 10 designs, some girls, some masculine, some text and some general use... 
I thought this was a great way to get the most out of this collection... 

Kraft is a natural, neutral colour which is probably why I like using it... it's so versatile! 

So, I have created the same 10 designs in 5 finishes! White, Black, Beige, Grey and Brown.... all of them are (in my opinion) beautiful so good luck choosing which to use first! lol

I have also included a free, bonus design, but you will need to treat yourself to the collection to see it ;-)
That's a whopping 51 sheets in total!

The whole collection is available for only £5 from my online store.. 
Click the pack shot below to take you straight to them :-)

These are high resolution, 300dpi pdf files and I have tested every sheet and they print beautifully onto cardstock or paper!

Once checkout is completed, you will receive and email with your download links so you can save them on your computer and print them whenever you want them :-)

Happy Crafting!

Here's a little snapshot --