
Hello crafters!
Here is a card made during our 'Make & Take' workshops at the Create It Events Show in Telford in June.
The whole project was completed in under an hour!
This card was made using Phill's new A5 Stencils and the gorgeous new product 'Chalk Cloud'. If you haven't used these yet, you will love them! Our crafters at Telford couldn't get enough of them!
We also used Sue Wilson dies; Orange Blossom Complete Petals, Whimsical Leaves Magical Butterflies and Grace.
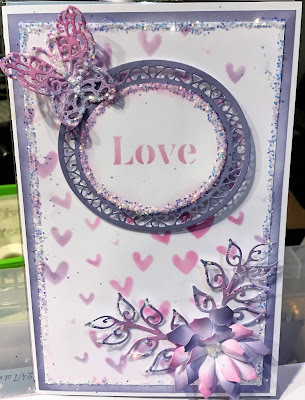
The colours on the main sample card are Cozy Clay and Gentle Lavender. The stencils used are Butterfly Cascade and Birthday. We have included other samples made with other colours/stencils.
(all these cards have been made by crafters at our workshop)
Stage 1 - Cut out all the card layers and die cut shapes needed. This card is A4 folded in half and then trimmed to 21cm x 14cm to make the layering easy to work out! The first layer is 20.5cm x 13.5cm and the second layer is 19.5cm x 12.5cm.
Stage 2 - Choose your two co-ordinating colours! The great thing we found about the Chalk Cloud was that all the colours went with each other, so it didn't matter which two our crafters chose! Apply one of the Chalk Cloud colours to the first layer just around the edges with a Smoothie using circular actions. Use this same colour on the lacy topper of the Grace die and also lightly on the Whimsical Leaves die. Here our crafter has used Cosy Clay as the background colour and Gentle Lavender as the additional colour.
Stage 3 - Choose your stencil background for your card. Here our crafter has used the Butterfly Cascade stencil. Place your background stencil over the next card layer and tape down the edges just a little with Scotch Tape to keep it place. Use your two chosen colours with a smoothie to stencil the design onto the layer.
Stage 4 - Choose your stencil sentiment for your card. Here our crafter has used the 'Just For You' sentiment for the Birthday stencil. Place your background stencil over the plain oval topper from the Grace die and tape down the edges just a little with Scotch Tape to keep it place. Make sure you also tape over any other parts of the stencil that might be exposed!!! Use your two chosen colours (or one colour if you wish) with a smoothie to stencil the design onto the topper.
Stage 5 - Lay out the 4 Orange Blossom Petals largest (1) to smallest (4). Use a smoothie to colour petals 1 and 3 in one colour and then petals 2 and 4 in the other colour. (You could also use both colours on all the petals). Shape the petals as you wish.
Stage 6 - Assemble all your layers and die cuts pieces and add some bling!
The Full Card

Close up of petals

Close up of topper

Here is what our crafter used with link to the www.....
- Sentimentally Yours A5 Stencils - Various
- Sue Wilson Die - Orange Blossom Complete Petals
- Sue Wilson Die - Whimsical Leaves
- Sue Wilson Die - Grace
- Sue Wilson Die - Magical Butterflies
- Foundations Card Stock - Bright White
- Creative Expressions - Smoothies
- Scotch Removable Tape
- Cosmic Shimmer PVA Glue
- Dove Craft Foam Tape
- Cosmic Shimmer Glitter Jewels
Other samples
 |
| Sweet Apple & Terracotta |
 |
| Gentle Lavender & Princess Pink |
 |
| Enchanted Blossom and Sweet Apple |
Remember - we are more than happy for you to replicate our cards in your own style! :-)
Happy Crafting!

PS - Don't forget to 'like' Phill's Facebook page and follow him on Twitter to keep in touch, you can also find him on Pinterest and Instagram for ideas and inspiration :-)
(Links below)
Facebook: Twitter: Pinterest: Instagram: Honeypot Crafts (my website): You Tube Channel