What's New

My Brand New Sentimentally Yours 2017 Xmas Stencils are now available at www.honeypotcrafts.co.uk!

Friday 28 August 2015

Chic Floral - Just For You

Good Morning Everyone,

Only 2 days left until Phill's Craftathon where 50 lucky crafters will have a wonderful day making cards with Phill and Julia Watts.

I will be there helping out and look forward to meeting you all, either again or for  the first time.


Today's card is something different from the last few days but I will be back with Christmas Cards soon as I am getting a little obsessed with all the lovely New Stamps, Colour Cloud, Paper pads etc that Phill has brought out for us all.

Here we go then with today's card, its an A4

Products used: ( which are links to Phill's website too) :-)

A4 Card White Card Blank
A4 Green Card stock
A4 White Card stock
Chic Floral Everyday Sentiment Collection A5 Stamps
Chic Floral Corner, Border & Icon A5 Stamp Set
8 x 8 Snakeskin Embossing Folder
Chic Floral Paper pad
Sue Wilson French Collection Corner, Border & Tag Dies
Sue Wilson French Collection Provence Dies
Sue Wilson Finishing Touches Petite Vinery Dies
Spell Binder Blooms Three
Stick Pins
Dazzlers
Seam Binding


1st layer
Green card stock cut to 20 cm x 29 cm and attach to main card.

2nd layer
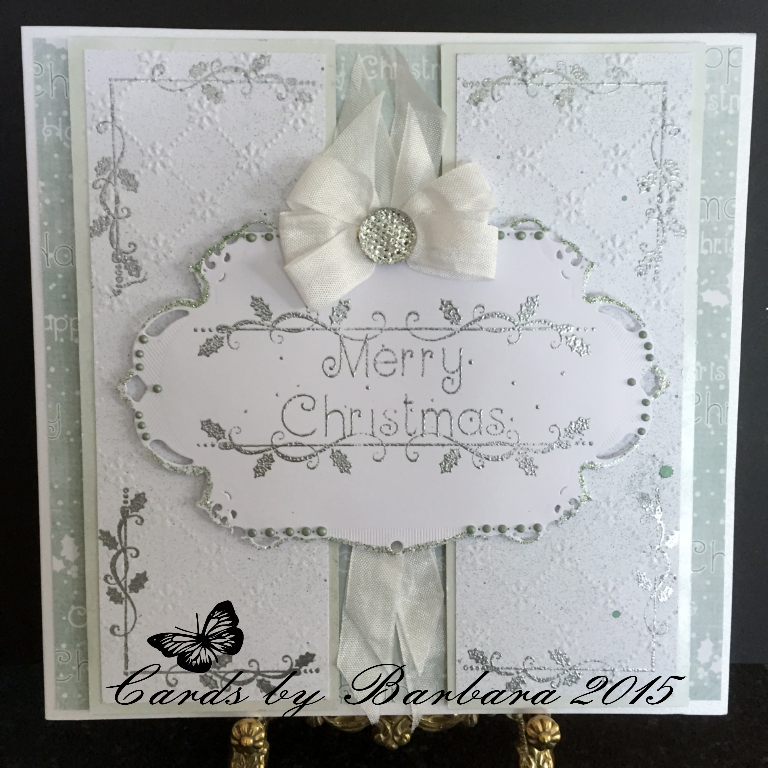
Plain white card stock cut to 19 cm x 28 cm I then used a stamp from the Corner Border & Icon stamps and Chic Moss Mister Spray to create the background, then attached to main card.

Using a piece of plain white card I cut to 17 cm x 18 cm and embossed it using the Snakeskin Embossing Folder, then pierced around the edges. I then cut across the bottom diagonally.

Next I cut out the border die and stamped the top of it using the Border Stamp and then attached it to the 17 x 18 card.

Using the plain side of Chic Floral Moss paper I embossed again using the Snakeskin Folder. I then attached both pieces to the main card.


Sentiment

Using the French Collection Provence Die I cut this out using  plain white card, then stamped the Sentiment from Chic Floral Everyday Collection Stamps.

Then using the Provence die I cut out a piece of Chic Floral Moss paper and attached the Sentiment to it using pads, and attached this to card again using pads.


Flowers

To create the flowers I used Spell Binder Blooms Three and Sue Wilson Petite Vinery.
I cut out the bloom using plain white card and also left over chic floral paper, then used Chic Moss Mister Spray on the white ones, after shaping these I attached to the main card along with the Vinery.

Butterfly

For this I used a Spellbinder Butterfly Die and cut it out using scraps of Chic Floral Moss plain and patterned paper, and attached to card.


Finishing Touches

I edged around the Sentiment with Chic Moss Twinkles, and also used this on the butterfly wings.
The triple bow and swags were made using seam binding, Finally I added Stick pins and Medium Dazzler to the bow and small dazzlers to the flowers.

                                                                  Happy Crafting


Thursday 27 August 2015

Black & Cream - Joy

Good Morning Everyone,

Once again thank you all for your lovely comments on my previous blog.


Today's card is created in the ever popular black & ivory

Products used: (which are also links to Phill's website) :-)

8 x 8 Ivory Card Blank
Ivory Card stock
Black Card stock
Christmas Holly Flourishes Stamps A5
Christmas Holly Decorative Sentiment Stamps A5
Sue Wilson Noble Dies Ornate Pierced Rectangles
Sue Wilson Festive Collection Holly Accessory Kit Dies
Swirling Holly Embossing Folder
Black Soot Distress Ink
Black Seam Binding
Black P.V.A.


First Layer  - Black card stock cut to 7.75 square
Second layer  - Ivory card stock cut to 7.5 square
Third layer Black card stock cut to 7.25 square
Then attach all three layers to main card blank.

Next I cut a piece of Ivory card to 7" square and using one of the Christmas Holly Flourish stamps and Black Soot Distress Ink I created the background. Next I embossed this using the Swirling Holly Embossing Folder.I then attached to card.


Sentiment
Using the 2nd and 3rd size Ornate Pierced Rectangle dies I cut this out using cream card and also a larger piece in black to back it onto.
Then I stamped the sentiment using Black Soot Distress Ink, adding these to the card using pads to give dimension.


Finishing Touches

I used Black Pearl P.V.A.around the edge of the centre die to embellish the sentiment.
Using the Holly Die and scraps of Ivory & Black card I cut out a few holly leaves and added these to the card.
Finally I made a triple bow using Black Seam Binding and added this along with a medium Dazzler.

                                                                     Happy Crafting


Wednesday 26 August 2015

Frosty Heather Christmas Card

Good Morning Everyone,

It is overcast here in Nottingham so a good time to spend the day in my craft room.

Once again I have had received some lovely comment on my previous blog and I thank you all so much.


On with today's card:

Products used:- (which are also links to Phill's website) :-)

8 x 8 Card Blank
Frosty Christmas Holly Paper pad
Frosty Heather Gilding Was by Phill Martin
Frosty Heather Twinkles by Phill Martin
Frosty Heather P.V.A. by Phill Martin
Frosty Heather Colour Cloud Blending Ink
Christmas Holly Verse Stamp Set A5
Embossing Folder Snowflake Lattice
Sue Wilson Die - Caribbean Island Collection, Border Accent & Tag
Silver Embossing Powder
Dazzlers
Seam Binding
Stick pins


The first thing I did before creating this card was to cut a piece of White Seam Binding, enough to make a triple bow and swags. I then coloured it with Frosty Heather Colour Cloud Blending Ink.

1st Layer
I cut a piece of plain white card to 7.75 square, then I used Frosty Heather Gilding Wax  around the edges.

Using a sheet of Frosty Heather Christmas Paper I cut this to 7.5 square and then attached both layers
to the main card.

Next I cut 2 pieces of plain white card to 2" x 7.75 then using the Border Die I cut them both out before Embossing them with the Snowflake Lattice Embossing Folder. I then attached both to the card.


Sentiment

For the Sentiment I used a Verse from the Christmas Holly Verse Collection and heat embossed it using Silver Embossing Powder.
I then attached this to the card using pads.


Finishing Touches

I added Frosty Heather P.V.A. Pearls to the centre of the snowflakes, and Frosty Heather Twinkles to the edges of the border and around the edges of the sentiment.
Then making sure the ribbon wad dry I made a triple bow with swags and added this using a large Dazzler.

Finally I added a matching insert form the Christmas Holly Paper pad insert.


                                                                Happy Crafting


Monday 24 August 2015

Frosty Jade - Merry Christmas

Good Morning Everyone,

Once again thank you all for your lovely comments on my previous blog.

It's good to know you are all looking forward to the New Channel Hochanda, we are all getting even more excited as the time draws closer.

Todays card:-

Products used:- ( which are all links to Phill's website) :-)

8 x 8 Card Blank
Frosty Christmas Holly Paper pad
Frosty Jade Gilding Wax by Phill Martin
Frosty Jade P.V.A. by Phill Martin
Frosty Jade Twinkles by Phill Martin
Frosty Jade Mister Spray by Phill Martin
Christmas Holly Corners, Borders, & Icon Stamp Set A5
Christmas Holly More Decorative Sentiments Stamp Set A5
 Snowflake Lattice Embossing Folder
Spellbinder Decorative Labels 28 Dies
Silver Embossing Powder
Seam Binding
Dazzlers


Using a sheet of Frosty Jade I cut this to 7.75 square and attached to main card blank.

I then cut 2 panels of plain white card. Each on measuring 2.75 x 7.75
Using the Frosty Jade Gilding Wax I coloured the edges and attached to main card using pads.

Next I cut 2 more pieces of plain white card to 2.5 x 7.75
I sprayed both of these with Frosty Jade Ink Mister. Once this was dry (only a couple of minutes)
using the Corner Border Stamp I stamped corners and heat embossed using Silver Embossing Powder. I then embossed these using the Snowflake Lattice Embossing Folder. Then attached to the card.


Sentiment

I cut a plain piece of white card using the largest of the Spellbinder Decorative Labels 28 and heat embossed it with the Sentiment
stamp. I then attached  this to the card using pads.


Finishing Touches

I used Frosty Jade Twinkles and Frosty Jade P.V.A. around the edge of the sentiment.
A triple bow and swags made with White Seam Binding and finally finishing off with a large Dazzler.

                                                          Happy Crafting


Saturday 22 August 2015

Frosty Sky - Let It Snow

Good Morning Everyone


Very exciting times ahead and I hope you are all as excited as we are with the launch of the New Channel Hochanda.

Phill's 1st show is scheduled for 8.00pm on Tuesday 15th September, followed by :
9.00am, 10.00am, 12 noon, 4.00pm, and 7.00pm. on Wednesday 16th September.

I hope you will all be tuned in ready to enjoy this New and Exciting Channel!


Today's card:
Yes another 8 x 8 (my favourite but looks equally as nice in smaller sizes)


Products used: (which are also links to Phill's Website) :-)

8 x 8 Card Blank
Phill Martin Frosty Sky Gilding Wax
Phill Martin Frosty Sky Mister Spray
 Frosty Sky Colour Cloud Blending Ink
Phill Martin Frosty Sky Twinkles
Phill Martin Frosty Sky P.V.A.
Christmas Holly Sentiment A5 Stamp Set
Christmas Holly Flourishes A5 Stamp Set
Seam Binding
Dazzlers
Hat pins
Spellbinder Die Create -A-Flake Three


To create this card I first cut a piece of plain white card to 7.75 square and used Frosty Sky Gilding Wax around the edges then attached to 8 x 8 card blank.

Next I cut a piece of plain white card to 7.5 square, using Frosty Sky Mister Spray I sprayed this, when dry ( a couple of minutes) I attached to main card.

I then cut a piece of plain white card to 7" square. Using the Frosty Sky Colour Cloud Blending Ink and stamps from the Holly Flourish Set I randomly stamped the background. Once dry I attached to main card.


 Using Spellbinder Decorative Labels 28 I cut the dies out and used Frosty Sky Ink Mister on the largest one and stamped the smallest one using Frosty Sky Colour Cloud and a stamp from the Holly Sentiment Set.
I than attached these to the main card using pad to give dimension.


Finishing Touches:

I added Frosty Sky P.V.A. around the edge of the second size die and Twinkles around the smallest one.

Next I cut out the Snowflakes (3 of each size) and sprayed these with Frosty Sky Ink Mister, then added Glacier Ice. Once dry I shaped these and attached to the card, and added a small dazzler to each.

Finally I made a triple bow and swags using White Seam Binding, added a large dazzler to the centre and finished off with Blue and White Hat pins.


                                                        Happy Crafting

Friday 21 August 2015

Creative Expressions launching with Hochanda

Good Afternoon Everyone,

Guess who’s been invited to join the new TV shopping channel Hochanda, dedicated to crafts, hobbies and arts for their launch on the Thursday 27 August, 2015? Yes, you’ve guessed it – Creative Expressions have and they can’t wait to be part of this exciting new channel.
Creative Expressions’ talented team of demonstrators will all be appearing on the new channel, so all look out for Sue Wilson, Phill Martin, John Lockwood and Julia Watts.

Popular paper crafter, John Lockwood will be kicking off proceedings with a ‘One Day Special’ showcasing two of Creative Expressions’ best-selling brands - Craft Dies designed by Sue Wilson
and Cosmic Shimmer Colour Cloud.  This beautiful collection of dies haven’t been demoed on TV before, so make sure you tune in to see John work his magic with these and the fabulous Cosmic Shimmer Colour Cloud Blending Inks.


Keep up with the latest news - check out Hochanda’s facebook page at https://www.facebook.com/Hochanda for the latest updates as you don’t want to miss this exciting launch and make sure to ‘Like them’ too!

Hochanda's website is www.hochanda.com for those of you that don't use Facebook :-)

Exciting times ahead!

My first shows will be a One Day Special, launching at 8pm on Tuesday the 15th September and then at 9am, 10am, 12noon, 4pm and 7pm on Wednesday 16th September!!

I can't wait and look forward to you joining us there :-)

Happy Crafting!!


Christmas Card Featuring The New Frosty Mink

Good Morning Everyone,

Thank you for your lovely comments on my previous post.

Today's card is a Christmas  8 x 8

 I made this using the New Frosty Mink


Products Used:-  (which are also links to Phill's Website) :-)

8 x 8 Card Blank
Phill Martin Frosty Mink Gilding Wax
Phill Martin Frosty Mink Twinkles
Phill Martin Frosty Mink 
Frosty Christmas Holly Paper Pad
Christmas Holly Verse Stamp
Christmas Holly Background Stamp A6
Frosty Mink Colour Cloud Blending Ink
Seam Binding
Dazzlers
White Crochet Ribbon
Sue Wilson Noble Dies - Ornate Pierced Design


First I cut 2 pieces of plain white card stock,
1st  7.75 square
2nd  7.5 square

I edged the first layer using Frosty Mink Gilding Wax then used Frosty Mink Mister Spray on the second layer, and attached these to the main card  blank.

3rd Layer is Frosty Mink Paper cur to 7" square and add to card.

Next I cut a piece of plain white card to 7.75 x 2" and stamped this using Frosty Mink Colour Cloud Ink and the Christmas Holly Background Stamp. Once this was dry I used White Crochet Ribbon and attached this to the card.


Sentiment:

Using the die I cut this out and stamped the top layer with a Verse from the New Christmas Verse Stamps.
I heat embossed this in gold, then attached to card using pads


Finishing Touches:

I edged around the outer die using Frosty Mink Twinkles and Frosty Mink P.V.A. around the inner die.
I then made a triple bow using white seam binding which I had previously coloured with Frosty Mink Colour Cloud Blending Ink, adding Dazzlers to finish.

                                                     
                                                      Happy Crafting


Thursday 20 August 2015

Frosty Sky & White - Seasons Greetings

Good Evening  Everyone,

Today's card is an 8 x 8  Christmas Card

Products used:- (which are also links to Phill's Website) :-)

8 x 8 Card Blank
Frosty Christmas Holly Paper pad
Christmas Holly Sentiment A5 Stamp Set
Christmas Holly Decorative Frame Single Stamp Holly
Christmas Holly Verse Collection A5 Stamp Set
Phill Martin Frosty Sky Twinkles
Phill Martin Frosty Sky P.V.A.
Phill Martin Frosty Sky Gilding Wax
Seam Binding
Dazzlers
Black Soot Distress Ink
Silver Embossing Powder
Sue Wilson Die Festive Collection - Holly Sprays
Sue Wilson Caribbean Island Collection Die - Border, Accent & Tag 


8 x 8 card blank
1st 7.75 square
2nd layer Frosty Sky from paper pad cut to 7.5 square

Using the 7,75 square card I edged this with Frosty Sky Gilding Wax and attached to main card blank.
Then attached the patterned paper to card.

Next I cut 3 pieces of white card
First one 2 x 7.5
Second one 2.5 x 7.5
Third one 3 x 7.5
I then cut these out using the Border Die. Once this was complete I glued all three strips together.
Cutting a piece of White Seam Binding and using the Frosty Blue Colour Cloud I dyed the Seam Binding to match the card. At this stage I also dyed enough Seam Binding to make a double bow. Once this was dry I added the strip of Seam Binding to the strips of card before attaching this to the main card.

Using the Christmas Holly Frame Stamp and the Frosty Sky Colour Cloud to stamp this, I cut it out and mounted in onto the card using pads to give dimension, then added the Sentiment using Silver Embossing Powder, again using pad to attach to card.


Finishing Touches

I cut out the Holly Sprays and added these to the card.
I added Glamour Dust to the leaves and also onto the background of the stamp.
Around the edges I used Cosmic Shimmer Glue and Glacier Ice.
The holly berries are highlighted using Frosty Sky P.V.A. Glue.
I made a double bow and a tie bow for the strip of seam binding and added dazzlers to each.
Along the edges of the Border Die I used Frosty Sky Twinkles, when this was dry I curled each edge.


Finally I added the insert using the New Christmas Holly Paper pad matching insert and a verse from the Christmas Holly Verse Collection.


                                                                    Happy Crafting


Sunday 2 August 2015

Baroque Best Wishes - Black & Cream

Good Morning Everyone,

Once again thank you all for taking the time to comment on my cards, Its lovely to know what you all think.

Today I decided to use stamps from one of my Favourite Collections - The Baroque Collection.

I hope you like it.


Products Used:- (which are also links to Phill's Website too) :-)

8 x 8 Cream Card Stock
Sentimentally Yours Baroque Background A6 Stamp
Sentimentally Yours Baroque Sentiment Collection A5 Stamp Set
Creative Expressions Snakeskin Embossing Folder
Black PVA Glue
Sue Wilson Die New York Collection - Herald Square 
Dazzlers
Seam Binding
Couture Creations Dragonfly Die


Matting & Layering

1st layer Black Card cut to 7.75 sq.
2nd Layer Cream Card cut to 7.5 sq.
3rd Layer Black Card cut to 6.75 sq.
4th Layer Cream Card cut to 6.5 sq.

First I attached the 7.75 Black Card to the Base Card - flat using Cosmic Shimmer Glue
I than embossed the Cream 7.5 card and attached this (again flat)


Background

To create the background I used the cream 6.5 card and The Baroque Background Stamp. I stamped this using Black Soot Distress Ink. Once this was dry I attached it to the 6,75 black card and then added both to the main card using pads to give dimension.


Sentiment

Using a piece of cream card and Sue Wilson Herald Square Die I cut the die out and then backed it onto a  piece of black card.

I then did the PVA Pearls around the edge of this as they take a while to dry.

Next I cut a piece of cream card to 2.5 sq and stamped the Sentiment attaching this the centre with pads.
This was then added to the centre of the main card.

Once I was sure the PVA Pearls were dry I attached the sentiment to the centre of the card.


Finishing Touches

I made a triple bow and swags using Black Seam Binding and added a Dazzler to the centre.
Finally adding two Dragonflies.


                                                         Happy Crafting


Saturday 1 August 2015

Christmas Wishes - To The Best Husband - Featuring the NEW Christmas Holly Collection

Good Morning Everyone

Once again I would like to thank you all for your lovely comments on the cards I post, I really appreciate you taking the time to look and comment.

Today's card is another 8 x 8 which is my favourite size, although this can be adapted for smaller cards,and looks equally as nice.

It is also straightforward and an easy one to make.

Products Used:- (which are also links to Phill's Website too) :-)


8 x 8 Cream Card Blank
Christmas Holly Relatives A5 Stamps
Christmas Holly More Relatives A5 Stamps
Christmas Holly Sentiment Borders A5 Stamps
Christmas Holly Decorative Frame Single Stamp Lattice
A4 Snowflake Lattice Embossing Folder
Dazzlers
Creative Expressions PVA Black Pearl
Black Soot Distress Ink Pad
Gold Embossing Powder


Matting & Layering

1st Layer Black Card cut to 19.5cm sq.

2nd layer Cream Card cut to 19cm. sq.

3rd Layer Black Card cut to 14.5cm sq.

4th Layer Cream Card cut to 14cm. sq.

5th Layer Black Card cut to 12cm. sq

For the Sentiment I cut :-                                  
Cream Card 6.5 cm. sq
Black Card 6 cm. sq
Cream Card 5.75 cm


The 19.5 sq. black card I left plain and attached this to the Base Card.

Next with the 19 cm.sq Cream Card and the Sentiment Border Stamps I stamped around the edge of the card using two different Sentiments and Black Soot Distress Ink.

Next lining up the 14.5 cm sq Black Card I attached this to the card using pads.
The next layer 14 cm sq Cream Card I Embossed and attached this flat to the card.


Next using the 12 cm, sq  Black Card and the Christmas Holly Decorative Frame Lattice Stamp I heat embossed this with Gold Embossing Powder, and attached to the card using pads.


Sentiment
Using the smallest layer of Cream Card I stamped the Sentiment and then attached all three layers flat to the card.

Finally I added  Pearl PVA to each corner of the Sentiment and Dazzlers to the corners of the main card.


                                                             Happy Crafting