What's New

My Brand New Sentimentally Yours 2017 Xmas Stencils are now available at www.honeypotcrafts.co.uk!
Showing posts with label Christmas Holly Stamps. Show all posts

Wednesday, 9 September 2015

Decandent Teal & Ivory - Christmas Blessings

Good Morning Everyone

Thank you all for the lovely comments and emails you keep sending, its lovely to read them all, I appreciate you taking the time to do this,

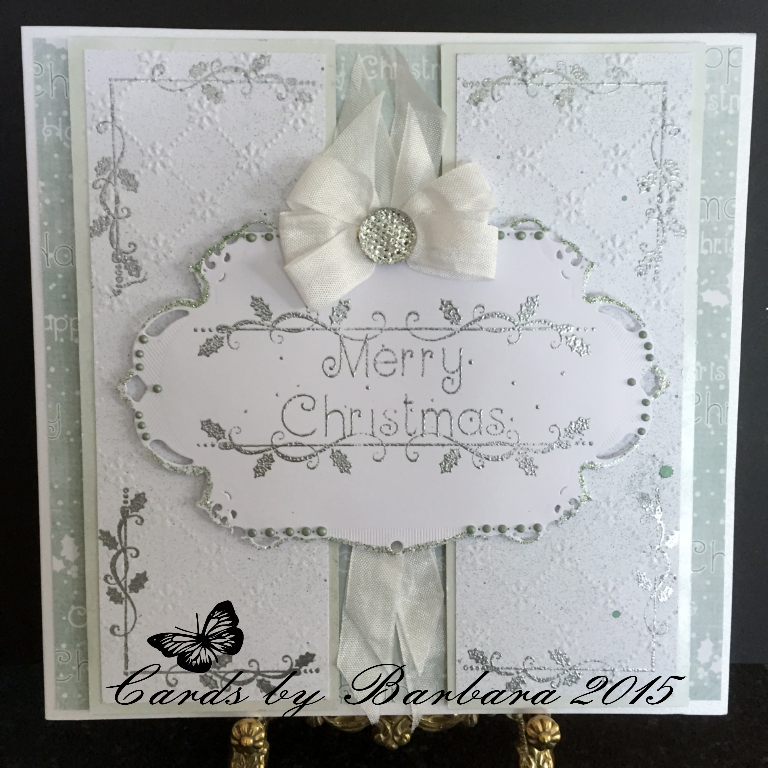
On with today's card an 8 x 8 Christmas Card

Product Used:- (which are also links to Phill's website) :-)


Teal Card Stock
Ivory Card Stock
Decadent Teal Colour Cloud Ink
Decadent Teal Twinkles
Christmas Holly Background Stamp
Christmas Holly Sentiment Stamp
Sue Wilson Die - Caribbean Collection - St Kitts
Spellbinder Die Create-a-Flake Three
Creative Expressions Clear Micro Glass Beads
A4 Self Adhesive Sheets
Seam Binding
Small & Medium Dazzlers


First I made an 8 x 8 card in Teal by cutting 20cm x 20cm sq
and 20cm x 23cm
score and join on the reverse

Matting & Layering:

19.5cm sq Ivory Card
19cm sq Teal Card
18.5cm sq Ivory Card

Then attach all these flat to the card.

Using a piece of  Ivory Card cut to 18cm sq I created the background using Decadent Teal Colour Cloud and the Christmas Holly Background Stamp.
Once this was dry I cut a piece of the Self Adhesive Sheeet to 18cm sq.
After carefully removing the backing sheet, after carefully removing the backing sheet I covered the card with Micro Beads. ( I used a shallow box for this then poured the surplus beads back into the jar). I then attached this to the card.


Sentiment:
 Using the 2 largest dies I cut these out in Ivory and backed onto Teal Card.

With the 3rd largest I cut this out in Ivory and stamped the  Sentiment using Decadent Teal Colour Cloud Ink. Then attached these to the card using pads.

 Finishing Touches:

Using dies Create-a-Flake 3 I cut several out in both Ivory and Teal, shaped and attached to the card. Then added a small Dazzler to centres.

Making a triple bow and swags with Teal Seam Binding I attached this to the card and added a Medium Dazzler.

Finally I edged around the outer edge of the sentiment with Decadent Teal Twinkles and Glamour Dust around the inner and snowflakes.

                                                           Happy Crafting


Tuesday, 8 September 2015

Frosty Jade - Let It Snow:

Good Morning Everyone

Another lovely morning with sunshine forecast, although I will only see it through my windows as I will be busy crafting.

Today's Card is created using one of my favourite colours from Phill's Frosty Collection, I hope you like it.

Products used: ( which are also links to Phill's website) :-)

8 x 8 Card Blank
White Card Stock
Frosty Jade Colour Cloud
Frosty Jade P.V.A.
Frosty Jade Twinkles
Christmas Holly Corners, Borders&  Icons Stamps A5
Christmas Holly Sentiment Stamps A5
Christmas Holly Decorative Frame Stamp - Holly
Spellbinder Dies - Layered Poinsettia
Sue Wilson Die -Holly Sprays
Creative Expressions Embossing Folder
Glacier Ice Glitter Jewels
Cosmic Shimmer Acrylic Glue


8 x 8 Card Blank

1st layer white card stock cut to 7.75 sq.  I then used Frosty Jade Colour Cloud around the edges and attached flat to the main card.

2nd layer
White card stock cut to 7,5 sq.and then stamped using the Corner Stamps and Jade Colour Cloud Ink.
I then embossed this and attached flat to the card.


Next I used the Frame Stamp and again Jade Colour Cloud Ink to stamp the design, then using my
craft knife I cut out the centre,Using Cosmic Shimmer Glue and Glacier Ice Glitter Jewels I decorated the edge before attaching to the card using a double layer of pads to give dimension.
I then cut out a piece of white card to fit into the aperture, stamped this with a Sentiment again using Colour Cloud, then attached flat to the centre.


Finishing Touches

I cut out 4 Holly Spray and used Glacier Ice on the leaves before attaching to the card, then I used Frosty Jade on the holly berries.

Using the 3 smallest dies from the Poinsettias I cut these out, shaped and glued together then added Glacier Ice before adding to the card.
Finishing off with Frosty Jade Twinkles in the centres.


                                                                        Happy Crafting

Monday, 7 September 2015

Black & Cream - Season's Greetings

Good Morning Everyone,

A chilly but dry morning here in Nottingham, a nice day for crafting!

Thank you all for your lovely comments on my previous posting.

Today's card:-

Products used: (which are links to Phill's Website) :-)

8 x 8 Card Blank
Cream Card Stock
Black Card Stock
Swirling Holly Embossing Folder
Christmas Holly Corners, Border & Icon Stamp Set A5
Christmas Holly Decorative Frame - Snow 
Glacier Ice Glitter Jewels
Spellbinder Dies - Layered Poinsettia
Black Soot Distress Ink
Assorted Dazzlers
Gold Embossing Powder


 First I cut the layers as follows:-

 Cream card Stock cut to 7,75 square and attach flat to card blank

Next layer black card stock cut to 7.5 square and attach flat to card

3rd layer cream card stock cut to 7.25 square.

Using the third layer and the corner stamps I stamped each corner using Black Soot Distress Ink,
I then embossed this using Swirling Holly Embossing Folder. Next I attached it flat to the card


Sentiment


Using the Decorative Holly Frame I heat embossed this, then cut out the centre using my craft knife.
I then attached the frame to the card using pads.

Next I cut a piece of cream card to fit the centre square, and stamped the Sentiment onto it before adding to the card.


Finishing Touches

Using scraps of black and cream card I cut several of the Poinsettias out then used Glacier Ice Glitter Jewels to add sparkle, then I moulded the petals, glued them together and attached to the card.

Finally I added Dazzlers to the centre of each flower.


                                       Happy Crafting


Thursday, 27 August 2015

Black & Cream - Joy

Good Morning Everyone,

Once again thank you all for your lovely comments on my previous blog.


Today's card is created in the ever popular black & ivory

Products used: (which are also links to Phill's website) :-)

8 x 8 Ivory Card Blank
Ivory Card stock
Black Card stock
Christmas Holly Flourishes Stamps A5
Christmas Holly Decorative Sentiment Stamps A5
Sue Wilson Noble Dies Ornate Pierced Rectangles
Sue Wilson Festive Collection Holly Accessory Kit Dies
Swirling Holly Embossing Folder
Black Soot Distress Ink
Black Seam Binding
Black P.V.A.


First Layer  - Black card stock cut to 7.75 square
Second layer  - Ivory card stock cut to 7.5 square
Third layer Black card stock cut to 7.25 square
Then attach all three layers to main card blank.

Next I cut a piece of Ivory card to 7" square and using one of the Christmas Holly Flourish stamps and Black Soot Distress Ink I created the background. Next I embossed this using the Swirling Holly Embossing Folder.I then attached to card.


Sentiment
Using the 2nd and 3rd size Ornate Pierced Rectangle dies I cut this out using cream card and also a larger piece in black to back it onto.
Then I stamped the sentiment using Black Soot Distress Ink, adding these to the card using pads to give dimension.


Finishing Touches

I used Black Pearl P.V.A.around the edge of the centre die to embellish the sentiment.
Using the Holly Die and scraps of Ivory & Black card I cut out a few holly leaves and added these to the card.
Finally I made a triple bow using Black Seam Binding and added this along with a medium Dazzler.

                                                                     Happy Crafting


Wednesday, 26 August 2015

Frosty Heather Christmas Card

Good Morning Everyone,

It is overcast here in Nottingham so a good time to spend the day in my craft room.

Once again I have had received some lovely comment on my previous blog and I thank you all so much.


On with today's card:

Products used:- (which are also links to Phill's website) :-)

8 x 8 Card Blank
Frosty Christmas Holly Paper pad
Frosty Heather Gilding Was by Phill Martin
Frosty Heather Twinkles by Phill Martin
Frosty Heather P.V.A. by Phill Martin
Frosty Heather Colour Cloud Blending Ink
Christmas Holly Verse Stamp Set A5
Embossing Folder Snowflake Lattice
Sue Wilson Die - Caribbean Island Collection, Border Accent & Tag
Silver Embossing Powder
Dazzlers
Seam Binding
Stick pins


The first thing I did before creating this card was to cut a piece of White Seam Binding, enough to make a triple bow and swags. I then coloured it with Frosty Heather Colour Cloud Blending Ink.

1st Layer
I cut a piece of plain white card to 7.75 square, then I used Frosty Heather Gilding Wax  around the edges.

Using a sheet of Frosty Heather Christmas Paper I cut this to 7.5 square and then attached both layers
to the main card.

Next I cut 2 pieces of plain white card to 2" x 7.75 then using the Border Die I cut them both out before Embossing them with the Snowflake Lattice Embossing Folder. I then attached both to the card.


Sentiment

For the Sentiment I used a Verse from the Christmas Holly Verse Collection and heat embossed it using Silver Embossing Powder.
I then attached this to the card using pads.


Finishing Touches

I added Frosty Heather P.V.A. Pearls to the centre of the snowflakes, and Frosty Heather Twinkles to the edges of the border and around the edges of the sentiment.
Then making sure the ribbon wad dry I made a triple bow with swags and added this using a large Dazzler.

Finally I added a matching insert form the Christmas Holly Paper pad insert.


                                                                Happy Crafting


Monday, 24 August 2015

Frosty Jade - Merry Christmas

Good Morning Everyone,

Once again thank you all for your lovely comments on my previous blog.

It's good to know you are all looking forward to the New Channel Hochanda, we are all getting even more excited as the time draws closer.

Todays card:-

Products used:- ( which are all links to Phill's website) :-)

8 x 8 Card Blank
Frosty Christmas Holly Paper pad
Frosty Jade Gilding Wax by Phill Martin
Frosty Jade P.V.A. by Phill Martin
Frosty Jade Twinkles by Phill Martin
Frosty Jade Mister Spray by Phill Martin
Christmas Holly Corners, Borders, & Icon Stamp Set A5
Christmas Holly More Decorative Sentiments Stamp Set A5
 Snowflake Lattice Embossing Folder
Spellbinder Decorative Labels 28 Dies
Silver Embossing Powder
Seam Binding
Dazzlers


Using a sheet of Frosty Jade I cut this to 7.75 square and attached to main card blank.

I then cut 2 panels of plain white card. Each on measuring 2.75 x 7.75
Using the Frosty Jade Gilding Wax I coloured the edges and attached to main card using pads.

Next I cut 2 more pieces of plain white card to 2.5 x 7.75
I sprayed both of these with Frosty Jade Ink Mister. Once this was dry (only a couple of minutes)
using the Corner Border Stamp I stamped corners and heat embossed using Silver Embossing Powder. I then embossed these using the Snowflake Lattice Embossing Folder. Then attached to the card.


Sentiment

I cut a plain piece of white card using the largest of the Spellbinder Decorative Labels 28 and heat embossed it with the Sentiment
stamp. I then attached  this to the card using pads.


Finishing Touches

I used Frosty Jade Twinkles and Frosty Jade P.V.A. around the edge of the sentiment.
A triple bow and swags made with White Seam Binding and finally finishing off with a large Dazzler.

                                                          Happy Crafting


Saturday, 22 August 2015

Frosty Sky - Let It Snow

Good Morning Everyone


Very exciting times ahead and I hope you are all as excited as we are with the launch of the New Channel Hochanda.

Phill's 1st show is scheduled for 8.00pm on Tuesday 15th September, followed by :
9.00am, 10.00am, 12 noon, 4.00pm, and 7.00pm. on Wednesday 16th September.

I hope you will all be tuned in ready to enjoy this New and Exciting Channel!


Today's card:
Yes another 8 x 8 (my favourite but looks equally as nice in smaller sizes)


Products used: (which are also links to Phill's Website) :-)

8 x 8 Card Blank
Phill Martin Frosty Sky Gilding Wax
Phill Martin Frosty Sky Mister Spray
 Frosty Sky Colour Cloud Blending Ink
Phill Martin Frosty Sky Twinkles
Phill Martin Frosty Sky P.V.A.
Christmas Holly Sentiment A5 Stamp Set
Christmas Holly Flourishes A5 Stamp Set
Seam Binding
Dazzlers
Hat pins
Spellbinder Die Create -A-Flake Three


To create this card I first cut a piece of plain white card to 7.75 square and used Frosty Sky Gilding Wax around the edges then attached to 8 x 8 card blank.

Next I cut a piece of plain white card to 7.5 square, using Frosty Sky Mister Spray I sprayed this, when dry ( a couple of minutes) I attached to main card.

I then cut a piece of plain white card to 7" square. Using the Frosty Sky Colour Cloud Blending Ink and stamps from the Holly Flourish Set I randomly stamped the background. Once dry I attached to main card.


 Using Spellbinder Decorative Labels 28 I cut the dies out and used Frosty Sky Ink Mister on the largest one and stamped the smallest one using Frosty Sky Colour Cloud and a stamp from the Holly Sentiment Set.
I than attached these to the main card using pad to give dimension.


Finishing Touches:

I added Frosty Sky P.V.A. around the edge of the second size die and Twinkles around the smallest one.

Next I cut out the Snowflakes (3 of each size) and sprayed these with Frosty Sky Ink Mister, then added Glacier Ice. Once dry I shaped these and attached to the card, and added a small dazzler to each.

Finally I made a triple bow and swags using White Seam Binding, added a large dazzler to the centre and finished off with Blue and White Hat pins.


                                                        Happy Crafting

Friday, 21 August 2015

Christmas Card Featuring The New Frosty Mink

Good Morning Everyone,

Thank you for your lovely comments on my previous post.

Today's card is a Christmas  8 x 8

 I made this using the New Frosty Mink


Products Used:-  (which are also links to Phill's Website) :-)

8 x 8 Card Blank
Phill Martin Frosty Mink Gilding Wax
Phill Martin Frosty Mink Twinkles
Phill Martin Frosty Mink 
Frosty Christmas Holly Paper Pad
Christmas Holly Verse Stamp
Christmas Holly Background Stamp A6
Frosty Mink Colour Cloud Blending Ink
Seam Binding
Dazzlers
White Crochet Ribbon
Sue Wilson Noble Dies - Ornate Pierced Design


First I cut 2 pieces of plain white card stock,
1st  7.75 square
2nd  7.5 square

I edged the first layer using Frosty Mink Gilding Wax then used Frosty Mink Mister Spray on the second layer, and attached these to the main card  blank.

3rd Layer is Frosty Mink Paper cur to 7" square and add to card.

Next I cut a piece of plain white card to 7.75 x 2" and stamped this using Frosty Mink Colour Cloud Ink and the Christmas Holly Background Stamp. Once this was dry I used White Crochet Ribbon and attached this to the card.


Sentiment:

Using the die I cut this out and stamped the top layer with a Verse from the New Christmas Verse Stamps.
I heat embossed this in gold, then attached to card using pads


Finishing Touches:

I edged around the outer die using Frosty Mink Twinkles and Frosty Mink P.V.A. around the inner die.
I then made a triple bow using white seam binding which I had previously coloured with Frosty Mink Colour Cloud Blending Ink, adding Dazzlers to finish.

                                                     
                                                      Happy Crafting


Thursday, 20 August 2015

Frosty Sky & White - Seasons Greetings

Good Evening  Everyone,

Today's card is an 8 x 8  Christmas Card

Products used:- (which are also links to Phill's Website) :-)

8 x 8 Card Blank
Frosty Christmas Holly Paper pad
Christmas Holly Sentiment A5 Stamp Set
Christmas Holly Decorative Frame Single Stamp Holly
Christmas Holly Verse Collection A5 Stamp Set
Phill Martin Frosty Sky Twinkles
Phill Martin Frosty Sky P.V.A.
Phill Martin Frosty Sky Gilding Wax
Seam Binding
Dazzlers
Black Soot Distress Ink
Silver Embossing Powder
Sue Wilson Die Festive Collection - Holly Sprays
Sue Wilson Caribbean Island Collection Die - Border, Accent & Tag 


8 x 8 card blank
1st 7.75 square
2nd layer Frosty Sky from paper pad cut to 7.5 square

Using the 7,75 square card I edged this with Frosty Sky Gilding Wax and attached to main card blank.
Then attached the patterned paper to card.

Next I cut 3 pieces of white card
First one 2 x 7.5
Second one 2.5 x 7.5
Third one 3 x 7.5
I then cut these out using the Border Die. Once this was complete I glued all three strips together.
Cutting a piece of White Seam Binding and using the Frosty Blue Colour Cloud I dyed the Seam Binding to match the card. At this stage I also dyed enough Seam Binding to make a double bow. Once this was dry I added the strip of Seam Binding to the strips of card before attaching this to the main card.

Using the Christmas Holly Frame Stamp and the Frosty Sky Colour Cloud to stamp this, I cut it out and mounted in onto the card using pads to give dimension, then added the Sentiment using Silver Embossing Powder, again using pad to attach to card.


Finishing Touches

I cut out the Holly Sprays and added these to the card.
I added Glamour Dust to the leaves and also onto the background of the stamp.
Around the edges I used Cosmic Shimmer Glue and Glacier Ice.
The holly berries are highlighted using Frosty Sky P.V.A. Glue.
I made a double bow and a tie bow for the strip of seam binding and added dazzlers to each.
Along the edges of the Border Die I used Frosty Sky Twinkles, when this was dry I curled each edge.


Finally I added the insert using the New Christmas Holly Paper pad matching insert and a verse from the Christmas Holly Verse Collection.


                                                                    Happy Crafting


Saturday, 1 August 2015

Christmas Wishes - To The Best Husband - Featuring the NEW Christmas Holly Collection

Good Morning Everyone

Once again I would like to thank you all for your lovely comments on the cards I post, I really appreciate you taking the time to look and comment.

Today's card is another 8 x 8 which is my favourite size, although this can be adapted for smaller cards,and looks equally as nice.

It is also straightforward and an easy one to make.

Products Used:- (which are also links to Phill's Website too) :-)


8 x 8 Cream Card Blank
Christmas Holly Relatives A5 Stamps
Christmas Holly More Relatives A5 Stamps
Christmas Holly Sentiment Borders A5 Stamps
Christmas Holly Decorative Frame Single Stamp Lattice
A4 Snowflake Lattice Embossing Folder
Dazzlers
Creative Expressions PVA Black Pearl
Black Soot Distress Ink Pad
Gold Embossing Powder


Matting & Layering

1st Layer Black Card cut to 19.5cm sq.

2nd layer Cream Card cut to 19cm. sq.

3rd Layer Black Card cut to 14.5cm sq.

4th Layer Cream Card cut to 14cm. sq.

5th Layer Black Card cut to 12cm. sq

For the Sentiment I cut :-                                  
Cream Card 6.5 cm. sq
Black Card 6 cm. sq
Cream Card 5.75 cm


The 19.5 sq. black card I left plain and attached this to the Base Card.

Next with the 19 cm.sq Cream Card and the Sentiment Border Stamps I stamped around the edge of the card using two different Sentiments and Black Soot Distress Ink.

Next lining up the 14.5 cm sq Black Card I attached this to the card using pads.
The next layer 14 cm sq Cream Card I Embossed and attached this flat to the card.


Next using the 12 cm, sq  Black Card and the Christmas Holly Decorative Frame Lattice Stamp I heat embossed this with Gold Embossing Powder, and attached to the card using pads.


Sentiment
Using the smallest layer of Cream Card I stamped the Sentiment and then attached all three layers flat to the card.

Finally I added  Pearl PVA to each corner of the Sentiment and Dazzlers to the corners of the main card.


                                                             Happy Crafting


Wednesday, 29 July 2015

New Cosmic Shimmer Colour Reveal, no.6 - Frosty Blossom

Good Morning Everyone

As promised, here is the final reveal of my new Cosmic Shimmer Colour no.3, which is,.. Frosty Blossom :-)

Now, I'm not really a pink person, but I love this tone!! I'm really pleased with it!

This is a really beautiful dusky shade with a hint of vintage about it,.., the colour is also reflected in the new Frosty Christmas Holly Paper and Insert Pads too :-)

Here is what I used:
Sentimentally Yours Christmas Holly Sentiment Border Stamps
Sentimentally Yours Christmas Holly Background Stamp
Frosty Blossom PVA Glue
Frosty Blossom Ink Mister
Frosty Blossom Gilding Wax
Frosty Blossom Colour Cloud Blending Ink
Dies by Sue Wilson Ornate Pierced Design Noble
Cosmic Shimmer Silver Shine Detail Embossing Powder
Glitter Jewels - Glacier Ice (my fave)
Dies by Sue Wilson Holly Sprays


Here is the card
Taking an 8x8 card blank as my base, I created 2 more layers, one at 19.5cm square and another at 19cm square.
The 19.5cm square was given the gilding wax treatment around the edge, to give the lovely pearlescent frosty blossom shade.
The 19cm square layer was embossed with the linen texture embossing folder.

I cut the two largest pieced dies from the Noble die set, this then gave me a frame and an inside die cut.The frame was ink misted with the Frosty Blossom Ink Mister and the inside layer was stamped with my lovely Christmas Holly Background stamp and the Colour Cloud Blending ink,.. this gives me the perfect match to the rest of the Frosty Blossom products.

The fab Christmas Holly Sentiment Border stamp was stamped onto a 2.5cm x 20cm strip with perfect medium and embossed with the silver shine detail embossing powder.
I cut a 'V' into one end of the strip and inked all round the edges with the colour cloud blending ink, then went round the edge of this strip and the inside and outside edges of the frame with Cosmic Shimmer glue and dipped it into the Glacier Ice glitter jewels :-)

I die cut two Holly Sprays and added the Frosty Blossom pearl pva to the areas for berries. Once dry, I added Glacier Ice to the Holly leaves.

The seam binding ribbon was white so I coloured it with the Frosty Blossom colour cloud (using smoothie sponges) and, once dry, I created a big triple bow and added an extra 2 sets of 'tails'.

The assembly was easy..
The gilding wax layer and embossed layer are stuck on flat with Cosmic Shimmer glue, the ink misted frame was stuck on with foam tape for dimension, then the Christmas Holly background layer was stuck inside with glue.

The small centre die cut is on foam tape and the sentiment border is just glued into place at the lowest points (once shaped)

The holly sprays went on next with glue and finally the bow, with glue..

My final finishing touches were the dazzler and a few pearls in each corner.

Hope you've enjoyed seeing all the new Frosty Colours,.. you can get them on my website now here..


So, your 6 brand new Cosmic Shimmer colours are
Frosty Aqua, Frosty Jade, Frosty Heather, Frosty Blossom, Frosty Sky and Frosty Mink


Happy Crafting!


Tuesday, 28 July 2015

New Cosmic Shimmer Colour, Reveal no.5 - Frosty Aqua

Good Morning Everyone

As promised, here is the reveal of my new Cosmic Shimmer Colour no.5, which is,.. Frosty Aqua :-)

This is a really beautiful turquoise/green shade with a lovely fresh look,.., the colour is also reflected in the new Frosty Christmas Holly Paper and Insert Pads too :-)

Here is the card..
It's an 8x8 and I will give you all the instructions on day 6, with the final colour reveal :-)

I've done the exact same card in all 6 new colour ways, it's my favourite way of showing you how different they all look :-)

Here is the card


And here is your close up


Hope you like it :-)

Final colour reveal tomorrow!!

Happy Crafting!


Monday, 27 July 2015

New Cosmic Shimmer Colour, Reveal no.4 - Frosty Mink

Good Evening Everyone

Sorry it's late,.. busy day,.. back at Creative Expressions HQ for a retailer workshop and busy as soon as I got home (you know me!)

As promised, here is the reveal of my new Cosmic Shimmer Colour no.4, which is,.. Frosty Mink :-)

Another lovely colour, in my humble opinion, a lovely mid brown/beige tone that has a vintage, dusky look,.., the colour is also reflected in the new Frosty Christmas Holly Paper and Insert Pads too :-)

I must confess, this is probably (along with Frosty Jade and Frosty Heather) my favourite!

It's an 8x8, the same as the others (are you bored with them yet?!) lol :-)

I've done the exact same card in all 6 new colour ways, it's my favourite way of showing you how different they all look :-)

Here's the card


And here's your close up 


Hope you like it!

Only two more colours to go :-)

Happy Crafting!


Sunday, 26 July 2015

Cosmic Shimmer New Colour Reveal No.3 - Frosty Heather

Good Afternoon Everyone

As promised, here is the reveal of my new Cosmic Shimmer Colour no.3, which is,.. Frosty Heather :-)

This is a really beautiful lavender/lilac shade with a lovely aubergine undertone,.., the colour is also reflected in the new Frosty Christmas Holly Paper and Insert Pads too :-)

Here is the card..
It's an 8x8 and I will give you all the instructions on day 6, with the final colour reveal :-)

I've done the exact same card in all 6 new colour ways, it's my favourite way of showing you how different they all look :-)


And here;s your close up..


Hope you're having a great day!

Until tomorrow!

Happy Crafting!


Saturday, 25 July 2015

Cosmic Shimmer Colour Reveal, no.2 - Frosty Sky

Good Morning Everyone

As promised, here is the reveal of my new Cosmic Shimmer Colour no.2, which is,.. Frosty Sky :-)

This is a really beautiful blue shade, which, actually looks 'frosty' when you add a touch of glitter, the colour is also reflected in the new Frosty Christmas Holly Paper and Insert Pads too :-)

Here is the card..
It's an 8x8 and I will give you all the instructions on day 6, with the final colour reveal :-)


And here's your close up..


Have a great weekend!

Happy Crafting!


Wednesday, 22 July 2015

Gold Embossed Season's Greetings - Giveaway Card

Good Morning Everyone

I'll be heading off to Creative Expressions HQ today for a retailer demonstration day with my colleagues from Creative Expressions,..

I'll be demonstrating my new Christmas Holly Collection of stamps, paper pads and my 6 new Cosmic Shimmer colours .. should be fun!
(you'll be able to get the paper pads and cosmic colours from my website this week)

Anyhoo,..
I've been so busy these last few weeks that I haven't done a giveway card (shocking, I know), so, I am going to give away one of my favourite new samples of a card I made using my new Christmas Holly Decorative Frame and Insert Frame stamps,..

Now, this 8x8 card took me a fair bit of time, what with all the embossing and glittering and I'm heading off soon so I won't give details of how I made it today, I'll do that over the next few days,..

I'll tell you what I used though...
(they are all links to the products on my www to, in case you 'need' to purchase them) :-)

Sentimentally Yours Christmas Holly Flourishes A5 Stamp Set
Sentimentally Yours Christmas Holly Decorative Frame  Stamp - Lattice
Sentimentally Yours Insert Frame Stamp - Season's Greetings
Cosmic Shimmer Detail Embossing Powder - Gold
Sue Wilsons' Stick Pin Elements
Creative Expressions Dazzlers


And here's the card :-)


And here's a little close up of the lovely lattice in the stamps :-)


To be in with a chance of winning this card, you must be a follower of my Blog and leave a comment on this post,.. The draw will close at 9am next Monday (27th July) and I will choose a winner randomly at that time.

Suzanne - I haven't forgotten you, just been really busy! I'll get your winning card off to you tomorrow :-)

Remember: you can 'Pin' any of these photos to your own Pinterest Boards (or Facebook etc),.. just hover your mouse over the photo's and it gives you little buttons with various options of places to share the photos etc 

Good Luck!

Happy Crafting!