What's New

My Brand New Sentimentally Yours 2017 Xmas Stencils are now available at www.honeypotcrafts.co.uk!

Tuesday 29 September 2015

Giveaway Card Winners

Good Morning Everyone..

Well, once the mist lifts, I think it's going to be a lovely day here in Nottingham!

I'm busy getting ready for the Great Create Extravaganza in Harrogate this Friday and Saturday,.. are any of you going?

I've drawn the winners of my Giveaway Cards this morning,.. there will be 4 from here and 4 from my Facebook page (as I think I must have left 2 cards at HOCHANDA, so I can't send them lol)
Don't worry though, I'll do a special Giveaway for you all later today.. (keep a look out)

Anyhoo, here are the four winners from my Blog posts..

Crafty Clare
Gillian Simons
Heather Treble
Josie B

Well Done to you all!
Can you please email me your address to phill@honeypotcrafts.co.uk and I will sign the cards and get them posted upon my return from Harrogate...

Happy Crafting!


Wednesday 23 September 2015

Royal Purple and White - Special Birthday Wish


Good Morning Everyone,

Phill is busy at Creative Expressions HQ today so I am doing today's blog. I hope you like it.

Products used: (which are all links to Phill's website) :-)

8 x 8 Card Blank
White Card stock
Centura Pearl Royal  Purple  Card Stock 
Dusty Concord Distress Ink
Frosty Heather Twinkles
Frosty Heather P.V.A.
Sentimentally Yours Scribbled Sentiments
Sentimentally Yours Elegant Milestone Birthday A5 Stamp Set
Spellbinder Dies Labels 47
Sue Wilson Dies Caribbean Collection Border, Accent & Tags
Sue Wilson Dies Perfect Peony Complete Petals
Sue Wilson Dies Perfect Peony Open Petals
Sue Wilson Dies Petite Vinery
Spellbinder Die D-Lites Flutter Flight
Cosmic Shimmer Acrylic Glue


To create this card I cut a 7.75 sq piece of Royal Purple Card and attached flat to the main card blank.

Next using Plain White Card Stock I cut a 7.5 sq and using the Accent Die I cut each corner.

Then using the Sentimentally Yours Scribbles Sentiments and Dusty Concord Distress Ink I stamped across the top . Then attached flat to the card,.


Using Plain White card Stock and Spellbinder Labels 47 I cut out the largest die and backed this onto a piece of Royal Purple card,

Then using the Elegant Milestone Birthday Stamps and Dusty Concord Distress Ink I stamped the sentiment and attached this to the card using pads to give dimension.

Next using both Complete and Open Petals of the Peony Dies I cut out several of these in scraps of lilac card, which I shaped and glued to the card using Cosmic Shimmer Acrylic Glue. I then cut out 2 of the Petite Vinery Dies using scrap pieces of white card, and attached to the card.

I then cut out the butterfly and attached to the card.

Finally I added Frosty Heather Twinkle to the wings of the Butterfly, and Frosty Heather Pearl P.V.A. to the centre of the flowers.

                                                               Happy Crafting


Tuesday 22 September 2015

Giveaway Card - Christmas Holly in Frosty Blossom

Good Afternoon Everyone

Here is my Giveaway Card no.2, that I made on air last week on my HOCHANDA shows :-)

This is a pretty simple 8x8 card for me, but the papers and the Christmas Holly Verse Stamp made it quite easy :-) and there are loads of layers of white on white! lol

Remember to leave a comment on this post and for all the details, please read yesterdays Giveaway Card post here..

Remember, you must be a follower of my Blog to win a card giveaway from my Blog and you must be a follower of my Facebook Page and click the 'like' and 'share' post for that particular post featuring the card.
Of course, if you follow me on both, you can enter on both :-)

This is the list of what I used (with links, as you'd expect, to the products on my website, should you need to purchase them) :-)

Sentimentally Yours Christmas Holly Verses Stamp Set
Sentimentally Yours Frosty Christmas Holly 8x8 Paper Pad
Phill Martin for Cosmic Shimmer Frosty Blossom Gilding Wax, Twinkles, Colour Cloud Blending Ink
Sue Wilson Classic Poinsettia Dies
Sue Wilson Noble Ornate Pierced Design Dies
Cosmic Shimmer Silver Shine Detail Embossing Powder

Here it is...


Happy Crafting!

Good Luck Everyone!


Monday 21 September 2015

Giveaway Card - Season's Greetings in Frosty Aqua

Good Afternoon Everyone...

... from a wet, rainy, grey day here in Nottingham!

On a good note, as promised, today begins the first day of my Card Giveaway Week, where I will be giving away all 10 of the cards I made on my HOCHANDA shows last Tuesday/Wednesday :-)

I thought it was a nice idea, as we don't do the giveaways on HOCHANDA, to do it via my Blog and Facebook Page,.. so, I will be posting my 5 giveaway cards on my Blog this week (one each day through til Friday) and 5 on my Facebook Page in the same way..(different card)

Next Monday (28th September), I will draw winners, randomly, from the comments section on each card post on my Blog and from the 'like' and 'shared' list on my Facebook Page, which means you have a week to make sure you have commented on my Blog Posts and 'liked' and 'shared' my Facebook Posts featuring the giveaway card for that day.

Just to be clear, you must be a follower of my Blog to win a card giveaway from my Blog and you must be a follower of my Facebook Page and click the 'like' and 'share' post for that particular post featuring the card.
Of course, if you follow me on both, you can enter on both :-)

Anyhoo,.. I hope all that makes sense!! ha ha

This is a list (with links to my website if you 'need' to buy the components to recreate this card..

Sentimentally Yours Christmas Holly More Decorative Sentiments Stamp Set
Sentimentally Yours Christmas Holly Flourishes Stamp Set
Sue Wilson Holly Sprays Dies
Sue Wilson Classic Poinsettia Dies (my favourites!)
Phill Martin for Cosmic Shimmer Frosy Aqua Twinkles and Colour Cloud Blending Ink
Cosmic Shimmer Silver Shine Detail Embossing Powder
Sue Wilson Contemporary Poinsettia Embossing Folder

Here is the first Giveaway Card for my Blog..


Good Luck Everyone!!

Happy Crafting!


Frosty Sky - Christmas Wishes

Good Morning Everyone,

Thanks you all for your lovely comments on my previous post .

I hope all  who went To Ally Pally at the weekend had a wonderful time, and got the chance to meet Phill.

Today's card : 8 x 8 Christmas Card in Frosty Sky.

Products used ( which are all links to Phill's website) :-)

8 x 8 Card Blanks
White Card Stock
Frosty Sky Mister Spray
Frosty Sky Colour Cloud Ink
Frosty Sky Twinkles
Frosty Sky P.V.A. Glue
Sentimentally Yours Christmas Stamps - Bauble Opulence Collection
Spell Binder Dies Create-a-Flake Three
Seam Binding
Glacier Ice Glitter Jewels
Dazzlers
Sue Wilson Snowflake Lattice Embossing Folder


To create this card first  I cut a 7.75 sq from  A4 White Card Stock and used Frosty Sky Mister Spray. Once this was dry (a couple of minutes) I attached to main card blank, using Cosmic Shimmer Glue.

Next I cut a piece of White Card Stock to 6.75 sq and edged it with Frosty Sky Colour Cloud Blending Ink, and again attached flat to card.

The next layer I cut to 6.5 sq and using the Snowflakes from the Bauble Opulence Collection Stamps I created the background using Frosty Sky, then attached flat to the card.


 Next I cut a piece of white card stock to 5.5 sq and embossed it with the Snowflake Lattice Embossing Folder
and attached this to the card using pads.

Using the Bauble Opulence Collection Stamps I stamped 2 baubles using Frosty Sky Colour Cloud Blending Ink. Then stamped the Sentiment in the centre of the bauble. Once these were dry I cut them out and glued back to back, inserting a very narrow strip of acetate to the top and attached to the card.


Using the  Spellbinder Create -a -Flake Three I cut several of these out and shaped these,glued together and attached to the card.


Finishing Touches

Once all this was assembled I used Frosty Sky P.V.A. Glue to add pearls to the Snowflake Lattice. Then I used Glacier Ice Glitter Jewels to the tips of the snowflakes and also to snowflake background and snowflakes on the bauble.

I then added Frosty Sky Twinkles around the edge of the bauble.

Using Seam Binding, I made a triple bow and tails to add to the top of the bauble.

Finally I added Dazzlers to the centre of the snowflakes and also the centre of the bow.

                                       
                                                                   Happy Crafting


Friday 18 September 2015

Black and White - Happy New Year

Good Morning Everyone,

It was lovely to read all your comments on my last posting, thank you all so much.

Phill's shows on HOCHANDA went down a storm with everyone enjoying his demo's.

Keep watching his Facebook page and his Blog as all the cards he made are being given away, details will be posted very soon.

Today's card: 8 x 8 New Year Card in Black & White

Products used: (which are links to Phill's website )  :-)


8 x 8 Card Blank
Plain White Card Stock
Plain Black Card Stock
Plain White Vellum
Sentimentally Yours Bauble Elegant Collection A5 Stamps
Sentimentally Yours Festive Border Collection Stamp A5
Dazzlers
Seam Binding
Silver Embossing Powder
Glacier Ice Glitter Jewels
Cosmic Shimmer Acrylic Glue
Perfect Medium
Spell Binder Dies - Grand Nestabilities
Spell Binder Dies -Create -A-Flake Three
Sue Wilson Embossing Folder - Swirling Holly


First I cut a piece of Black Card to 7.75 sq and attached flat the the main card blank, then I cut a piece of white card stock to 7.5 sq . Using the Swirling Holly Embossing Folder I embossed this and attached flat to the card.

Next I cut out the frame using Black Card Stock, and my Grand Nestabilities Dies. I then chose my border from the Festive Border Collection Stamps. Using Silver Shine Embossing Powder and Perfect Medium I embossed around the frame, then attached to the card using pads to give dimension.


Sentiment

To create the sentiment I used the Bauble Elegant Collection Stamp.

I stamped two of these and again used Silver Shine Embossing Powder.

I then added the sentiment and again embossed it.

Next I cut them both out and glued them back to back inserting a very thin strip of acetate into the top of the bauble, which I then attached under the frame.

(The back of the bauble could be left blank to insert a personal message)


Snowflakes

Using Create-a-Flake Three dies I cut several of these out using white vellum. I shaped and glued together and attached to the card, using Cosmic Shimmer glue.

Finishing Touches

I added Cosmic Shimmer Glue to the edges of the snow flakes and then added Glacier Ice,
then added a small dazzler to the centre,

Finally I made a triple bow using Black Seam Binding and attached to the top of the bauble and added a medium sized dazzler.

                                                     Happy Crafting


.


Wednesday 16 September 2015

Happy Christmas - Frosty Sky

Good Evening Everyone,

I hope you  all enjoyed watching Phill doing his demonstrations on Hochanda today. Its been a very long but enjoyable day for him, as I'm sure you will agree its enjoyable for us to.

Its also great news that all the cards he maked on the show will be given away, keep a look out on his facebook page as well as the blog for further details.

Today's card :- 8 x 8 Christmas Card using the lovely Frosty Sky

Products used - (which are links to Phill's website) :-)

8 x 8 Card Blank
Frosty Sky Mister Spray
Frosty Sky Pearl P.V.A.
Frosty Sky Colour Cloud
Sentimentally Yours Bauble Opulence Stamp
Cosmic Shimmer Acrylic P.V.A. Glue
Glacier Ice
Sue Wilson Embossing Folder - Snowflake Lattice
Sue Wilson Poinsettia Die
Spellbinder Die Labels 47


To create this card I cut the first layer  -  plain white card stock to 7.75 sq then used /frosty Sky Mister Spray and when dry I attached flat to the main card blank.

I then cut a piece of plain white card to 6.75 sq and inked the edge with Frosty Sky Colour Cloud and attached flat to the card.

The next layer I cut to 6.5 sq and embossed this using the Snowflake Lattice Die and attached flat to the card.

Sentiment

Using the Spellbinder die I cut this out and taking the largest cut out I coloured the lattice with Frosty Sky Gilding Wax, and the centre with Frosty Sky Colour Cloud. then attached this to the card using pads to give dimension.

Next I coloured the centre lattice with Frosty Sky Gilding Wax and attached flat to card.

Taking the fancy edged cut out I attached this to the centre using pads.

I then chose my sentiment from the Bauble Opulence Stamp Set and stamped this using Frosty Sky Colour Cloud, I then edged this with the same ink and attached to the centre using pads.


Sentiment

I created the flowers using the Poinsettia dies and cut several of these out using plain white card stock and card sprayed with Frosty Sky Mister Spray.

I then shaped these before adding to the card.


Finishing Touches

I added Glacier Ice to the top and bottom of the filigree on the largest die and added Dazzlers to the centre of the poinsettias.

Finally I added Frosty Sky P.V.A. Pearls to the corners of the card.

                                               Happy Crafting


Monday 14 September 2015

Birthday Wishes in Chic Moss Giveaway Card ... The winner is.........

Good Morning Everyone

Thank you so much for all your lovely comments on the blog, for both my own projects and Barbs,.. I hope you're getting lots of inspiration from them :-)

Anyhoo,.. the winner of my Chic Moss Birthday Wishes card is....

Linda Norris!

Well Done Linda!!
Can you please email me your address etc to phill@honeypotcrafts.co.uk and this little lovely will be winging its way to you when I get back from my HOCHANDA shows on Thursday :-)

I'm in a good mood, so I will do another Giveaway card post later today :-)


Happy Crafting!


Friday 11 September 2015

Graceful Lilac featuring Sentimentally Yours Inspirational Stamps

Good Morning Everyone

Another lovely day is forecast for us here in Nottingham.

Today's card is created using Graceful Lilac which is one of my favourite colours, I hope you like it too.

Products used:- ( which are also links to Phill's website) :-)

8 x 8 Card Blank
Graceful Butterflies and Dragonflies Paper Pad
Plain White Card Stock
Purple Card Stock
Sentimentally Yours Inspirational Quotes Stamps A5
Graceful Lilac Twinkles
Graceful Lilac P.V.A.
Sue Wilson Dies - Curled Vines
Sue Wilson Dies - French Collection - Provence
Sue Wilson Dies - Delicate Daisies Full Petals
Sue Wilson Dies - Delicate Daisies Open Petals
Embossing Folder Climbing Vines
Dusty Concord Distress Ink
Spell Binder Dragonfly Die


8 x 8 Card Blank
I used a sheet of the Graceful Lilac Dragonfly Paper and cut it to 7.75 sq. and attached flat to the main card

I then cut a 6" sq from the White Card Stock and embossed this using Climbing Vines Embossing Folder, then attached to the card using pads.

Next I cut a 5.5 sq from the Graceful Dragonfly Paper Pad and attached flat to card.


Sentiment:


Using the second largest die I cut out using Plain Purple Card Stock and attached to the card using pads.

Then using the next 2 sizes of dies I cut out using White Card Stock and a sentiment from the Inspirational Quotes using Dusty Concord Distress Ink. I then attached to the card using pads.


Flowers


Using both the Open Petals and the Full Petals I cut several of these using up scraps of Graceful Lilac paper from the pad ( nothing goes to waste).
Then cut out 4 Curled Vines and attached all of these to the card.

I then cut out the Dragonfly using White Card Stock and Purple Card Stock, and attached to card.


Finishing Touches:

I added Graceful Lilac Twinkles around the edge of the Sentiment, and also on the wings of the dragonfly.
Then P.V.A. pearls to the centre of the flowers and also top right corner of the card and bottom left.

                                                                            Happy Crafting


Thursday 10 September 2015

Graceful Pink - Just For You

Good Morning Everyone,

Another lovely day is forecast, I do hope the weatherman is right.

Once again thank you to everyone for your lovely emails and comments, its nice to know I give inspiration to lots of you, but then I am privileged to have one of the best teachers in the crafting world. :-)

On with today's card:-

Products used ( which are links to Phill's website) :-)

8 x 8 Card Blank
Plain White Card Stock
 Butterflies -in-flight Background Stamp
Graceful Butterflies and Dragonflies Paper Pad
Graceful Pink P.V.A.
Graceful Pink Twinkles
Graceful Pink Mica Powder
Stickles
Baroque Sentiments Collection A5 Stamps
Sue Wilson Dies Spanish - Cordoba
Sue Wilson Dies Petite Vinery
Spell Binder Dies Enchanted Labels Twenty Eight
Spell Binder Dies Bloom Four
Small Dazzlers


8 x 8 Card Blank
1st layer White Card Stock cut to 7.75 sq,
I pierced around the edge and then attached flat to the card blank.

Next layer I cut a piece of White Card stock  to 6,75 sq then using the Graceful Pink Mica Powder and the Butterflies in Flight Background Stamp I created the background.


Sentiment :-   

Using the outer Cordoba Die I cut out a Plain White and a Graceful Pink, then layered these together and attached to the card using pads.

Using the middle die from Labels Twenty Eight I cut this out in Plain White and attached to the card again using pads.

Then using a Spell Binder Die ( the name escapes me at the moment, but I will post later) I cut out and stamped the Sentiments from the Baroque Sentiment Collection and attached to the card using pads.


To create the flowers I cut out 8 using the two smallest dies and scraps of paper from the graceful pink, moulded and curled the petals then glued together.

Next I cut out 2 fronds using Petite Vinery and attached all these to the card.
  
Finishing Touches   

Using Graceful Pink P.V.A.   added pearls to the centre middle die and Graceful Pink Twinkles around the sentiment. I then added a small Dazzler to each flower and finally added Stickles to the petals.

                                                                                  Happy Crafting


Wednesday 9 September 2015

Decandent Teal & Ivory - Christmas Blessings

Good Morning Everyone

Thank you all for the lovely comments and emails you keep sending, its lovely to read them all, I appreciate you taking the time to do this,

On with today's card an 8 x 8 Christmas Card

Product Used:- (which are also links to Phill's website) :-)


Teal Card Stock
Ivory Card Stock
Decadent Teal Colour Cloud Ink
Decadent Teal Twinkles
Christmas Holly Background Stamp
Christmas Holly Sentiment Stamp
Sue Wilson Die - Caribbean Collection - St Kitts
Spellbinder Die Create-a-Flake Three
Creative Expressions Clear Micro Glass Beads
A4 Self Adhesive Sheets
Seam Binding
Small & Medium Dazzlers


First I made an 8 x 8 card in Teal by cutting 20cm x 20cm sq
and 20cm x 23cm
score and join on the reverse

Matting & Layering:

19.5cm sq Ivory Card
19cm sq Teal Card
18.5cm sq Ivory Card

Then attach all these flat to the card.

Using a piece of  Ivory Card cut to 18cm sq I created the background using Decadent Teal Colour Cloud and the Christmas Holly Background Stamp.
Once this was dry I cut a piece of the Self Adhesive Sheeet to 18cm sq.
After carefully removing the backing sheet, after carefully removing the backing sheet I covered the card with Micro Beads. ( I used a shallow box for this then poured the surplus beads back into the jar). I then attached this to the card.


Sentiment:
 Using the 2 largest dies I cut these out in Ivory and backed onto Teal Card.

With the 3rd largest I cut this out in Ivory and stamped the  Sentiment using Decadent Teal Colour Cloud Ink. Then attached these to the card using pads.

 Finishing Touches:

Using dies Create-a-Flake 3 I cut several out in both Ivory and Teal, shaped and attached to the card. Then added a small Dazzler to centres.

Making a triple bow and swags with Teal Seam Binding I attached this to the card and added a Medium Dazzler.

Finally I edged around the outer edge of the sentiment with Decadent Teal Twinkles and Glamour Dust around the inner and snowflakes.

                                                           Happy Crafting


Tuesday 8 September 2015

Frosty Jade - Let It Snow:

Good Morning Everyone

Another lovely morning with sunshine forecast, although I will only see it through my windows as I will be busy crafting.

Today's Card is created using one of my favourite colours from Phill's Frosty Collection, I hope you like it.

Products used: ( which are also links to Phill's website) :-)

8 x 8 Card Blank
White Card Stock
Frosty Jade Colour Cloud
Frosty Jade P.V.A.
Frosty Jade Twinkles
Christmas Holly Corners, Borders&  Icons Stamps A5
Christmas Holly Sentiment Stamps A5
Christmas Holly Decorative Frame Stamp - Holly
Spellbinder Dies - Layered Poinsettia
Sue Wilson Die -Holly Sprays
Creative Expressions Embossing Folder
Glacier Ice Glitter Jewels
Cosmic Shimmer Acrylic Glue


8 x 8 Card Blank

1st layer white card stock cut to 7.75 sq.  I then used Frosty Jade Colour Cloud around the edges and attached flat to the main card.

2nd layer
White card stock cut to 7,5 sq.and then stamped using the Corner Stamps and Jade Colour Cloud Ink.
I then embossed this and attached flat to the card.


Next I used the Frame Stamp and again Jade Colour Cloud Ink to stamp the design, then using my
craft knife I cut out the centre,Using Cosmic Shimmer Glue and Glacier Ice Glitter Jewels I decorated the edge before attaching to the card using a double layer of pads to give dimension.
I then cut out a piece of white card to fit into the aperture, stamped this with a Sentiment again using Colour Cloud, then attached flat to the centre.


Finishing Touches

I cut out 4 Holly Spray and used Glacier Ice on the leaves before attaching to the card, then I used Frosty Jade on the holly berries.

Using the 3 smallest dies from the Poinsettias I cut these out, shaped and glued together then added Glacier Ice before adding to the card.
Finishing off with Frosty Jade Twinkles in the centres.


                                                                        Happy Crafting

Monday 7 September 2015

Giveaway Card - Birthday Wishes in Chic Moss

Good Afternoon Everyone

So,.. here I am, with enough time to actually do a Blog post and I thought, it's been a while since I did a card giveaway,so .. here you go :-)

I'll just say a big thank you to Barb too, she's doing a grand job keeping you inspired with some of her cards she's made for me for samples.. Thanks Barb!

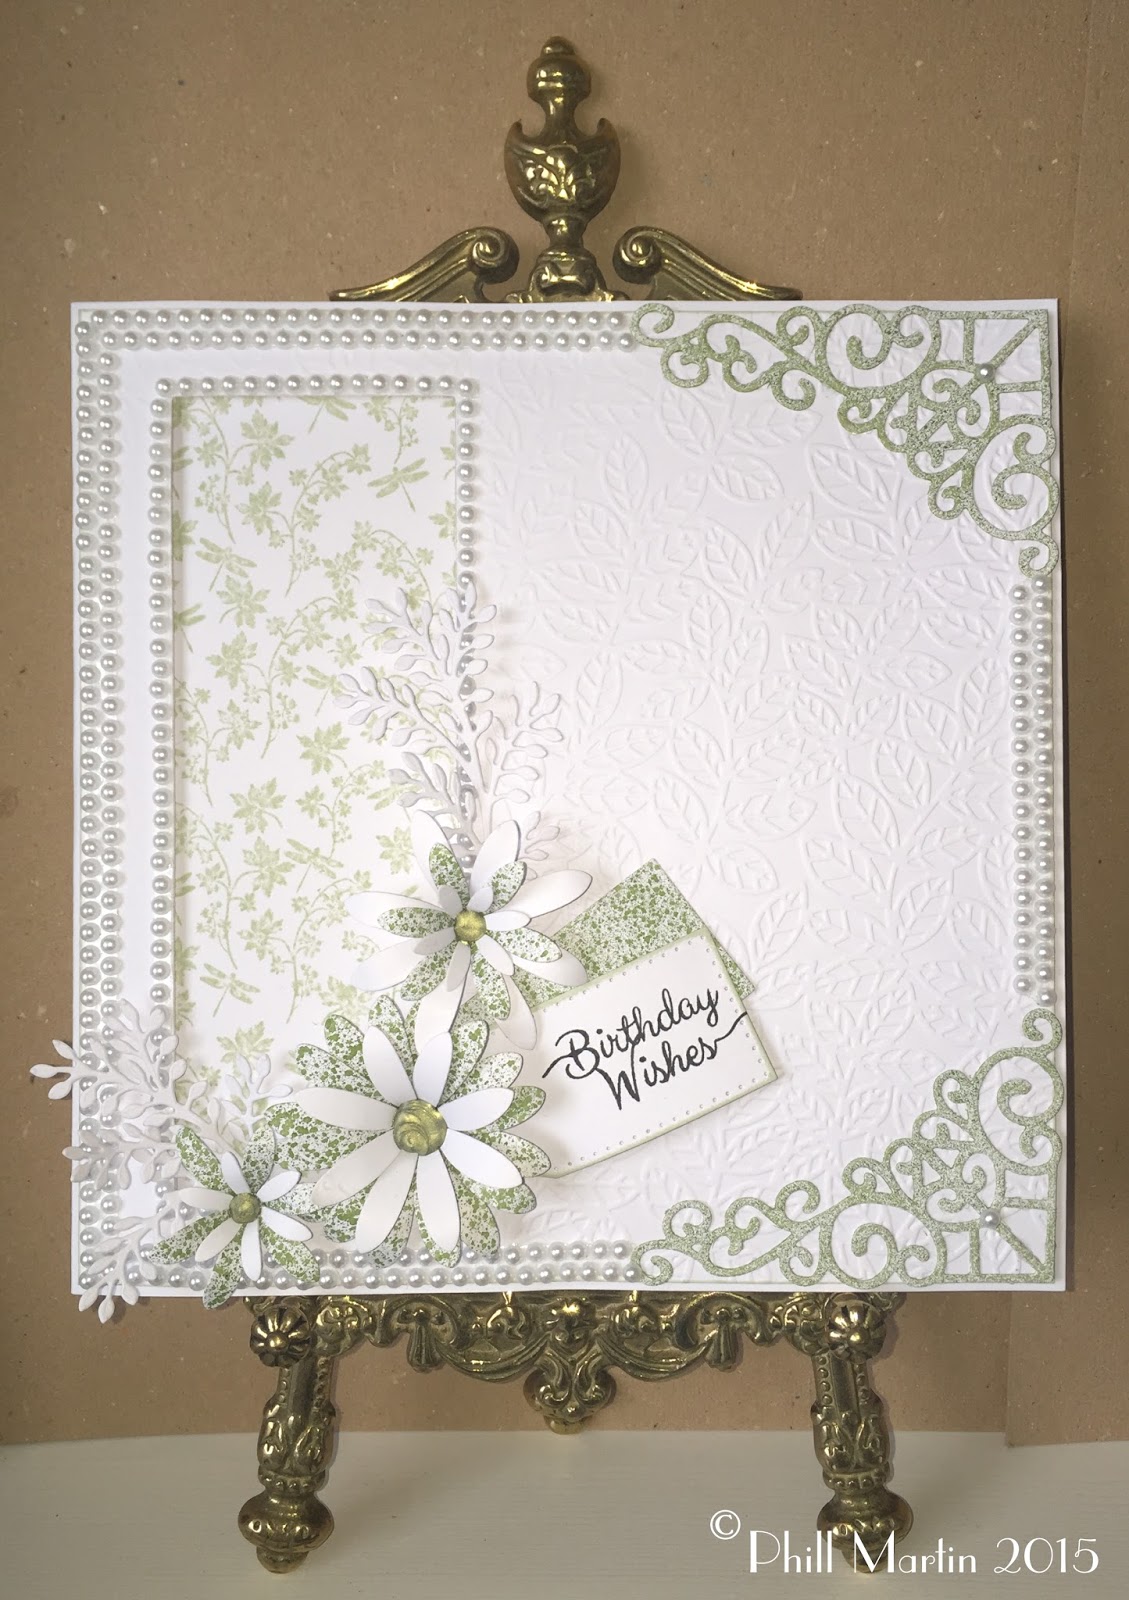
This is an 8x8 card I made using some of my Chic Moss collection of Cosmic Shimmer products (a colour that I absolutely love!)

To be in with a chance to win this card, signed by lil ole me, please just ensure you are following my Blog and leave a comment on this post..
I'll draw a winner randomly next Monday morning (14th) and notify you here :-)

Here's what I used (and, surprisingly, I've made the list links to the items on my website too (well, it does make it easier for you to swish over and buy them lol)

Sentimentally Yours Dragonfly Retreat A6 Background Stamp
Sentimentally Yours Scribbled Frame Sentiments Stamp Set (must have set in my humble opinion)
Chic Moss : Colour Cloud, Ink Mister and PVA Glue
Sue Wilson Delicate Fronds Die Set
Sue Wilson Delicate Daisies Complete Petals Die Set (must have set in my humble opinion)
Sue Wilson Ornamental Corners Die Set
Sue Wilson Pierced Tags Die Set
Sue Wilson A4 Leafy Montage Embossing Folder
Creative Expressions Self Adhesive Pearl Strips - Double Row White
Creative Expressions Smoothies


And here's what I did... 

I embossed an A4 piece of white cardstock with the lovely Leafy Montage embossing folder, (important to do this before trimming it down as embossing cardstock alters the dimensions slightly) I then trimmed it to 19.5cm x 19.5cm.

I then cut the aperture to the left side of my embossed cardstock and I did this with one of Sues' Striplet dies as most have the plain outer edge (you can, of course, use your craft knife)
I positioned the aperture onto my card blank as if I was going to stick it and made a pencil mark around all four corners (this gave me a a guide with which to stamp within)

Using the fabulous Smoothies and my even more fabulous Dragonfly Retreat background stamp, I applied Chic Moss Colour Cloud directly to the stamp and stamped within the pencil lines.

At this point, you may find it easier to apply the self adhesive pearls around the aperture (I do it at the end so I don't have them where they don't need to be, but it is trickier trying to navigate them under flowers etc) The single row was created by simply cutting a strip of the double row pearls in half :-)

I then used foam tape on this piece, for dimension, then stuck it to my card blank.

I then did all my die cutting, which was:-
4 x daisies x 2
2 x Ornate Corners
2 x Delicate Fronds
2 x Pierced Tags

The ornate corners, one of the pieced tags and a selection of the delicate daisies were popped into my ink misting box and misted all in one go with the Chic Moss Ink Mister.

The flowers were shaped and stuck together with my trusty Cosmic Shimmer PVA Glue and finished off in the centre with a good blob (very technical lol) of the Chic Moss Pearl PVA Glue.

I then stamped my 'Birthday Wishes' from my Scribbled Frame Stamps (these are a fabulous smaller size to my other sentiments so work perfectly on these tags)

Last but not least, I assembled it all together as you see in the photo and finished with the double row white pearls around the open edges.

Here's a bigger photo :-)


Don't forget my very first shows on Hochanda are:-

Tuesday 15th September at 8pm
Wednesday 16th September at 9am, 10am, 12noon, 4pm and 7pm

I hope you will join me!!
Remember, if you don't have Sky or Freeview/Freesat you can watch in High Definition on their website


Happy Crafting!


Black & Cream - Season's Greetings

Good Morning Everyone,

A chilly but dry morning here in Nottingham, a nice day for crafting!

Thank you all for your lovely comments on my previous posting.

Today's card:-

Products used: (which are links to Phill's Website) :-)

8 x 8 Card Blank
Cream Card Stock
Black Card Stock
Swirling Holly Embossing Folder
Christmas Holly Corners, Border & Icon Stamp Set A5
Christmas Holly Decorative Frame - Snow 
Glacier Ice Glitter Jewels
Spellbinder Dies - Layered Poinsettia
Black Soot Distress Ink
Assorted Dazzlers
Gold Embossing Powder


 First I cut the layers as follows:-

 Cream card Stock cut to 7,75 square and attach flat to card blank

Next layer black card stock cut to 7.5 square and attach flat to card

3rd layer cream card stock cut to 7.25 square.

Using the third layer and the corner stamps I stamped each corner using Black Soot Distress Ink,
I then embossed this using Swirling Holly Embossing Folder. Next I attached it flat to the card


Sentiment


Using the Decorative Holly Frame I heat embossed this, then cut out the centre using my craft knife.
I then attached the frame to the card using pads.

Next I cut a piece of cream card to fit the centre square, and stamped the Sentiment onto it before adding to the card.


Finishing Touches

Using scraps of black and cream card I cut several of the Poinsettias out then used Glacier Ice Glitter Jewels to add sparkle, then I moulded the petals, glued them together and attached to the card.

Finally I added Dazzlers to the centre of each flower.


                                       Happy Crafting


Friday 4 September 2015

Graceful Mustard - Birthday

Good Morning Everyone,

I am overwhelmed with the lovely comments and emails I am receiving from so many of you, thank you all so much.

On with today's card which I hope you will like.

Products Used: (which are also links to Phill's Website) :-)


8 x 8 Card Blank
White Card Stock
Brown Card Stock
Graceful Butterflies & Dragonflies Paper Pad
Graceful Mustard Twinkles
Graceful Mustard P.V.A.
Graceful Mustard Gilding Wax
Sentimentally Yours Birthday Verse 2 Collection Stamps A5
Sue Wilson Die - Classic Rose
Sue Wilson Die - Austrian Collection - Innsbruck
Spellbinder Die Dragon Delight
Walnut Stain Distress Ink


 Using a sheet of Mustard Dragonfly paper from the paper pad I attached this to front of the card blank.

Then using the Rose Dies I cut the apertures in the top left hand corner. Next I used Mustard Twinkles around the edges of the apertures.

I then cut out the Dragonflies using off cuts of brown and white card, and attached these to the card.
Then added Mustard Twinkles and Mustard P.V.A. to decorate.


Sentiment

Using the two largest  Innsbruck Dies and Brown Card stock I cut the dies out.

Then using the smallest plain oval die cut out using  White Card Stock.
Using Walnut Stain Ink I stamped the Birthday Verse Sentiment.
I then edged this with Mustard Gilding Wax, and Mustard Twinkles to the brown oval.


Using a sheet of plain white card stock I sprayed it with Mustard Mister Spray and then cut several of the roses out, I also used scraps of Graceful Mustard paper.

I made the roses up, then closing the card I lined the roses up attached to the inside of the card, (through the aperture)

I cut 3 triangles from the paper pad and added these to the corners of the inside of the card, and finally finished with a dragonfly.


                               Happy Crafting