I've had a thoroughly good time at Hochanda over the last few days and I'm so pleased you are all loving my new Petite Scribbled Sentiments and the new Scribbled Birthday Verses,.. I do too! (albeit I am biased ha ha)
Thanks too for all the lovely comments on my Facebook Page and Twitter, I really do appreciate it :-)
So, you have some Blog posts from lil ole me this week and I will be giving away the cards I made as demo's on air (the last lot are signed and ready to go now)
I'll do seperate posts for the cards I'm giving away so keep an eye on the Blog and my Facebook Page..
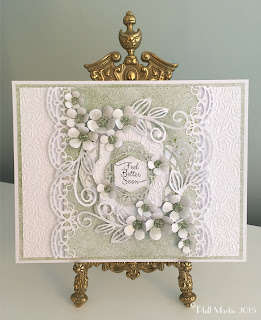
Anyhoo, here's my first sample,.. in Chic Moss, which I absolutely love!
What I used:
Phill Martin for Cosmic Shimmer Chic Moss Ink Mister, Gilding Wax & Twinkles
Dies by Sue Wilson, Portuguese Collection, Lisbon, Corner, Border & Tag, Curled Vines and Camellia Compete Petals
Cosmic Shimmer Glitter Jewels, Glacier Ice
White Cardstock
Creative Expressions Bed of Roses A4 Embossing Folder
What I did:
I cut all my layers in white cardstock, these were 23cm x 18cm, 22.5cm x 17.5cm, 22cm x 17cm and finally 14cm x 17cm (centre panel)
I then cut out my Lisbon dies in white card making sure I cut the largest die on it's own, then the three largest together, then the tag from the corner, border and tag set (including an extra one of the smallest for my sentiment), two borders and four curled vines.
The middle base layer, largest of the Lisbon die cuts and the tag were all then ink misted using my Chic Moss ink mister and put to one side to dry.
I embossed the smallest of the base layers and the inner die cut from the Lisbon set using the beautiful Bed of Roses embossing folder (I used the reverse or debossed side on this card as it's just as pretty as the embossed side)
I then cut 14 of the fabulous Camellia (Camilla ha ha) flowers in the same white cardstock, you'll notice that I haven't layered these flowers up either, I love them just simply shaped and left as individual flowers!
I used the Chic Moss Gilding Wax in the centre of each flower, not paying particular attention to this, simply a good application in a circle, I then let this dry for a minute or two, then buffed the gilding wax with a tumble dryer sheet (this also gets rid of any hard edges), I then shaped them slightly with my ball tool from underneath, applied a good blob of Chic Moss Twinkles and covered this with Glacier Ice Glitter Jewels (have you tried this yet?, looks amazing over the top of Twinkles)
I then stamped the bootiful Petite Scribbled Sentiment in Black Soot distress ink and edged this with Cosmic Shimmer Glue and applied Glacier Ice to this too.
The four curled vines and the centre die cut were also given the glacier ice treatment,.. just make sure you don't cover the whole of the curled vines with glue and glacier ice,.. I do it in loosely random spots to add more interest.. it makes them too 'heavy' if you cover them.
Now my ink misted layers were dry, so I started assembling the card.. so, the three base layers were all flat, the die cut borders were stuck onto the small ink misted layer, just on the edge and the edge of those given the glacier ice treatment, this 'panel' was then stuck on with foam tape in the centre of the card. The ink misted part of the Lisbon die cuts was stuck to the base layer and this was stuck onto the centre panel with foam tape, as were the extra layers of the die cuts, finishing with the sentiment on top.
The flowers and curled vines were all stuck on with Cosmic Shimmer glue around the centre to create a 'frame'.
The finished card:
And there we have it,.. doesn't take long to make this card really,..in fact, it's probably one of my quicker ones!
The card I replicated on air was in Chic Viola (another really pretty colour) and this will be the first of my give aways on my Facebook Page later today.
As always, you can find everything I've used on my TV Shows over at my website by clicking here: www.honeypotcrafts.co.uk
Until tomorrow.... Happy Crafting!


