What's New

My Brand New Sentimentally Yours 2017 Xmas Stencils are now available at www.honeypotcrafts.co.uk!
Showing posts with label Seam Binding. Show all posts

Monday, 21 September 2015

Frosty Sky - Christmas Wishes

Good Morning Everyone,

Thanks you all for your lovely comments on my previous post .

I hope all  who went To Ally Pally at the weekend had a wonderful time, and got the chance to meet Phill.

Today's card : 8 x 8 Christmas Card in Frosty Sky.

Products used ( which are all links to Phill's website) :-)

8 x 8 Card Blanks
White Card Stock
Frosty Sky Mister Spray
Frosty Sky Colour Cloud Ink
Frosty Sky Twinkles
Frosty Sky P.V.A. Glue
Sentimentally Yours Christmas Stamps - Bauble Opulence Collection
Spell Binder Dies Create-a-Flake Three
Seam Binding
Glacier Ice Glitter Jewels
Dazzlers
Sue Wilson Snowflake Lattice Embossing Folder


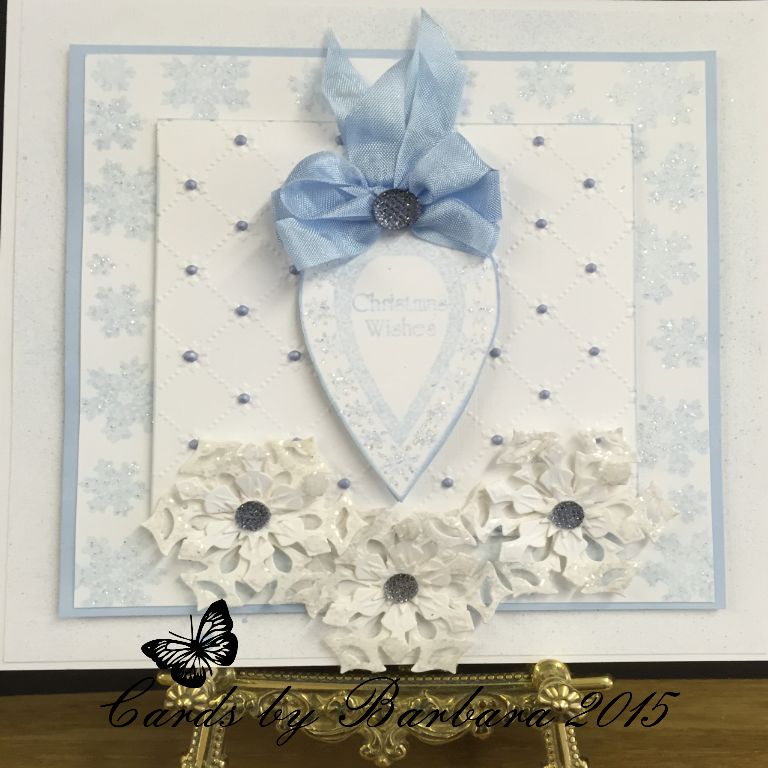
To create this card first  I cut a 7.75 sq from  A4 White Card Stock and used Frosty Sky Mister Spray. Once this was dry (a couple of minutes) I attached to main card blank, using Cosmic Shimmer Glue.

Next I cut a piece of White Card Stock to 6.75 sq and edged it with Frosty Sky Colour Cloud Blending Ink, and again attached flat to card.

The next layer I cut to 6.5 sq and using the Snowflakes from the Bauble Opulence Collection Stamps I created the background using Frosty Sky, then attached flat to the card.


 Next I cut a piece of white card stock to 5.5 sq and embossed it with the Snowflake Lattice Embossing Folder
and attached this to the card using pads.

Using the Bauble Opulence Collection Stamps I stamped 2 baubles using Frosty Sky Colour Cloud Blending Ink. Then stamped the Sentiment in the centre of the bauble. Once these were dry I cut them out and glued back to back, inserting a very narrow strip of acetate to the top and attached to the card.


Using the  Spellbinder Create -a -Flake Three I cut several of these out and shaped these,glued together and attached to the card.


Finishing Touches

Once all this was assembled I used Frosty Sky P.V.A. Glue to add pearls to the Snowflake Lattice. Then I used Glacier Ice Glitter Jewels to the tips of the snowflakes and also to snowflake background and snowflakes on the bauble.

I then added Frosty Sky Twinkles around the edge of the bauble.

Using Seam Binding, I made a triple bow and tails to add to the top of the bauble.

Finally I added Dazzlers to the centre of the snowflakes and also the centre of the bow.

                                       
                                                                   Happy Crafting


Wednesday, 9 September 2015

Decandent Teal & Ivory - Christmas Blessings

Good Morning Everyone

Thank you all for the lovely comments and emails you keep sending, its lovely to read them all, I appreciate you taking the time to do this,

On with today's card an 8 x 8 Christmas Card

Product Used:- (which are also links to Phill's website) :-)


Teal Card Stock
Ivory Card Stock
Decadent Teal Colour Cloud Ink
Decadent Teal Twinkles
Christmas Holly Background Stamp
Christmas Holly Sentiment Stamp
Sue Wilson Die - Caribbean Collection - St Kitts
Spellbinder Die Create-a-Flake Three
Creative Expressions Clear Micro Glass Beads
A4 Self Adhesive Sheets
Seam Binding
Small & Medium Dazzlers


First I made an 8 x 8 card in Teal by cutting 20cm x 20cm sq
and 20cm x 23cm
score and join on the reverse

Matting & Layering:

19.5cm sq Ivory Card
19cm sq Teal Card
18.5cm sq Ivory Card

Then attach all these flat to the card.

Using a piece of  Ivory Card cut to 18cm sq I created the background using Decadent Teal Colour Cloud and the Christmas Holly Background Stamp.
Once this was dry I cut a piece of the Self Adhesive Sheeet to 18cm sq.
After carefully removing the backing sheet, after carefully removing the backing sheet I covered the card with Micro Beads. ( I used a shallow box for this then poured the surplus beads back into the jar). I then attached this to the card.


Sentiment:
 Using the 2 largest dies I cut these out in Ivory and backed onto Teal Card.

With the 3rd largest I cut this out in Ivory and stamped the  Sentiment using Decadent Teal Colour Cloud Ink. Then attached these to the card using pads.

 Finishing Touches:

Using dies Create-a-Flake 3 I cut several out in both Ivory and Teal, shaped and attached to the card. Then added a small Dazzler to centres.

Making a triple bow and swags with Teal Seam Binding I attached this to the card and added a Medium Dazzler.

Finally I edged around the outer edge of the sentiment with Decadent Teal Twinkles and Glamour Dust around the inner and snowflakes.

                                                           Happy Crafting


Wednesday, 2 September 2015

Graceful Lilac - Birthday Wishes

Good Morning Everyone,

Its been a busy time these last few days, Phill's Craftathon was  a great success, many thanks to all who attended, judging by the comments on the day, you all enjoyed yourselves.


Today's card 8 x 8

Products Used:- ( which are also links to Phill's Website) :-)


8 x 8 Card Blank
Graceful Butterflies and Dragonflies Paper Pad
Dragonfly Days Background Stamp
Sentimentally Yours Baroque Sentiments 2 Collection Stamps
Lilac Card Stock
White Card Stock
Graceful Lilac Mister Spray
Graceful Lilac Mica Powder
Graceful Lilac P.V.A
Graceful Lilac Twinkles
Seam Binding
Medium Dazzlers
Spell Binder Dragon Delight Dies
Sue Wilson French Collection Provence Dies


The first thing I did before cutting out was to colour the Seam Binding with Graceful Lilac Mister Spray. ( needs time to dry)

1st Layer Lilac Paper from Paper pad cut to 7.75 square.
I then cut a strip of the coloured Seam Binding and attached it to the 7.75 square before attaching to the main card.

Next I cut the layers:-

2 pieces of plain white card stock

1st layer - 7 x 4.25
2nd layer - 7 x 2.25

I then inked the edges and attached flat to the main card.

Using the Lilac Card Stock I cut 2 pieces

1st - 6.75 x 4"
2nd - 6.75 x 2"
and attached to the card using pads.

I then cut 2 more pieces of white card

1st - 6.5 x 3.75
2nd - 6.5 x 1.75

Using a small amount of Mica Powder and Mister Spray I blended these together to use as ink, then using the Dragonfly Days Background Stamp I randomly stamped. Once dried I attached to the card using pads to give dimension.


Sentiment

I cut out the centre feature using white and lilac card stock, and the Provence Die.

I chose a Sentiment from the Baroque Collection and then attached to to the card.


Finishing Touches
Using White and Lilac Card I cut out the Dragonflies and attached to the card. I then added the P.V.A. and Glamour Dust.

I added Graceful Lilac Twinkles around the edge of the sentiment.


Finally with the remaining Seam Binding I made a double bow and swags, then finished  off with a Whie  medium size Dazzler.


                                  Happy Crafting


-


Thursday, 27 August 2015

Black & Cream - Joy

Good Morning Everyone,

Once again thank you all for your lovely comments on my previous blog.


Today's card is created in the ever popular black & ivory

Products used: (which are also links to Phill's website) :-)

8 x 8 Ivory Card Blank
Ivory Card stock
Black Card stock
Christmas Holly Flourishes Stamps A5
Christmas Holly Decorative Sentiment Stamps A5
Sue Wilson Noble Dies Ornate Pierced Rectangles
Sue Wilson Festive Collection Holly Accessory Kit Dies
Swirling Holly Embossing Folder
Black Soot Distress Ink
Black Seam Binding
Black P.V.A.


First Layer  - Black card stock cut to 7.75 square
Second layer  - Ivory card stock cut to 7.5 square
Third layer Black card stock cut to 7.25 square
Then attach all three layers to main card blank.

Next I cut a piece of Ivory card to 7" square and using one of the Christmas Holly Flourish stamps and Black Soot Distress Ink I created the background. Next I embossed this using the Swirling Holly Embossing Folder.I then attached to card.


Sentiment
Using the 2nd and 3rd size Ornate Pierced Rectangle dies I cut this out using cream card and also a larger piece in black to back it onto.
Then I stamped the sentiment using Black Soot Distress Ink, adding these to the card using pads to give dimension.


Finishing Touches

I used Black Pearl P.V.A.around the edge of the centre die to embellish the sentiment.
Using the Holly Die and scraps of Ivory & Black card I cut out a few holly leaves and added these to the card.
Finally I made a triple bow using Black Seam Binding and added this along with a medium Dazzler.

                                                                     Happy Crafting


Wednesday, 26 August 2015

Frosty Heather Christmas Card

Good Morning Everyone,

It is overcast here in Nottingham so a good time to spend the day in my craft room.

Once again I have had received some lovely comment on my previous blog and I thank you all so much.


On with today's card:

Products used:- (which are also links to Phill's website) :-)

8 x 8 Card Blank
Frosty Christmas Holly Paper pad
Frosty Heather Gilding Was by Phill Martin
Frosty Heather Twinkles by Phill Martin
Frosty Heather P.V.A. by Phill Martin
Frosty Heather Colour Cloud Blending Ink
Christmas Holly Verse Stamp Set A5
Embossing Folder Snowflake Lattice
Sue Wilson Die - Caribbean Island Collection, Border Accent & Tag
Silver Embossing Powder
Dazzlers
Seam Binding
Stick pins


The first thing I did before creating this card was to cut a piece of White Seam Binding, enough to make a triple bow and swags. I then coloured it with Frosty Heather Colour Cloud Blending Ink.

1st Layer
I cut a piece of plain white card to 7.75 square, then I used Frosty Heather Gilding Wax  around the edges.

Using a sheet of Frosty Heather Christmas Paper I cut this to 7.5 square and then attached both layers
to the main card.

Next I cut 2 pieces of plain white card to 2" x 7.75 then using the Border Die I cut them both out before Embossing them with the Snowflake Lattice Embossing Folder. I then attached both to the card.


Sentiment

For the Sentiment I used a Verse from the Christmas Holly Verse Collection and heat embossed it using Silver Embossing Powder.
I then attached this to the card using pads.


Finishing Touches

I added Frosty Heather P.V.A. Pearls to the centre of the snowflakes, and Frosty Heather Twinkles to the edges of the border and around the edges of the sentiment.
Then making sure the ribbon wad dry I made a triple bow with swags and added this using a large Dazzler.

Finally I added a matching insert form the Christmas Holly Paper pad insert.


                                                                Happy Crafting


Monday, 24 August 2015

Frosty Jade - Merry Christmas

Good Morning Everyone,

Once again thank you all for your lovely comments on my previous blog.

It's good to know you are all looking forward to the New Channel Hochanda, we are all getting even more excited as the time draws closer.

Todays card:-

Products used:- ( which are all links to Phill's website) :-)

8 x 8 Card Blank
Frosty Christmas Holly Paper pad
Frosty Jade Gilding Wax by Phill Martin
Frosty Jade P.V.A. by Phill Martin
Frosty Jade Twinkles by Phill Martin
Frosty Jade Mister Spray by Phill Martin
Christmas Holly Corners, Borders, & Icon Stamp Set A5
Christmas Holly More Decorative Sentiments Stamp Set A5
 Snowflake Lattice Embossing Folder
Spellbinder Decorative Labels 28 Dies
Silver Embossing Powder
Seam Binding
Dazzlers


Using a sheet of Frosty Jade I cut this to 7.75 square and attached to main card blank.

I then cut 2 panels of plain white card. Each on measuring 2.75 x 7.75
Using the Frosty Jade Gilding Wax I coloured the edges and attached to main card using pads.

Next I cut 2 more pieces of plain white card to 2.5 x 7.75
I sprayed both of these with Frosty Jade Ink Mister. Once this was dry (only a couple of minutes)
using the Corner Border Stamp I stamped corners and heat embossed using Silver Embossing Powder. I then embossed these using the Snowflake Lattice Embossing Folder. Then attached to the card.


Sentiment

I cut a plain piece of white card using the largest of the Spellbinder Decorative Labels 28 and heat embossed it with the Sentiment
stamp. I then attached  this to the card using pads.


Finishing Touches

I used Frosty Jade Twinkles and Frosty Jade P.V.A. around the edge of the sentiment.
A triple bow and swags made with White Seam Binding and finally finishing off with a large Dazzler.

                                                          Happy Crafting


Saturday, 22 August 2015

Frosty Sky - Let It Snow

Good Morning Everyone


Very exciting times ahead and I hope you are all as excited as we are with the launch of the New Channel Hochanda.

Phill's 1st show is scheduled for 8.00pm on Tuesday 15th September, followed by :
9.00am, 10.00am, 12 noon, 4.00pm, and 7.00pm. on Wednesday 16th September.

I hope you will all be tuned in ready to enjoy this New and Exciting Channel!


Today's card:
Yes another 8 x 8 (my favourite but looks equally as nice in smaller sizes)


Products used: (which are also links to Phill's Website) :-)

8 x 8 Card Blank
Phill Martin Frosty Sky Gilding Wax
Phill Martin Frosty Sky Mister Spray
 Frosty Sky Colour Cloud Blending Ink
Phill Martin Frosty Sky Twinkles
Phill Martin Frosty Sky P.V.A.
Christmas Holly Sentiment A5 Stamp Set
Christmas Holly Flourishes A5 Stamp Set
Seam Binding
Dazzlers
Hat pins
Spellbinder Die Create -A-Flake Three


To create this card I first cut a piece of plain white card to 7.75 square and used Frosty Sky Gilding Wax around the edges then attached to 8 x 8 card blank.

Next I cut a piece of plain white card to 7.5 square, using Frosty Sky Mister Spray I sprayed this, when dry ( a couple of minutes) I attached to main card.

I then cut a piece of plain white card to 7" square. Using the Frosty Sky Colour Cloud Blending Ink and stamps from the Holly Flourish Set I randomly stamped the background. Once dry I attached to main card.


 Using Spellbinder Decorative Labels 28 I cut the dies out and used Frosty Sky Ink Mister on the largest one and stamped the smallest one using Frosty Sky Colour Cloud and a stamp from the Holly Sentiment Set.
I than attached these to the main card using pad to give dimension.


Finishing Touches:

I added Frosty Sky P.V.A. around the edge of the second size die and Twinkles around the smallest one.

Next I cut out the Snowflakes (3 of each size) and sprayed these with Frosty Sky Ink Mister, then added Glacier Ice. Once dry I shaped these and attached to the card, and added a small dazzler to each.

Finally I made a triple bow and swags using White Seam Binding, added a large dazzler to the centre and finished off with Blue and White Hat pins.


                                                        Happy Crafting

Thursday, 20 August 2015

Frosty Sky & White - Seasons Greetings

Good Evening  Everyone,

Today's card is an 8 x 8  Christmas Card

Products used:- (which are also links to Phill's Website) :-)

8 x 8 Card Blank
Frosty Christmas Holly Paper pad
Christmas Holly Sentiment A5 Stamp Set
Christmas Holly Decorative Frame Single Stamp Holly
Christmas Holly Verse Collection A5 Stamp Set
Phill Martin Frosty Sky Twinkles
Phill Martin Frosty Sky P.V.A.
Phill Martin Frosty Sky Gilding Wax
Seam Binding
Dazzlers
Black Soot Distress Ink
Silver Embossing Powder
Sue Wilson Die Festive Collection - Holly Sprays
Sue Wilson Caribbean Island Collection Die - Border, Accent & Tag 


8 x 8 card blank
1st 7.75 square
2nd layer Frosty Sky from paper pad cut to 7.5 square

Using the 7,75 square card I edged this with Frosty Sky Gilding Wax and attached to main card blank.
Then attached the patterned paper to card.

Next I cut 3 pieces of white card
First one 2 x 7.5
Second one 2.5 x 7.5
Third one 3 x 7.5
I then cut these out using the Border Die. Once this was complete I glued all three strips together.
Cutting a piece of White Seam Binding and using the Frosty Blue Colour Cloud I dyed the Seam Binding to match the card. At this stage I also dyed enough Seam Binding to make a double bow. Once this was dry I added the strip of Seam Binding to the strips of card before attaching this to the main card.

Using the Christmas Holly Frame Stamp and the Frosty Sky Colour Cloud to stamp this, I cut it out and mounted in onto the card using pads to give dimension, then added the Sentiment using Silver Embossing Powder, again using pad to attach to card.


Finishing Touches

I cut out the Holly Sprays and added these to the card.
I added Glamour Dust to the leaves and also onto the background of the stamp.
Around the edges I used Cosmic Shimmer Glue and Glacier Ice.
The holly berries are highlighted using Frosty Sky P.V.A. Glue.
I made a double bow and a tie bow for the strip of seam binding and added dazzlers to each.
Along the edges of the Border Die I used Frosty Sky Twinkles, when this was dry I curled each edge.


Finally I added the insert using the New Christmas Holly Paper pad matching insert and a verse from the Christmas Holly Verse Collection.


                                                                    Happy Crafting


Sunday, 2 August 2015

Baroque Best Wishes - Black & Cream

Good Morning Everyone,

Once again thank you all for taking the time to comment on my cards, Its lovely to know what you all think.

Today I decided to use stamps from one of my Favourite Collections - The Baroque Collection.

I hope you like it.


Products Used:- (which are also links to Phill's Website too) :-)

8 x 8 Cream Card Stock
Sentimentally Yours Baroque Background A6 Stamp
Sentimentally Yours Baroque Sentiment Collection A5 Stamp Set
Creative Expressions Snakeskin Embossing Folder
Black PVA Glue
Sue Wilson Die New York Collection - Herald Square 
Dazzlers
Seam Binding
Couture Creations Dragonfly Die


Matting & Layering

1st layer Black Card cut to 7.75 sq.
2nd Layer Cream Card cut to 7.5 sq.
3rd Layer Black Card cut to 6.75 sq.
4th Layer Cream Card cut to 6.5 sq.

First I attached the 7.75 Black Card to the Base Card - flat using Cosmic Shimmer Glue
I than embossed the Cream 7.5 card and attached this (again flat)


Background

To create the background I used the cream 6.5 card and The Baroque Background Stamp. I stamped this using Black Soot Distress Ink. Once this was dry I attached it to the 6,75 black card and then added both to the main card using pads to give dimension.


Sentiment

Using a piece of cream card and Sue Wilson Herald Square Die I cut the die out and then backed it onto a  piece of black card.

I then did the PVA Pearls around the edge of this as they take a while to dry.

Next I cut a piece of cream card to 2.5 sq and stamped the Sentiment attaching this the centre with pads.
This was then added to the centre of the main card.

Once I was sure the PVA Pearls were dry I attached the sentiment to the centre of the card.


Finishing Touches

I made a triple bow and swags using Black Seam Binding and added a Dazzler to the centre.
Finally adding two Dragonflies.


                                                         Happy Crafting


Thursday, 30 July 2015

Decadent Damask Oak - Best Wishes

Good Morning Everyone,


Thank you all very much for such lovely comments on my previous blog.


Today's card is an 8 x 8
 I particularly enjoyed creating this card, its so nice to be able to colour match everything, and I love the NEW Colour Cloud Blending Inks.

Products Used:- (which are also links to Phill's Website too) :-)

8 x 8 Cream Card Blank
Cream Card
Decadent Damask Border & Icon Collection A6 stamps
Decadent Damask Everyday Sentiments A5 stamps
Decadent Damask Paper Pad
Phill Martin Cosmic Shimmer Ink Mister Spray Decadent Oak
Phill Martin Cosmic Shimmer PVA Pearl Decadent Oak
Phill Martin Cosmic Shimmer Twinkles Decadent Oak
Decadent Oak Colour Cloud ,
Sue Wilson Caribbean Collection Border, Accent & Tag Dies
Spellbinder Decorative Labels Twenty Eight Dies
Seam binding
Dazzlers


Matting & Layering

8 x 8 Card Blank

1st layer Cream Card cut to 7.75 x 7.75
2nd layer Decadent Oak Patterned Paper cut to 7.5 x 7.5

4 pieces of cream card
1st cut to 4.5 x 7.75
2nd cut to 4 x 7.75
3rd cut to 3.5 x 7.75
4th cut to 3.5 x 7.75

Starting with the 7.75 square cream card I used the NEW Decadent Oak Colour Cloud to ink around the edges of the card. I then attached this and the patterned Decadent Damask paper to the base card.

Next taking the 4 pieces of cream card and the Inner Border Tag I cut each piece of card, Once this was complete I used the smallest and medium size stamps from the Decadent Damask Border & Icon Collection and randomly stamped the smallest piece of card using first and second generation.
Once this was dry I attached all the layers together, then added a strip of seam binding securing this on the reverse before attaching this to the main card.


Sentiment

Using Spellbinders Labels Twenty Eight and the second largest die I cut this out and then sprayed it with Decadent Oak  Mister Spray. While this was drying which is only a couple of minutes, I cut the third largest die. I then stamped this using the Decadent Oak Colour Cloud and the Decadent Damask Everyday Sentiment Stamps.
These were then attached to the card using pads on both to give dimension


Finishing Touches

I made a triple bow and swags and attached to the seam binding strip, then added a matching Dazzler.

Then to the Decorative Border edges I added the the Twinkles - once this was dry I curled each layer.

Finally I added Decadent Oak PVA to the sentiment.


                     Happy Crafting


Thursday, 16 July 2015

White & Burgundy Card Featuring Sentimentally Yours Christmas Holly Range

Good Morning Everyone,

Thank you all so much for your lovely comments on my previous posting. I would also like to thank everyone who took the time to come and say 'Hello' at Doncaster at the weekend, it was lovely to meet you all.


Today's card is an 8 x 8

Products used: (which are linked to items on Phill's Website too) :-)

Plain White Card Stock
Burgundy Card Stock
Double Sided  Self Adhesive
Clear Glass Micro Beads
Spellbinder Die
Christmas Holly Collection Verses
Christmas Holly Stamps
Burgundy Seam Binding
Creative Expressions Self Adhesive Pearls
Creative Expressions Pins


Starting with an 8 x 8 White Card Blank

Layer 1 Burgundy Card
cut to 7.5 x 7.5

Layer 2 White Card cut to 7 x 7

Layer 3 Burgundy Card cut to 6.75 x 6.75

Layer 4 White Card cut to 6.5 x 6.5

Double Sided Adhesive cut to 6.5 x 6.5 I then glued layers 1-3 onto the White Card.


Next using layer 4 and Stamps from Sentimentally Yours
New Christmas Holly Collection, I chose Aged Mahogany
Distress Ink to create the background.

Taking the piece of Double Sided Adhesive I peeled back the top corners to line up with layer 4 and carefully removed the backing sheet.

 I then removed  the top sheet to reveal the adhesive and added the Micro Beads. To do this I find it easier to place project into a shallow box or tin before adding beads,
 then surplus beads can be poured back into the jar.


I chose a Spellbinder Die and cut the bottom layer in burgundy and the top in white before adding one of the lovely Sentiments from the New Christmas Holly Collection.

I stamped this with Aged Mahogany to match the background.


I added these to the card using pads.

Next I added the Self Adhesive Pearl Strips around the edge.

Finally I added a triple bow (upside down lol) and stick pins.


                                                             Happy Crafting .......


Friday, 3 July 2015

A4 White & Silver Embossed Wedding Card

Good Morning Everyone,

Todays card is a Wedding Day Card in White and Silver Embossed  A4 format.

I have had lots of 'likes' and comments on this both on my Facebook page and at Phill's Shows.
I hope you all like it too.


Products Used (which are links to the items on Phill's Website too)

Plain White Cardstock
Decadent Damask Occasions Stamps
Decadent Damask Corners Stamps
Sentimentally Yours Lacy Rectangles
Sue Wilson Camellia Open Petals
Sue Wilson Camellia Complete Petals
Cosmic Shimmer Silver Embossing Powder
Seam Binding
Dazzlers & Stick Pins
Crystal Stickles
Sue Wilson Heart Lattice Embossing Folder
Spellbinders Flutters Die


For the Base
1x A3 Plain White Card Stock folded in half (21 x 29.5)
Then cut 2 layers - first layer 20.5 x 29
second layer 20 x 28.5
Cut 2 strips for centre panel 6.5 x 28.5 and 4.5 x 28.5

Matt and Layer

The first layer I left plain.
Second layer I stamped the corners and heat embossed, then used the embossing folder. Add both layers to the card.
For the centre panel I used one of the long stamps and heat embossed along the edges. The second strip I put through the embossing folder.

Focal Point
Using a plain piece of card, stamp and heat emboss using the rectangle stamp, then cut this out. Cut a rectangle using the die, then stamp sentiment and heat emboss. These are then added to the card using pads to give dimension.


Flowers   

I cut a large amount of flowers using offcuts of white card and moulded these before gluing together.
Once dry I added twinkles around the edges of the petals
and a gem to the centre.
The butterfly I layered and added twinkles.

Finally to finish the card I made a bow using Seam Binding (no prizes for guessing who taught me lol) and added a gem and stick pins.


Happy Crafting ......