What's New

My Brand New Sentimentally Yours 2017 Xmas Stencils are now available at www.honeypotcrafts.co.uk!

Friday, 22 July 2016

Rich Plum & Gold - And the winner is....

Hello Crafters

Sorry I'm late in the day doing this post,.. it's been a crazy, crazy busy day!

Anyhoo,..
Thank you so much for all your lovely comments on my Blog, I really do appreciate you taking the time to leave them :-)
And, aren't you impressed that I have blogged for 4 days in a row! ha ha

So, on Monday, I said I was going to give this little beauty to one of you who left a comment on the post,..


well, the winner is...

Jennifer Smith-Kirk

whoo hoo - well done Jennifer!

If you would kindly email me an address to send the card to, we will get it off to you after my HOCHANDA shows next week :-)
E-Mail to phill@honeypotcrafts.co..uk

Thanks again everyone,..

I'll have another giveaway for you on my next post (which I will be writing in a minute)

Happy Crafting!

PS - Don't forget to 'like' my Facebook page and follow me on Twitter to keep in touch!


Thursday, 21 July 2016

Brilliant Sparkle - Special Couple

Hello Crafters

It's another gorgeous start to the day here in Nottingham, but with a lovely breeze too, which makes it so much more comfortable!

I know I've mentioned my Precious Metals Collection of Cosmic Shimmer products before, but I don't know if you know that most of the Cosmic Shimmer products with the same type of colour will co-ordinate too (not an exact match as my products, but they will work well together)

This is what I 'tested' when I made this card, I used Cosmic Shimmers' new Brilliant Sparkle Embossing Powder in Copper with my Precious Metals Copper Sparkle Texture Paste and PVA Glue... and I was pleasantly surprised :-)

I've never been a fan of glittery embossing powders in the past as I always found them a little too 'chunky' when used with my stamps, as they are too detailed, so gave up,.. until now!

These Brilliant Sparkle ones from Cosmic Shimmer are so fine, almost powder like, you wouldn't think they would be glittery, but they are :-)

On this card, I used a couple of my dies from my 'More Relatives' set from my 'From The Heart Collection' and embossed them with the Brilliant Sparkle Copper Embossing Powder,.. amazing! Love the finish and such a fab way to make your dies 'do more' for you :-)

It's the same technique as double embossing with detail embossing powder, only you only need to do it once with the brilliant sparkle powders,.. (push the die, face down, into your perfect medium pad, then sprinkle your embossing powder on and heat up... simple)

Coupled with my Copper Sparkle Texture Paste in the background, it's a fabulous colour match!

Here's what I used (as always, with links to the products on my www should you 'need' to treat yourself)
Peach Foundations Card (works great with copper tones)
Sentimentally Yours 'More Relatives' die set
Precious Metals Copper Sparkle Texture Paste by Phill Martin
Precious Metals Copper Pearl PVA Glue by Phill Martin
Cosmic Shimmer Brilliant Sparkle Embossing Powder - Copper
Tied Together Large Embossing Folder (sold out)
Grace dies by Sue Wilson
Orange Blossom Flowers Complete Petals dies by Sue Wilson
Beaded Swirl Flourish die by Sue Wilson
Self Adhesive Pearl Strips
Flowers Mask
(As always, I only use Cosmic Shimmer dries clear PVA glue, Perfect Medium pad and an anti static bag)


The Full Card


Close Up


I hope you like today's offering, if you haven't used my Sparkle Texture Paste, try it, as you know, I don't do messy crafting, so you know it's not too messy and teh results are fab!

Happy Crafting!


PS - Don't forget to 'like' my Facebook page and follow me on Twitter to keep in touch!

Wednesday, 20 July 2016

Brunswick Green - From Our Home To Yours

Hello Crafters

Today's post is a little later than usual as
a) I deleted the post after typing it all last night!
and
b) I've been at our Sheffield store today, doing one of my workshops (great day!!)

So, I wanted to show you this card, it was one of my demos on HOCHANDA, but a most unusual colour scheme for me and, I have to say, I absolutely love it!

I'm not a fan of greens, in the main (unless it's my Decadent Bamboo, Frosty Jade or Chic Moss!), so working with a darker green takes me a little out of my comfort zone,..but, I have to say, this Brunswick Green looks gorgeous with the soft tones of the Milk Foundation Card, even the snowflakes!

The gold embossing detail adds a little touch of luxury to this card, especially as I used my new snowflakes stamps and the whole colour scheme looks really rather classy (in my humble opinion ha ha)(I hope you agree!)

One of my absolute 'must have' sets of stamps, from any of my collections now, are the sentiment borders,.. I simply can't not have them now,.. So versatile, create beautiful banners, stamp around the card to create a frame, mask off and use certain parts,.. love them!
On this card, I created a banner (one of my fave ways to use them)

So, here's what I used (as always, with links to the products on my www should you 'need' to treat yourself)
Brunswick Green Foundations Card
Milk Foundations Card
Snowflakes Dies by Sue Wilson
Double Pierced Oval Dies by Sue Wilson
Sentimentally Yours Snowflakes Sentiment Borders Stamps
Sentimentally Yours Snowflake Icons Stamps
Sentimentally Yours Snowflakes Large Oval Frame Stamp
Snowflake Lattice Embossing Folder by Sue Wilson
Star Sprays Dies by Sue Wilson
Cosmic Shimmer Glitter Jewels - Glacier Ice
(As always, I only use Cosmic Shimmer dries clear PVA glue, Perfect Medium pad and an anti static bag)

The Full Card


Close Up Of The Detail


Anyhoo, just to answer a question I've been asked a few times, yes, I am absolutely happy for you to replicate any of my card designs,.. go for it! I'm flattered :-)

Hope you like today's project!

Happy Crafting!


PS - Don't forget to 'like' my Facebook page and follow me on Twitter to keep in touch!

Tuesday, 19 July 2016

Precious Metals Double Embossing - Just For You

Hello Crafters

I thought I'd share these cards with you today, where I have used the Lustre Embossing Powders from my latest Precious Metals Collection with Cosmic Shimmer.

I did post photos of these cards on my Facebook page, but I'm aware that not everyone 'does' Facebook, so I'm sharing here and, to be honest, I love these cards too ha ha

Double Embossing is one of my favourite techniques, it's a fabulous way to take a die cut sentiment (as I have), shape, flower, leaf or whatever and make it into something really special, they almost look like metal (or enamel, depending on which colour powder you use), what a great way to use all those scraps of card we have, but can't bear to throw away (you know what I mean!)

If you watch me on HOCHANDA, you will most likely have seen me demo this technique as I always try to get it in one or two of my shows for those who haven't seen it before..

In case you haven't seen me do this,.. it's the easiest thing in the world!
Just take your die cut, push it (face down) into your perfect medium pad (it's the best!) then sprinkle with your chosen embossing powder, heat up and repeat,.. twice is usually enough, but you can do three layers if you wish... (remember, all my embossing powders are lustre ones, so you get that gorgeous pearly sheen from them!)

I also used the Mica Powders in the respective colours to paint the centre of the orange blossom flowers (just use a water brush)

Here's what I used on all these cards (with links to the products on my www in case you 'need' to treat yourself,.. and why wouldn't you ha ha)
Swirling Hearts Embossing Folder by Sue Wilson
Sentimentally Yours Just For You die by Phill Martin
Coconut White Foundations Card
Innsbruck die by Sue Wilson (one of my all time faves!)
Fern Trio Leaves dies by Sue Wilson
Orange Blossom Complete Petals dies by Sue Wilson (another fave!)
Pearl PVA Glue, Pearl Ink Mister, Lustre Embossing Powder, Mica Powder
(in Copper, New Gold, Old Gold, Gunmetal, Titanium and Platinum)
Self Adhesive Pearl Strips by Creative Expressions
Self Adhesive Pearl Corners by Creative Expressions
Diamond Frost Fine Glitter by Creative Expressions (new)

And here is the card, the same card, but in all 6 colour ways,.. how different they all look to say it's the same card!

 Copper


Platinum


New Gold


Gunmetal


Old Gold


Titanium


I hope you like these cards, I loved making them, it's a great way to use those lustre embossing powders too and, as you know, I like co-ordination, so to have all these great products that co-ordinate, for me, is amazing!

Happy Crafting!


PS - Don't forget to 'like' my Facebook page and follow me on Twitter to keep in touch!

Monday, 18 July 2016

Giveaway Card - Merry Christmas in Rich Plum & Gold

Hello Crafters

It seems odd to be posting cards with snowflakes on when the weather is so gorgeous outside, but that's exactly what I'm doing :-)

It pays to be ahead, especially when Christmas is more than likely the special occasion we make the most cards for.. me?, well, as you know, I am rubbish at sending cards ha ha (just ask my family!), but, I do make alot :-)

So, here is one card that I will sign and send (well, get Carol or Karen to send once I've signed it ha ha)

This is the first giveaway card using my new Snowflakes Collection!

This combination of colours is absolutely gorgeous,.. this is the Rich Plum and Coconut White Foundations card with gold embossing powder,.. it's lush and the photo really doesn't do the colours justice!

Here is what I used (with links to the products on my www in case you 'need' to treat yourself)
Sydney Die by Sue Wilson
Snowflakes Dies by Sue Wilson
Star Sprays Dies by Sue Wilson (love these!!)
Snowflake Lattice Embossing Folder by Sue Wilson
Sentimentally Yours Snowflakes Sentiments Stamps
Sentimentally Yours Snowflake Icons Stamps
Rich Plum Foundations Card
Coconut White Foundations Card
Cosmic Shimmer Bright Gold Detail Embossing Powder
Cosmic Shimmer Glitter Jewels - Glacier Ice
(As always, I only use Cosmic Shimmer dries clear PVA glue, Perfect Medium pad and an anti static bag)

The Full Card


Close Up Of The Details

To be in with a chance of winning this card, simply leave a comment (lovely one, naturally ha ha) and I will choose a random name on Friday morning (22nd July).
You must be a follower of my blog (I'll check) and I will let the winner know on a new post on Friday morning :-)

Good Luck everyone!

Happy Crafting!

PS - Don't forget to 'like' my Facebook page and follow me on Twitter to keep in touch!


Sunday, 17 July 2016

New Look Blog and a Silver on White Snowflake Card...

Hello Crafters,

So, it's been an age since I last posted on my Blog so I thought, new look, more posts!

Hope you like how it looks, it took me 4 hours to get it right!

Lot's to tell you before I get on to the card, as you may or may not know, I opened my second Honeypot Crafts store in Sheffield in April this year (which is why I was busier than usual since February really), there was alot to do to get the shop right, decorating, buying new units and getting the look and feel right and, of course, stocking it with all our favourite crafty products too!

I couldn't have done it without my sister, Karen, who is managing this shop for me (thank you!)(and doing a grand job too!), I'm going to see if I can get her to do a post on here with before and after photos etc,..

We have been running workshops in the Sheffield store too (as well as my Nottingham one) so do have a look at the relevant tabs on my website if these would interest you :-)

I've updated the info on the side bars on the blog with my upcoming HOCHANDA shows, Craft Shows I will be exhibiting at and our Craftathons,

If you didn't catch the launch on HOCHANDA of my new 2016 Snowflakes collection, (it sold out!) I will be back with the rest of the collection on July 25th at 8pm (with two brand new paper pads too!)
I absolutely love these stamps, but I am biased as I love snowflake themes for Christmas cards :-)

Here's a quick link to my website for you to see the whole collection: Sentimentally Yours Snowflakes

This is one of my sample cards from the launch show (I did demo it too, but in gold and landscape, still looked gorgeous!)

This is what I used:- (with links to them on my www too)
Double Pierced Rectangle Dies by Sue Wilson
Snowflakes Dies by Sue Wilson
Frosty Swirls Embossing Folder by Sue Wilson
Sentimentally Yours Snowflake Sentiment Borders Stamps
Sentimentally Yours Snowflake Icons Stamps
Sentimentally Yours Large Rectangle Snowflake Frame Stamp
Cosmic Shimmer Glitter Jewels - Iced Snow
Cosmic Shimmer Detail Embossing Powder - Silver Shine
(As always, I only ever use Cosmic Shimmer dries clear PVA glue and Perfect Medium for embossing)

The Full Card
Close Up Of The Details
Anyhoo, I think I have rattled on for long enough!

I hope you like the new look blog and I hope you love my Snowflakes stamps as much as I do!

I will be posting again tomorrow, with a chance to win one of my sample cards from my Christmas shows :-)

Happy Crafting!

PS - Don't forget to 'like' my Facebook page and follow me on Twitter to keep in touch!


Friday, 6 May 2016

With Very Best Wishes - Showcasing 'From The Heart Dies'

Good Morning Everyone,

Thank you so much for your lovely comments,  messages and emails on my previous post.

I hope you are all ready to welcome Phill back onto our screens tonight at 8.00 and again tomorrow at

9.00 am, 12 noon, 4.00 pm and 7.00 pm

This is the first time showing on T.V. of  Phills 'From The Heart Dies' and also his new

Complete Cosmic Shimmer Precious Metals Collection.

These products are an absolute dream to work with, as we would expect nothing less from Phill.

Below is a card I have created using these products, which Phill will be demonstrating on the show,

I will post all the products used and step by step instructions on how to create this card during the weekend


Monday, 2 May 2016

Thank You So Much - Showcasing Phill's Complete Cosmic Shimmer Precious Metals Collection

Good Evening everyone,

I hope you are enjoying the Bank Holiday break.

We are busy preparing for Phill's Show............

YES He's back on our screens at HOCHANDA on FRIDAY 6th May at 8.00pm

Followed by more shows on SATURDAY  7th at 9.00 am,12 noon, 4.00pm  and 7.00pm

Phill will be bringing to you demonstrations of his From The Heart Collection Dies and also His

 Brand New Complete Cosmic Shimmer Precious Metals Collection

 These are absolutely stunning,  below is a sample I have made using his 'Copper' Precious Metals.

 I hope you like it, ( I will sneak another sample on before Friday)


Products used:- All of which can be found on Phill's website - www.honeypotcrafts.co.uk

Craft Card
White Foundation Card
Precious Metals Copper Gilding Wax
Precious Metals Copper Embossing Powder
Precious Metals Copper Pearl P.V.A.
Precious Metals Copper Twinkles
Precious Metals Copper Mister Spray
Phill Martin's From The Heart Collection Dies
Sue Wilson Dies Orange Blossom Complete Petals
Sue Wilson Dies Orange Blossom Open Petals
Sue Wilson Embossing Folder Swirling Hearts
Woodware Corner Punch
Cosmic Shimmer Acrylic Glue


This Is What I Did :-


Using Craft Card Stock I cut 2 pieces  8 x 6.5 and 6 x 5

Then using White Card Stock I cut 2 pieces 7.75 x 6.25 and 5.75 x 4.75

Next I used the Copper Gilding Wax and covered the 2 white pieces of card.

Once this was dry I buffed it up with a soft cloth, then embossed it using the Swirling Hearts Embossing Folder.

I then layered the 2 largest pieces flat and the 2 smallest pieces on pads.


Sentiment

I chose this sentiment using From The Heart Collection Dies.

After cutting it out I used Copper Embossing Powder and heat embossed it, then attached it to the card using pads to give dimension.


Finishing Touches

Using scraps of Craft Card I cut several flowers out.

Taking the Complete Petals I sprayed them with Copper Mister Spray.

Then I used Copper Embossing Powder on the Open Petals. I then shaped and layered these together, and attached to the card using small pads.

Finally I added Copper Twinkles to the edges of the closed petals and Copper P.V.A. to the stamen.

                                                 Happy Crafting


Wednesday, 6 April 2016

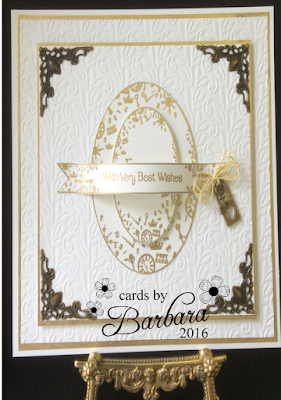
Cream and Gold Embossed Card - Featuring the New Timeless Collection Stamps (part 2)

Good  Evening Everyone

Thank you all for your lovely comments and messages on my previous post, its good to know you are enjoying replicating some of my posts,and that you gain inspiration from these. It makes it all worthwhile.

Today's card is one I particularly enjoyed making as it didn't  take too long and only used a few products, but I must say I was very pleased with the result.

All the products used to make this are listed below and are available on Phill's Website:-

www.honeypotcrafts.co.uk

Cream Card Stock
Timeless Collection Large Oval Frame Stamp Set
Timeless Collection Small Oval Frame Stamp Set
Timeless Collection Everyday Sentiment Banners A5
Bright Gold Embossing Powder
Bakers Twine
Sue Wilson Embossing Folder - Climbing Vines
Creative Expressions Art Deco Victorian & Decorative Metal  Corner Embellishments
Padlock & Key Metal Charms
Cosmic Shimmer Acrylic Glue
Perfect Medium


This is how I created the Card Front

Using Cream Card Stock I cut the layers as follows

1st layer 7.75 square
2nd layer 7.5 square
3rd layer 7.25 square
4th layer 6.25 square
5th layer 6" square

Next taking the 2nd and 4th layers I used Perfect Medium and Bright Gold Embossing Powder on the edges.

Then I used the Climbing Vines Embossing Folder on layers 3 & 5

I then attached all the layers together using Cosmic Shimmer Acrylic Glue.


Sentiment

Using the  Timeless Large Oval and Small Oval Stamps I stamped these onto cream card and heat embossed them using Bright Gold Embossing Powder.

I then chose the largest Banner the  'With Very Best Wishes' Sentiment and again heat embossed in gold.

After cutting these out I attached the Ovals to the card using pads to give dimension.

Then I shaped the 'Banner' and attached with Cosmic Shimmer glue.


Finishing Touches

 I made a quadruple bow using Bakers Twine and attached the Padlock and Key and finally I added the Art Deco Metal Corners using Cosmic Shimmer Glue.

This is now ready to attach to an 8 x 8 card blank.


                                                      Happy Crafting


Friday, 1 April 2016

Retirement Card in Cream & Craft Card - Featuring the New Timeless Collection Stamps

Good Morning Everyone,

Today's card is created using the New Timeless Stamps, I particularly used these stamps again to show how adaptable these are for male and female cards, plus the fact these are one of my favourite collections.

Products Used:- All of which are available on Phills website:-

www.honeypotcrafts.co.uk

Craft Card and Cream Card Stock
Timeless Everyday Corner Sentiment Stamps A5
Timeless Large Rectangle Frame Stamp A5
Timeless Everyday Sentiment Tags A5
Timeless Occasions Sentiment Stamps A5
Decadent Oak Pearl P.V.A. Glue
Cosmic Shimmer Acrylic Glue
Bakers Twine
Bright Gold Embossing Powder
Woodware Corner Punch
Sue Wilson Embossing Folder -  Tartan Trellis
Micro Beads
Double Sided Adhesive Sheets
Couture Creations Die - Keys To My Heart


This Is How I Created It

1st Layer -  Cream Card Cut to 7.75 Square
2nd Layer - Craft Card Cut to 7.5 Square
3rd Layer - Cream Card Cut to 7.25 Square

I embossed the 3rd layer using the Tartan Trellis Embossing Folder then attached all 3 layers together (flat) using Cosmic Shimmer Acrylic Glue.

Next I cut the panel as follows:-

Craft Card cut to 7.25 x 5.75 and cut the corners using the Woodware Corner Punch, and tied the Bakers Twine around the edges.

The next layer in Cream Card cut to 7 x 5.25

I then used Gold Embossing Powder and the Corner Sentiment Stamp and heat embossed this before embossing with the Tartan Trellis Embossing Folder.

I then attached the 2 panels to card using pads to give dimension.


Sentiment

Using Cream Card and the Large Timeless Rectangle Frame Stamp and the Everyday Sentiment Tag Stamp I heat embossed these in Bright Gold Embossing Powder and then cut them out.

I shaped the 'Tag' and attached with Cosmic Shimmer Glue and the Rectangle I attached on pads.


Finishing Touches

I cut the keys out in Cream Card, then using a double sided adhesive sheet, I added the Micro Beads, then attached to the top of the tag.

Finally I added a quadruple bow made from Bakers Twine  and Decadent Oak Pearl P.V.A. to the corners.

This is now ready to attach to an 8 x 8 Card Stock.

                                                    Happy Crafting