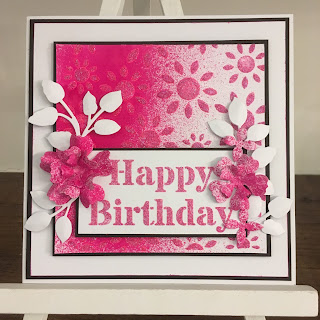
Here is a card made during our in-store workshops.
This card was made using Phill's new A5 Stencils with his gorgeous 'Carnival Colours' (texture paste, ink mister, colour cloud and gilding polish)
We also used Sue Wilson dies; Succulent Garden and Orange Blossom Leaves.
The colour on the main sample card is Tangy Tangerine and the stencils used are Grungy Dots and Birthday Sentiments. As always we've included examples made using the other Carnival Colours and stencils. (all these cards have been made by crafters at our workshops)
Stage 1 - Cut out the card layers needed for the card (and die cuts) in bright white and black foundation card. Although, we have done a square card these stencils work well with A5 cards too!
Card layers are:
- Base Card - 17cm x 17cm
- 1st layer in black - 16.5cm x 16.5cm
- 2nd layer in white - 16cm x 16cm
- 3rd layer in black - 13.5cm x 13.5cm
- 4th layer in white - 13cm x 13xm
- Banner black is 3cm x 12cm
- Banner white is 2.5cm x 12
Stage 2 - Ink Mist the smallest white layer (13cm x 13cm). To get this graduated look, we ink misted the card from the side. By turning the box on it's side and aiming the spray at the very front edge of the card only. It will not take long for this to dry, but if you want to speed it up use a heat tool!
Stage 3 - Texture Paste onto the Ink Mist layer. This needs time to dry, so best to leave for about 1 hour. Choose your A5 stencil and place over the Ink Mist layer about 3/4 way across from the heavy inked side. Hold in place with Scotch Removable Tape on all sides. Using a spatula apply the Sparkle Texture Paste through the stencil with long strokes until all the gaps are filled. Make sure you don't use lots of small strokes (like buttering bread) as this can cause the paste to seep under the gaps. Scrape off any excess paste and put back in tub.
Stage 4 - Texture Paste your Sentiment Banner. Choose your sentiment and then place stencil over banner layer and hold in place with Scotch Removable Tape as before. Make sure you tape over any exposed lettering of other sentiments. This really will not take much Sparkle Texture Paste.
Stage 5 - Colour your flowers! You can choose to colour your flowers with so many of the Carnival Colour products. On our main card the flowers have been coloured with Tangy Tangerine Colour Cloud and then Ink Misted with Precious Metals New Gold to add extra sparkle! We have also used the Tangy Tangerine Gilding Polish on some of the flowers for a lovely, pearly finish. Shape your flowers as you wish and then stick together.
Stage 5 - When all the layers are dry, you can start assembling your card. Use foam tape to left layers where you wish and add glitter jewels for extra bling!
The Full Card
Close Up
Here is what our crafter used, with links to the website......
- Sentimentally Yours A5 Stencils - Various
- Cosmic Shimmer Colours by Phill Martin - Carnival Colour Collection
- Sue Wilson Dies - Succulent Garden
- Sue Wilson Dies - Orange Blossom Leaves
- Foundations Card - Bright White
- Foundations Card - Black
- Palette Knife
- Scotch Removable Tape
- Cosmic Shimmer PVA Glue
- Dovecraft Foam Tape
- Creative Expressions Black Pearls
Other colour samples.....
 |
| Lime Burst and Floraganxa stencil |
 |
| Purple Paradise and Star Grid stencil |
 |
| Lush Pink and Floraganza stencil |
 |
| Sunshine Yellow and Barcodes stencil |
 |
| Electric Blue and Doodle Hearts stencil |
 |
| A5 Portrait in Sunshine Yellow and Butterfly Cascade stencil |
Remember - we are more than happy for you to replicate our cards in your own style! :-)
Happy Crafting!
PS - Don't forget to 'like' Phill's Facebook page and follow him on Twitter to keep in touch, you can also find him on Pinterest and Instagram for ideas and inspiration :-)
(Links below)
Facebook: Twitter: Pinterest: Instagram: Honeypot Crafts (my website): You Tube Channel


No comments:
Post a Comment