What's New

My Brand New Sentimentally Yours 2017 Xmas Stencils are now available at www.honeypotcrafts.co.uk!
Showing posts with label Twinkles. Show all posts

Monday, 25 January 2016

Decadent Oak - Showcasing the New Mini Baroque Stamps

Good Morning Everyone,

 I hope you have all had a 'Good Crafty Weekend'

On with today's card which is a smaller and relatively easier one.

All the product used to create this card are available on Phill's Website:-

www.honeypotcrafts.co.uk

This is what I used:-

Cream Card Stock
Decadent Oak Colour Cloud Blending Ink
Decadent Oak P.V.A.
Decadent Oak Twinkles
Decadent Damask Premium Paper Pad
Sentimentally Yours Mini Baroque Inspirational Stamps A5
Glacier Ice Glitter Jewels
Sue Wilson Noble Dies - Classic Adorned Rectangles
Sue Wilson Perfect Peony Complete Petals
Sue Wilson Laurel Leaves


This is how I created it:-

I cut the card shape using the largest die.

Then using cream card stock and  the 2 largest dies I cut out the frame. Then edges it with Decadent Oak Colour Cloud before removing from the die.

This was then attached to the card using pads to give dimension.

Next I cut the filigree die and again edged in oak , which I then layered on to a piece of Decadent Oak ( plain side) from the paper pad, then inserted this flat inside the frame.


Sentiment 

Using the largest of the two oval dies and Cream Card Stock, I cut this out and used the Mini Baroque Inspiration Stamp, and Decadent Oak Colour Cloud Blending Ink.

I then attached this to the centre of the card using pads, and added Decadent Oak P.V.A. Pearls around the edge.


 Finishing Touches

I cut several flowers out from the Peony Die and inked the petals with Decadent Oak before removing them from the dies.
I then shaped and glued together before attaching to the card.

Once attached to the card I edged the tips of the petals with Glacier Ice Glitter Jewels and added Oak Twinkles to the centres.

Finally I cut the leaves out and once again coloured these with Colour Cloud before removing from the die, then attached to the card.

                                                              Happy Crafting
      

Wednesday, 20 January 2016

Craft Card and Cream - On Your Special Day

Good Morning Everyone

I hope you are all managing to stay warm on this very cold morning, and what better way to stay nice
and warm but to lock myself away in my craft room and do what I enjoy most........ crafting

So on with today's card.......

All the product I used can be found on Phill's Website:-

www.honeypotcrafts.co.uk


This is what I used:-

8 x 8 Craft Card Blank
Cream Card Stock
Mink Colour Cloud
Mink Pearl P.V.A.
Mink Twinkles
Ancient Copper Embossing Powder
Sentimentally Yours Chic Floral Anniversary Stamps
Sentimentally Yours Bracket Everyday Sentiment Stamps
Glacier Ice Glitter Jewels
Sue Wilson Dies - Caribbean Border, Accents and Tags
Sue Wilson Dies - Caribbean Collection St. Lucia
Cosmic Shimmer Glue
Shimmer Glue


I used a Craft Card Blank 8 x 8 and cut the first layer in cream card stock to 7.75 square and attached flat to the card using Cosmic Shimmer Glue.

The next three layer are as follows:-

Craft Card cut to 7" square
Cream Card cut to 6.75 square
Craft Card cut to 6.25 Square
and attach all these flat to the card.

Next I cut a piece of Cream Card to 6" square and created the background by using the roses stamp from the Chic Floral Anniversary Stamps, and Mink Colour Cloud.

Then attached once again flat to the card.


Using the Caribbean Border Die I cut three strips out and backed them onto Cream Card Stock (gluing down one edge only)

These were then attached to the card and curled at the edges.


Sentiment

Using Cream Card Stock I cut out the Caribbean St Lucia Die .
Then using  The Bracket Everyday Stamp I embossed this with  Ancient Copper Embossing Powder and attached both layers using pads to give dimension.

Finishing Touches

Next I added Glacier Ice to the edges of the border dies and the back of the sentiment.
Finally I added Mink P.V.A. Pearls to the top sentiment.


Monday, 14 December 2015

Ultimate Baroque Collection - Have A Wonderful Birthday

Good Morning Everyone.

Another day closer to Christmas, so for those of you who have completed their cards I thought we would have a change and do a Birthday Card.

Today's card I created in Black & Cream. All the products I used can be found on Phill's Website -

www.honeypotcrafts.co.uk

This is what I used:-

Black Card Stock
Cream Card Stock
Sentimentally Yours Baroque Border Sentiment A5 Stamp Set
Sue Wilson Noble Dies - Ornate Pierced Rectangles
Sue Wilson Dies Laurel Leaves
Sue Wilson Dies Peony
Creative Expression Pearl Strips
Black Soot Distress Ink
Cosmic Shimmer Acrylic Glue


Using Black Card Stock I cut the shape of the card using the largest of the Pierced Rectangle Dies.

Then using the next 2 sizes down and Cream Card Stock I cut these out and attached to the main card (flat) using Cosmic Shimmer Glue.


Sentiment

Using Cream Card Stock and the smallest plain die I cut this out.

I then stamped across the centre using the Baroque Strip from the Border Sentiment Stamps and Black Soot Distress Ink.

Next I chose 'Have A Wonderful Birthday' from the Baroque Border Sentiments and stamped this again using Black Soot Distress Ink.
I attached to the card using pads to give dimension, then decorated the edges with Twinkles


Finishing Touches

I cut several flowers using The Complete Peony Dies and alternating with Black & Cream Card.

I then cut the Laurel Leaves using Cream Card, then while these were still in the die I used Black Soot Distress Ink to colour the leaves.

I then shaped these and attached to the card.
Finally I added Pearls around the edges of the Black Card and also the Cream layer, not forgetting the centre of each flower.

                                 Happy crafting


Monday, 2 November 2015

A Special Birthday Wish in Chic Aubergine (and a Giveaway Card)

Good Afternoon Everyone

Fog,.. perfect excuse to stay in my craft room all day! :-)
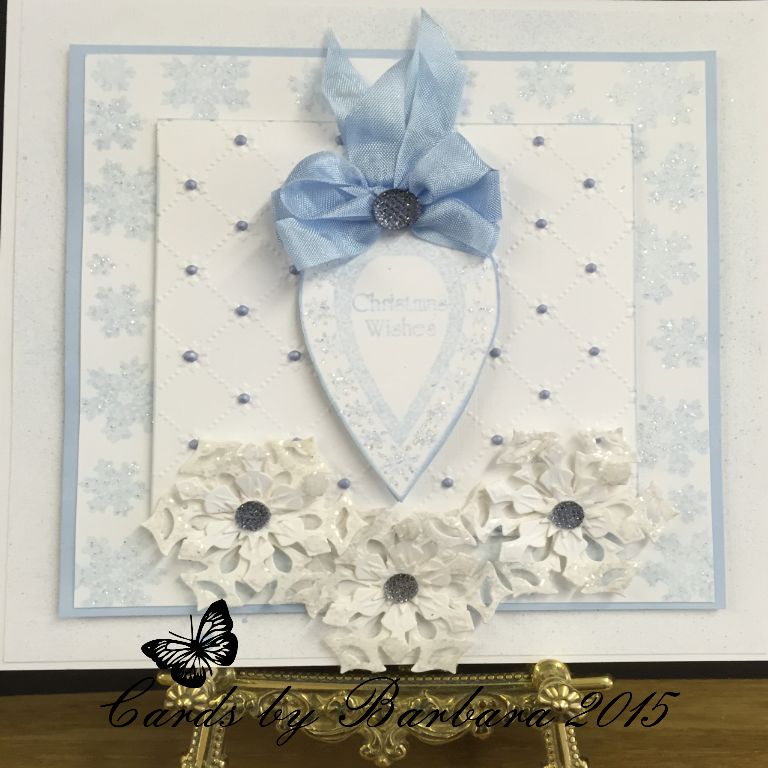
So, I'm taking the time to add a few more posts to the Blog, featuring some of the cards from my last shows on Hochanda and this is one of my favourites!
I absolutely love Chic Aubergine,.. it's a beautiful, rich, elegant colour that works so well on both white and cream cardstock...
You can be in with a chance of winning the card I made on air in Chic Magenta, over on my Facebook Page,.. you have until Friday :-)

Now, I did notice a few of you leave comments on my Blog that you're not on Facebook, so I will do a little giveaway card on here for you too :-) (details at the bottom of this post)

So,..

Here's what I used:
Foundations Milk Cardstock
Chic Aubergine Ink Mister, Twinkles and Pearl PVA Glue
Dies by Sue Wilson, Portuguese Collection, Lisbon and Corner, Border, Tag Set
Dies by Sue Wilson Camellia Complete Petals
Dies by Sue Wilson Curled Vines
Cosmic Shimmer Glacier Ice (shocked you that didn't it ha ha)
Sentimentally Yours Scribbled Sentiments Stamps
Creative Expressions Crystal Corner Embellishments
Creative Expressions Wild Roses A4 Embossing Folder

Here's what I did:
I cut all my layers from the Milk Cardstock, these were, 23.5 x 17.5cm, 23 x 17cm, 22.5 x 16.5cm and a 2.5 x 18cm strip for the sentiment.
I then did all the die cutting, which was the base layer, base and largest lacy layer of the Lisbon dies, the tag from the Corner, Border & Tag set, 7 Camellia flowers and two Curled Vines.
The base layer of the card was ink misted with the Chic Aubergine Ink Mister, as were the Camellia flowers and the base layer of the Lisbon dies. These were then set to one side to dry properly (only takes about 5 minutes, depends how heavy handed you are with the ink mister)


The smallest of the card layers was then embossed with the beautiful Wild Roses embossing folder (love this one, so pretty!)
Now the ink misted pieces were dry, I stuck the lacy part of the Lisbon die to the ink misted base with CS Glue, then went around the edges with my Chic Aubergine Twinkles and dunked it in my Glacier Ice Glitter Jewels. I then did the same to the tag die cut and stuck that on with foam tape, finishing by adding two drops of the Chic Aubergine Pearl PVA Glue to create two faux pearls in the perfect colour!

I then added a big blob of  Chic Aubergine Twinkles to the centre of the Camellia flowers and also dunked these into the Glacier Ice (note that I haven't shaped the petals of these flowers, just bent them up,.. this gives more dimension, particularly when you stick them to your card with CS Glue as it dries quicker)

I then stamped my Scribbled Sentiment and, as always, I used my Black Soot distress ink pad, I then shaped the end to create the tag effect, then applied Chic Aubergine Twinkles all the way around and dunked it into my Glacier Ice (so love this effect!)

Once everything was dry, I stuck all the base layers together with CS Glue, then added the Lisbon topper with foam tape, the sentiment was shaped, to create a curve, this was stuck with CS Glue, but just on the two points that make contact with the card, I finished off by adding the flowers and leaves as shown, then added the lovely Crystal Corners to 'frame' the whole card.. simple!

And here's the finished card :-)


As always, everything I have used is available on my website at www.honeypotcrafts.co.uk, but I do know the Scribbled Sentiments Stamps and Crystal Corners (and indeed the pearl ones) are very low in stock..

Anyhoo, as promised, here's the card I created on air on one of my Hochanda shows and this one is for my Bloggers to win,.. to be in with a chance of winning, simply leave a comment on this post and make sure you are following my Blog (you must be a follower to be able to win) (you can also share my blog address all over t'internet too if you want :-)
I will select a name, randomly, from the comments list this Friday (6th November)... Good Luck!


Until tomorrow,... Happy Crafting!

Wednesday, 28 October 2015

Petite Scribbled Sentiments in Chic Moss

Good Morning Everyone

I've had a thoroughly good time at Hochanda over the last few days and I'm so pleased you are all loving my new Petite Scribbled Sentiments and the new Scribbled Birthday Verses,.. I do too! (albeit I am biased ha ha)

Thanks too for all the lovely comments on my Facebook Page and Twitter, I really do appreciate it :-)

So, you have some Blog posts from lil ole me this week and I will be giving away the cards I made as demo's on air (the last lot are signed and ready to go now)
I'll do seperate posts for the cards I'm giving away so keep an eye on the Blog and my Facebook Page..

Anyhoo, here's my first sample,.. in Chic Moss, which I absolutely love!

What I used:
Phill Martin for Cosmic Shimmer Chic Moss Ink Mister, Gilding Wax & Twinkles
Dies by Sue Wilson, Portuguese Collection, Lisbon, Corner, Border & Tag, Curled Vines and Camellia Compete Petals
Cosmic Shimmer Glitter Jewels, Glacier Ice
White Cardstock
Creative Expressions Bed of Roses A4 Embossing Folder

What I did:

I cut all my layers in white cardstock, these were 23cm x 18cm, 22.5cm x 17.5cm, 22cm x 17cm and finally 14cm x 17cm (centre panel)
I then cut out my Lisbon dies in white card making sure I cut the largest die on it's own, then the three largest together, then the tag from the corner, border and tag set (including an extra one of the smallest for my sentiment), two borders and four curled vines.

The middle base layer, largest of the Lisbon die cuts and the tag were all then ink misted using my Chic Moss ink mister and put to one side to dry.

I embossed the smallest of the base layers and the inner die cut from the Lisbon set using the beautiful Bed of Roses embossing folder (I used the reverse or debossed side on this card as it's just as pretty as the embossed side)


I then cut 14 of the fabulous Camellia (Camilla ha ha) flowers in the same white cardstock, you'll notice that I haven't layered these flowers up either, I love them just simply shaped and left as individual flowers!
I used the Chic Moss Gilding Wax in the centre of each flower, not paying particular attention to this, simply a good application in a circle, I then let this dry for a minute or two, then buffed the gilding wax with a tumble dryer sheet (this also gets rid of any hard edges), I then shaped them slightly with my ball tool from underneath, applied a good blob of Chic Moss Twinkles and covered this with Glacier Ice Glitter Jewels (have you tried this yet?, looks amazing over the top of Twinkles)
I then stamped the bootiful Petite Scribbled Sentiment in Black Soot distress ink and edged this with Cosmic Shimmer Glue and applied Glacier Ice to this too.


The four curled vines and the centre die cut were also given the glacier ice treatment,.. just make sure you don't cover the whole of the curled vines with glue and glacier ice,.. I do it in loosely random spots to add more interest.. it makes them too 'heavy' if you cover them.

Now my ink misted layers were dry, so I started assembling the card.. so, the three base layers were all flat, the die cut borders were stuck onto the small ink misted layer, just on the edge and the edge of those given the glacier ice treatment, this 'panel' was then stuck on with foam tape in the centre of the card. The ink misted part of the Lisbon die cuts was stuck to the base layer and this was stuck onto the centre panel with foam tape, as were the extra layers of the die cuts, finishing with the sentiment on top.

The flowers and curled vines were all stuck on with Cosmic Shimmer glue around the centre to create a 'frame'.


The finished card:


And there we have it,.. doesn't take long to make this card really,..in fact, it's probably one of my quicker ones!
The card I replicated on air was in Chic Viola (another really pretty colour) and this will be the first of my give aways on my Facebook Page later today.

As always, you can find everything I've used on my TV Shows over at my website by clicking here: www.honeypotcrafts.co.uk  

Until tomorrow.... Happy Crafting!


Friday, 23 October 2015

Graceful Blue - Just for You

Good Morning Everyone,

A very busy weekend ahead for Phill and myself, we are preparing samples, demo's etc for

HOCHANDA T.V. on MONDAY at 8.00 pm - followed by 4 shows on Tuesday where you will see

Phill doing his demo's at 9.00 am, 12.00 noon, 4.00 pm and 7.00 pm


I hope you like today's card.

All the products used to create this can be found on Phill's Website - www.honeypotcrafts.co.uk

8 x 8 Card Blank
White Card Stock
Sentimentally Yours Bracket Collection Everyday Stamps
Graceful Butterfly and Dragonfly Paper Pad
Graceful Blue Colour Cloud Blending Ink
Graceful Blue Ink Mister Spray
Graceful Blue Twinkles
Graceful Blue Mica Powder
Sue Wilson Dies- Peony
Sue Wilson Dies - Curled Vines
Sue Wilson Dies Noble - Ornate Pierced Rectangles
Sue Wilson Greek Island Collection - Rhodes
Creative Expressions Adhesive Pearl Strips

This is how I made it :-

8 x 8 Card Blank
White Card Stock cut to 7.75 sq
Graceful Blue Paper cut to 7.5 sq
I then attached these layers flat to the main card.

Next using the largest of the Noble Dies I cut this out using White Card Stock and attached to the card using pads to give dimension.

Using the next 2 smaller dies I cut these out - again using white card stock. I then used Blue Mister Spray on the plain piece, and once dried I attached both layers flat to the card.


Sentiment

I used the 2 largest Dies from the Greek Island Rhodes and cut these out in plain white card stock.
I stamped the Sentiment using Graceful Blue Colour Cloud Blending Ink.

Then I mixed a paste using Graceful Blue Mica Powder together with Graceful Blue Mister Spray, and coloured the edges of the Sentiment, and attached to the centre using pads


Finishing Touches

Using a sheet of white card stock I sprayed this with Graceful Blue Mister Spray and then cut several flowers out, shaped, and attached to the card. I then added Twinkles to the centres, before adding the leaves.

Finally I used Self Adhesive Pearl Strips around the edges of the rectangles.


                                                     www.honeypotcrafts.co.uk  


Wednesday, 21 October 2015

Graceful Mint - Happy Anniversary

Good Morning Everyone

Not a very nice day here in Nottingham, but we have to make the most of it and 'Carry On Crafting'

Today's card is one I created using  Graceful Mint - I hope you like it.

Products Used:- Which can all be found on Phill's Website - www.honeypotcrafts.co.uk

8 x 8 Cream Card Blank
Cream Card Stock
Graceful Butterfly & Dragonfly Paper Pad
Graceful Mint Twinkles
Graceful Mint P.V.A.
Graceful Mint Mister Spray
Sentimentally Yours Bracket Everyday Sentiments A5 Stamps
Tartan Trellis Embossing Folder
Sue Wilson Dies - Petite Vinery
Sue Wilson New York Collection - Madison Square
Spellbinder Blooms
Spellbinder Bracket Borders 2
Spellbinder Flutters
Cosmic Shimmer Glue
Silver Embossing Powder

This is how I made it:-
8 x 8 Card Blank

1st layer -  Graceful Mint Paper cut to 7.75 sq

2nd layer - Cream Card Stock cut to 7.5 sq which I sprayed with Mint Mister Spray and then embossed using the Tartan Trellis Embossing Folder.

I then attached both layers flat to the card.

Using a sheet of Cream Card Stock and 2 Bracket Dies.
I lined these up each side and cut each one separate.
I then backed this with Mint Paper and attached to the card using pads to give dimension.


Sentiment 

Using the Madison Square Die I cut out in Cream Card stock and backed with Graceful Mint Paper. I then cut the centre square out and using the Everyday Sentiment I heat embossed using Silver Embossing Powder, then attached all these to the card using pads.


Flowers

Using Spellbinders Blooms 3 I cut out 2 sets using Cream Card offcuts and Graceful Mint Paper, then attached to the card, and also added the leaves.

Final Touches 

I used Cosmic Shimmer Glue on the petals and leaves, then sprinkled with Glacier Ice and added a dazzler to the centres.

Next I added Graceful Mint Twinkles to the edges of the large centre die cut and Graceful Mint P.V.A. to the outer edge of the sentiment square.

Finally I cut the butterfly out in Graceful Mint Paper and sprinkled the wings with Glacier Ice.

                                                                    Happy Crafting
www.honeypotcrafts.co.uk


Tuesday, 20 October 2015

Graceful Peach - By Barb - Just For You

Good Morning Everyone,

Once again thank you so much for your lovely comments on my previous post.

Today's card is one I created using the Lovely Graceful Peach products all of which can be found on Phill's Website:-

www.honeypotcrafts.co.uk

Products Used:-

8 x 8 White Card Blank
White Card Stock
Graceful Butterfly & Dragonfly Paper Pad
Graceful Peach Twinkles
Graceful Peach P.V.A.
Graceful Peach Mica Powder
Sentimentally Yours Bracket Everyday Sentiment Stamps
Sue Wilson Noble Dies - Classic Adorned Squares
Sue Wilson Peony Dies
Sue Wilson Petite Vinery
Embossing Folder Leafy Montage
Glamour Dust
Dazzlers
Perfect Medium
Black Soot Distress Ink

This is how I made it:-

8 x 8 Card Blank
First I embossed the front of the card using the Leafy Montage Embossing Folder. Then I used Perfect Medium and Peach Mica Powder to create the background.

Next I cut a 7 x 7 Sq from the Peach Dragonfly Paper Pad and attached flat to the card.

Using Plain White Card Stock and the Adorned Square Dies I cut this out and attached to the centre of the card using pads to give dimension.

Then using the 2 inner dies I again cut out using White Card Stock and then backed it with Plain Peach from the pad, and attached again with pads.


Sentiment

Using The Bracket Everyday Sentiment Stamp I masked the brackets off and stamped with Black Soot Distress Ink. Then cut this out with a separate die before attaching to the card using pads.


Finishing Touches

Using Offcuts of paper left from the paper pad I cut out several flowers and leaves and attached to the card, than added dazzlers to the centre of the flowers.

I used Glamour Dust to the centre of the
Adorned Squares, and Peach Twinkles around the edges.

Finally I cut out the Dragon Fly and added glamour dust to the wings and Peach P.V.A. Pearls to the tail.

                  Happy Crafting

                                                                          www.honeypotcrafts.co.uk


Thursday, 15 October 2015

Graceful Pink and White - Just For You

Good Morning Everyone,

A cloudy day is forecast for Nottingham today, so it looks like another craft room day for me, can't complain about that though can I ?

Your comments on the card I posted yesterday were absolutely lovely, I really appreciate you all taking the time to comment.

Today's card is another 8 x 8 but works really well on smaller cards too.


Products I used:- which can all be found on Phill's website :- www.honeypotcrafts.co.uk

8 x 8 White Card Blanks
White Card Stock
Graceful Butterfly & Dragonfly Paper Pads
Graceful Pink Mister Spray
Graceful Pink Twinkles
Graceful Pink P.V.A
Sentimentally Yours Bracket Stamps
Spellbinder Dies Bracket Borders 2
Spellbinder dies Blooms 3
Sue Wilson Petite Vinery Dies
Sue Wilson New York Collection Dies - Herald Square
Sue Wilson Embossing Folder - Leafy Montage

Here's what I did:-

8 x 8 Card Blank
I then cut a sheet from the Graceful Pink to 7.75 sq and attached to the main card.

Next I cut a piece of Plain White Card Stock to 7.5 sq and sprayed this using Graceful Pink Mister Spray. Once this was dry (only a couple of minutes) I embossed it using the Leafy Montage Embossing Folder.Then attached flat to the card.


Using Plain White Card Stock and a Bracket Border Die
I cut this 4 times lining up each time to create the fancy rectangle. I then attached this flat to the card,


For the centre feature I used the New York Collection - Herald Square die and cut this out in white card stock and backed it with a piece of scrap pink paper from the paper pad.

Then I cut the square from the small die and using a stamp from the Bracket Everyday Sentiments I heat embossed using Silver Embossing Powder.
I then attached all of these using pads to give dimension.


Finishing Touches

Using Spellbinder Blooms Three I cut several flowers, to which I shaped and attached to the card, then added the leaves using the Petite Vinery Die.

Finally using Graceful Pink P.V.A. I added the pearls around the edge of the Bracket  Rectangle and around the edge of the sentiment.

I then added Graceful Pink Twinkles to the edge of the petals and also to the centre of the flowers.


                                                          Happy Crafting

www.honeypotcrafts.co.uk


Wednesday, 23 September 2015

Royal Purple and White - Special Birthday Wish


Good Morning Everyone,

Phill is busy at Creative Expressions HQ today so I am doing today's blog. I hope you like it.

Products used: (which are all links to Phill's website) :-)

8 x 8 Card Blank
White Card stock
Centura Pearl Royal  Purple  Card Stock 
Dusty Concord Distress Ink
Frosty Heather Twinkles
Frosty Heather P.V.A.
Sentimentally Yours Scribbled Sentiments
Sentimentally Yours Elegant Milestone Birthday A5 Stamp Set
Spellbinder Dies Labels 47
Sue Wilson Dies Caribbean Collection Border, Accent & Tags
Sue Wilson Dies Perfect Peony Complete Petals
Sue Wilson Dies Perfect Peony Open Petals
Sue Wilson Dies Petite Vinery
Spellbinder Die D-Lites Flutter Flight
Cosmic Shimmer Acrylic Glue


To create this card I cut a 7.75 sq piece of Royal Purple Card and attached flat to the main card blank.

Next using Plain White Card Stock I cut a 7.5 sq and using the Accent Die I cut each corner.

Then using the Sentimentally Yours Scribbles Sentiments and Dusty Concord Distress Ink I stamped across the top . Then attached flat to the card,.


Using Plain White card Stock and Spellbinder Labels 47 I cut out the largest die and backed this onto a piece of Royal Purple card,

Then using the Elegant Milestone Birthday Stamps and Dusty Concord Distress Ink I stamped the sentiment and attached this to the card using pads to give dimension.

Next using both Complete and Open Petals of the Peony Dies I cut out several of these in scraps of lilac card, which I shaped and glued to the card using Cosmic Shimmer Acrylic Glue. I then cut out 2 of the Petite Vinery Dies using scrap pieces of white card, and attached to the card.

I then cut out the butterfly and attached to the card.

Finally I added Frosty Heather Twinkle to the wings of the Butterfly, and Frosty Heather Pearl P.V.A. to the centre of the flowers.

                                                               Happy Crafting


Monday, 21 September 2015

Frosty Sky - Christmas Wishes

Good Morning Everyone,

Thanks you all for your lovely comments on my previous post .

I hope all  who went To Ally Pally at the weekend had a wonderful time, and got the chance to meet Phill.

Today's card : 8 x 8 Christmas Card in Frosty Sky.

Products used ( which are all links to Phill's website) :-)

8 x 8 Card Blanks
White Card Stock
Frosty Sky Mister Spray
Frosty Sky Colour Cloud Ink
Frosty Sky Twinkles
Frosty Sky P.V.A. Glue
Sentimentally Yours Christmas Stamps - Bauble Opulence Collection
Spell Binder Dies Create-a-Flake Three
Seam Binding
Glacier Ice Glitter Jewels
Dazzlers
Sue Wilson Snowflake Lattice Embossing Folder


To create this card first  I cut a 7.75 sq from  A4 White Card Stock and used Frosty Sky Mister Spray. Once this was dry (a couple of minutes) I attached to main card blank, using Cosmic Shimmer Glue.

Next I cut a piece of White Card Stock to 6.75 sq and edged it with Frosty Sky Colour Cloud Blending Ink, and again attached flat to card.

The next layer I cut to 6.5 sq and using the Snowflakes from the Bauble Opulence Collection Stamps I created the background using Frosty Sky, then attached flat to the card.


 Next I cut a piece of white card stock to 5.5 sq and embossed it with the Snowflake Lattice Embossing Folder
and attached this to the card using pads.

Using the Bauble Opulence Collection Stamps I stamped 2 baubles using Frosty Sky Colour Cloud Blending Ink. Then stamped the Sentiment in the centre of the bauble. Once these were dry I cut them out and glued back to back, inserting a very narrow strip of acetate to the top and attached to the card.


Using the  Spellbinder Create -a -Flake Three I cut several of these out and shaped these,glued together and attached to the card.


Finishing Touches

Once all this was assembled I used Frosty Sky P.V.A. Glue to add pearls to the Snowflake Lattice. Then I used Glacier Ice Glitter Jewels to the tips of the snowflakes and also to snowflake background and snowflakes on the bauble.

I then added Frosty Sky Twinkles around the edge of the bauble.

Using Seam Binding, I made a triple bow and tails to add to the top of the bauble.

Finally I added Dazzlers to the centre of the snowflakes and also the centre of the bow.

                                       
                                                                   Happy Crafting


Friday, 11 September 2015

Graceful Lilac featuring Sentimentally Yours Inspirational Stamps

Good Morning Everyone

Another lovely day is forecast for us here in Nottingham.

Today's card is created using Graceful Lilac which is one of my favourite colours, I hope you like it too.

Products used:- ( which are also links to Phill's website) :-)

8 x 8 Card Blank
Graceful Butterflies and Dragonflies Paper Pad
Plain White Card Stock
Purple Card Stock
Sentimentally Yours Inspirational Quotes Stamps A5
Graceful Lilac Twinkles
Graceful Lilac P.V.A.
Sue Wilson Dies - Curled Vines
Sue Wilson Dies - French Collection - Provence
Sue Wilson Dies - Delicate Daisies Full Petals
Sue Wilson Dies - Delicate Daisies Open Petals
Embossing Folder Climbing Vines
Dusty Concord Distress Ink
Spell Binder Dragonfly Die


8 x 8 Card Blank
I used a sheet of the Graceful Lilac Dragonfly Paper and cut it to 7.75 sq. and attached flat to the main card

I then cut a 6" sq from the White Card Stock and embossed this using Climbing Vines Embossing Folder, then attached to the card using pads.

Next I cut a 5.5 sq from the Graceful Dragonfly Paper Pad and attached flat to card.


Sentiment:


Using the second largest die I cut out using Plain Purple Card Stock and attached to the card using pads.

Then using the next 2 sizes of dies I cut out using White Card Stock and a sentiment from the Inspirational Quotes using Dusty Concord Distress Ink. I then attached to the card using pads.


Flowers


Using both the Open Petals and the Full Petals I cut several of these using up scraps of Graceful Lilac paper from the pad ( nothing goes to waste).
Then cut out 4 Curled Vines and attached all of these to the card.

I then cut out the Dragonfly using White Card Stock and Purple Card Stock, and attached to card.


Finishing Touches:

I added Graceful Lilac Twinkles around the edge of the Sentiment, and also on the wings of the dragonfly.
Then P.V.A. pearls to the centre of the flowers and also top right corner of the card and bottom left.

                                                                            Happy Crafting


Thursday, 10 September 2015

Graceful Pink - Just For You

Good Morning Everyone,

Another lovely day is forecast, I do hope the weatherman is right.

Once again thank you to everyone for your lovely emails and comments, its nice to know I give inspiration to lots of you, but then I am privileged to have one of the best teachers in the crafting world. :-)

On with today's card:-

Products used ( which are links to Phill's website) :-)

8 x 8 Card Blank
Plain White Card Stock
 Butterflies -in-flight Background Stamp
Graceful Butterflies and Dragonflies Paper Pad
Graceful Pink P.V.A.
Graceful Pink Twinkles
Graceful Pink Mica Powder
Stickles
Baroque Sentiments Collection A5 Stamps
Sue Wilson Dies Spanish - Cordoba
Sue Wilson Dies Petite Vinery
Spell Binder Dies Enchanted Labels Twenty Eight
Spell Binder Dies Bloom Four
Small Dazzlers


8 x 8 Card Blank
1st layer White Card Stock cut to 7.75 sq,
I pierced around the edge and then attached flat to the card blank.

Next layer I cut a piece of White Card stock  to 6,75 sq then using the Graceful Pink Mica Powder and the Butterflies in Flight Background Stamp I created the background.


Sentiment :-   

Using the outer Cordoba Die I cut out a Plain White and a Graceful Pink, then layered these together and attached to the card using pads.

Using the middle die from Labels Twenty Eight I cut this out in Plain White and attached to the card again using pads.

Then using a Spell Binder Die ( the name escapes me at the moment, but I will post later) I cut out and stamped the Sentiments from the Baroque Sentiment Collection and attached to the card using pads.


To create the flowers I cut out 8 using the two smallest dies and scraps of paper from the graceful pink, moulded and curled the petals then glued together.

Next I cut out 2 fronds using Petite Vinery and attached all these to the card.
  
Finishing Touches   

Using Graceful Pink P.V.A.   added pearls to the centre middle die and Graceful Pink Twinkles around the sentiment. I then added a small Dazzler to each flower and finally added Stickles to the petals.

                                                                                  Happy Crafting