What's New

My Brand New Sentimentally Yours 2017 Xmas Stencils are now available at www.honeypotcrafts.co.uk!
Showing posts with label Baroque Sentiments. Show all posts

Wednesday, 18 January 2017

Baroque Collection - Distress Ink with Embossing Folder


Hello crafters!

Here is a 7x7 card made at our workshops recently.

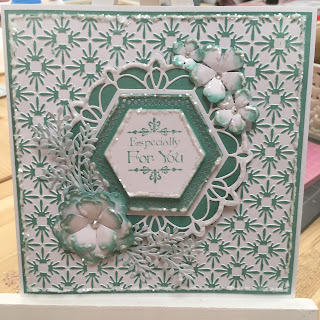
This card is a sample made using the Sentimentally Yours 'Baroque Stamp Collection', Sue Wilson Pacific Ocean Die 'Bora Bora' and Distress Inks with Embossing Folders.

The colour we have used on the main sample card is peeled paint, but as always we have included other samples made with different colours.

Stage 1 - cut out all the die cuts shapes needed for the card.  Here we have used 'Bora Bora' for the main centre piece, Perfect Peony Complete Petals and Delicate Fronds.

Stage 2 - cut out the layers needed for the card.  For the embossed layer we used a piece of card larger than needed and trimmed it down after to make sure it was the correct size.  We did this as we used the Gemini Machine to ensure we got a really deep embossed finish, as we wanted to ink over the pattern.  If we had cut the layer the correct size to start with, sometimes it can shrink when put through an embossing machine.

Stage 3 - we inked all the layers and die cut shapes using distress inks and smoothies.  Remember, you only need to colour the bits you will actually see; so don't colour all the card and save time!  It's worth practising with the distress inks first to gauge how much colour you want to add.  You can always add more, but you cannot take away!

Stage 4 - we used a 'Speedball Brayer' to apply the distress inks over the embossing folder pattern.  Load up the brayer with a good amount of ink and then lightly roll over the raised embossed pattern.  You will need to apply the ink a few times and in different directions to get an even coverage.

Stage 5 -  stamp your chosen Sentiment; here we have used 'Baroque Mini Sentiments'.  Then shape your flowers, assemble all the layers and add some bling!

Here is the list of what we used with links to the www:


The Full Card


Close Up


Close Up


Different Colour Samples


Peacock Feathers

Squeezed Lemonade

Iced Spruce

Victorian Velvet

Remember -We are more than happy for you to replicate our cards in your own style :-)

Happy Crafting!


PS - Don't forget to 'like' Phill's Facebook page and follow him on Twitter to keep in touch, you can also find him on Pinterest and Instagram for ideas and inspiration :-)

(Links below)


Thursday, 21 January 2016

Decadent Wine - Showcasing the New Mini Baroque Collection

Good Morning Everyone,

Once again thank you all so much for your lovely comments and messages on my previous post.

Today's card is created from the Decadent Collection showcasing the New Mini Baroque Stamps, which are so versatile and a dream to work with.

All the products used are available on Phill's Website:-
www.honeypotcrafts.co.uk

This is what I used:-

8 x 8 White Card Blank
Plain White Card Stock
Sentimentally Yours Baroque Everyday Corner Stamps A5
Sentimentally Yours Mini Baroque Everyday Sentiment Stamp A5
Sentimentally Yours Baroque Background Stamp
Decadent Wine Colour Cloud
Decadent Damask Premium Paper Pad
Decadent Damask Premium Insert
Micro Beads
Self Adhesive Double Sided Sheets
Glacier Ice Glitter Jewels
Silver Shine Embossing Powder
Cosmic Shimmer Glue
Seam Binding
Small Dazzlers
Sue Wilson Dies - Frames & Tags - Pierced Tags
Sue Wilson Lattice Heart Embossing Folder
Spellbinder Blooms 3
Couture Creation Butterfly

This is how I created it:-

8 x 8 Card Blank
From the Decadent Paper Pad I chose the plain side of the Decadent Wine and cut it to 7.75 square and attached flat to the card.


I then cut 2 panels in White Card Stock
1st 4.75 x 7
2nd 2 x 7

Using the Decadent Wine Colour Cloud and the Baroque Background Stamp I created the background on both panels before covering with the double sided adhesive sheets and Micro Beads.

These were then attached to the card using pads to give dimension.

The next layers are:-
2 x  Decadent Damask Wine 3.75 x 6 and 1.75 x 6

White Card Stock :-
3.5 x 5.75 and 1.5 x 5.75

2 x Decadent Damask Wine
3.25 x 5.5 and 1.25 x 5.5

The 2 white panels I stamped with Colour Cloud.
Next I stamped and heat embossed the 2 small Decadent Wine Panels with the Baroque Corner Stamps before embossing with the Lattice Hearts Embossing Folder. I then glued them together and attached to the card using pads.

Sentiment

I cut the 2 pierced tags out using plain white card stock and stamped the sentiments using Decadent Wine Colour Cloud, and then edged in the same.

These were attached to the card topped with a small bow and swags made from Seam Binding, then added a small dazzler.


Finishing Touches

Using a piece of scrap White Card I cut the flowers, then stamped them with the background stamp, then added Glacier Ice and a small dazzler to the centre.

Finally I cut out the butterfly and again stamped it and added glacier ice.

                                   Happy Crafting


Monday, 30 November 2015

Ultimate Baroque Collection - Wedding Card in Teal & White

Hello Everyone,

Phill is very busy with the HOCHANDA  Shows today, I hope you are enjoying his demo's and learning some new techniques.

Today's card is one I did for the show, its another large card as I absolutely love creating these, but I promise the cards for the next few days will be smaller ones, as lots of you have requested these.

For anyone wanting to replicate this card these are the products I used .... which are all available on Phills Website - www.honeypotcrafts.co.uk

A4 Card Blank
White Card Stock
Teal Mister spray by Phill Martin
Colour Cloud Blending Ink by Phill Martin
Sentimentally Yours Baroque Sentiment 2 A5 stamp set
Sentimentally Yours Baroque Frames A6 stamp set
Sentimentally Yours Baroque Corners A6 stamp set
Sue Wilson Lattice Hearts Embossing Folder
Sue Wilson Dies Perfect Peony Complete Petals
Sue Wilson Dies Laurel Leaves
Sue Wilson Dies Noble Ornate Pierced Rectangles
Cosmic Shimmer Silver Shine Embossing Powder
Cosmic Shimmer Glitter Jewels Iced Snow
Cosmic Shimmer Acrylic Glue
Creative Expressions Pearl Strips


I used a White A4 card and cut the first layer using plain white card stock to 11.75 x 8 then sprayed this with Teal Mister Spray. Once this was dry I attached flat to the card.

The second layer I cut to 11x 7.25
Then using the New Baroque Corner Stamps I embossed each corner using Silver Shine Embossing Powder.
I then embossed this using the Lattice Heart Embossing Folder, and attached flat to the card.

Next using plain white card stock I cut 2 panels, the first on 4.75 x 11 and the second 4.5 x 10.75.
I then used Mister Spray on the first panel.
Using the long stamp from the sentiment set I heat embossed the second layer at the top and bottom, then embossed with the Lattice Hearts. This was then attached to the card using pads to give dimension.


Sentiment

Using the second and third largest  Noble Pierced Rectangle Dies I cut these out using plain white card stock and sprayed the plain one with Mister Spray.

I then heat embossed the Sentiment and glued them both together before attaching to the card, again using pads.


Finishing Touches

Using a sheet of plain white card stock I sprayed it with Mister Spray, and once dried ( a couple of minutes) I cut several of the flowers out using the Perfect Peony Die.
I shaped these and glued them together, then used cosmic shimmer glue and Glitter Jewels Iced Snow to the edges of the petals.

I then cut out the Laurel leaves and while these were still in the die I used Teal Colour Cloud to highlight, then again added Iced Snow.
I then added all the flowers and leaves to the card.

Finally using Pearl Strips I edged around the Sentiment with a double row.

I really enjoyed making this card, and hope you will too.

                                                                  Happy Crafting


             www.honeypotcrafts.co.uk


Thursday, 10 September 2015

Graceful Pink - Just For You

Good Morning Everyone,

Another lovely day is forecast, I do hope the weatherman is right.

Once again thank you to everyone for your lovely emails and comments, its nice to know I give inspiration to lots of you, but then I am privileged to have one of the best teachers in the crafting world. :-)

On with today's card:-

Products used ( which are links to Phill's website) :-)

8 x 8 Card Blank
Plain White Card Stock
 Butterflies -in-flight Background Stamp
Graceful Butterflies and Dragonflies Paper Pad
Graceful Pink P.V.A.
Graceful Pink Twinkles
Graceful Pink Mica Powder
Stickles
Baroque Sentiments Collection A5 Stamps
Sue Wilson Dies Spanish - Cordoba
Sue Wilson Dies Petite Vinery
Spell Binder Dies Enchanted Labels Twenty Eight
Spell Binder Dies Bloom Four
Small Dazzlers


8 x 8 Card Blank
1st layer White Card Stock cut to 7.75 sq,
I pierced around the edge and then attached flat to the card blank.

Next layer I cut a piece of White Card stock  to 6,75 sq then using the Graceful Pink Mica Powder and the Butterflies in Flight Background Stamp I created the background.


Sentiment :-   

Using the outer Cordoba Die I cut out a Plain White and a Graceful Pink, then layered these together and attached to the card using pads.

Using the middle die from Labels Twenty Eight I cut this out in Plain White and attached to the card again using pads.

Then using a Spell Binder Die ( the name escapes me at the moment, but I will post later) I cut out and stamped the Sentiments from the Baroque Sentiment Collection and attached to the card using pads.


To create the flowers I cut out 8 using the two smallest dies and scraps of paper from the graceful pink, moulded and curled the petals then glued together.

Next I cut out 2 fronds using Petite Vinery and attached all these to the card.
  
Finishing Touches   

Using Graceful Pink P.V.A.   added pearls to the centre middle die and Graceful Pink Twinkles around the sentiment. I then added a small Dazzler to each flower and finally added Stickles to the petals.

                                                                                  Happy Crafting


Sunday, 2 August 2015

Baroque Best Wishes - Black & Cream

Good Morning Everyone,

Once again thank you all for taking the time to comment on my cards, Its lovely to know what you all think.

Today I decided to use stamps from one of my Favourite Collections - The Baroque Collection.

I hope you like it.


Products Used:- (which are also links to Phill's Website too) :-)

8 x 8 Cream Card Stock
Sentimentally Yours Baroque Background A6 Stamp
Sentimentally Yours Baroque Sentiment Collection A5 Stamp Set
Creative Expressions Snakeskin Embossing Folder
Black PVA Glue
Sue Wilson Die New York Collection - Herald Square 
Dazzlers
Seam Binding
Couture Creations Dragonfly Die


Matting & Layering

1st layer Black Card cut to 7.75 sq.
2nd Layer Cream Card cut to 7.5 sq.
3rd Layer Black Card cut to 6.75 sq.
4th Layer Cream Card cut to 6.5 sq.

First I attached the 7.75 Black Card to the Base Card - flat using Cosmic Shimmer Glue
I than embossed the Cream 7.5 card and attached this (again flat)


Background

To create the background I used the cream 6.5 card and The Baroque Background Stamp. I stamped this using Black Soot Distress Ink. Once this was dry I attached it to the 6,75 black card and then added both to the main card using pads to give dimension.


Sentiment

Using a piece of cream card and Sue Wilson Herald Square Die I cut the die out and then backed it onto a  piece of black card.

I then did the PVA Pearls around the edge of this as they take a while to dry.

Next I cut a piece of cream card to 2.5 sq and stamped the Sentiment attaching this the centre with pads.
This was then added to the centre of the main card.

Once I was sure the PVA Pearls were dry I attached the sentiment to the centre of the card.


Finishing Touches

I made a triple bow and swags using Black Seam Binding and added a Dazzler to the centre.
Finally adding two Dragonflies.


                                                         Happy Crafting


Tuesday, 7 July 2015

Special Friend - Sent with Love - Using the New Scribbled Corner Stamps


Good Morning Everyone, thank you all for your lovely comments on my previous post.

Today's card is an 8 x 8 in Cream & Magenta

Products Used: (which are links to items on Phill's Website too) :-


Cream Cardstock
Decadent Damask 8x8 Paperpad
Sentimentally Yours Scribbled Corner Stamps
Sentimentally Yours Baroque Sentiments
Creative Expressions 8x8 Snakeskin Embossing Folder
Sue Wilson Finishing Touches-Delicate Fronds
Sue Wilson Finishing Touches Delicate Daisies Complete Petals
Chic Magenta Cosmic Shimmer Mister Spray
Chic Magenta Cosmic Shimmer Twinkles
Chic Magenta Cosmic Shimmer Gilding Wax
Chic MagentaCosmic Shimmer P.V.A.Glue
Spellbinder Dies Curved Border One


Matting & Layering

 8 x 8 Cream Card Blank

 1st layer Decadent Damask paper cut to 20 cm x 20 cm

2nd layer Cream Card cut to 18.5 cm x 18.5 cm

3rd layer Cream Card cut to 17 cm x 17 cm

4th layer Decadent Damask cut to 15 cm x 15 cm

5th layer Cream Card cut to 14.5 cm x 16 cm


Taking the 2nd layer I sprayed this with Mister Spray, and while it was drying (which is only a few seconds) I embossed the 3rd layer. I then attached these to the card using pads on the 2nd layer to give dimension.
I then did the die cutting on the 5th layer and trimmed it down to leave a small border.


Using the lovely New Scribbled Corner Stamps 
I stamped the top 2 corners then attached both of these layers to the card, using pads on the burgundy layer. I then added P.V.A. around the curve.  
For the Topper I used an off cut from the Decadent Damask  Paper.
The Sentiment was stamped using Distress Ink


Flowers


Again using off cuts I cut out the fronds and daisies.            
I added Gilding Wax to the centre of the daisies before
shaping and gluing. Once I was happy with the shape I
added them to the card and finally added the Twinkles.


                                              Happy Crafting