What's New

My Brand New Sentimentally Yours 2017 Xmas Stencils are now available at www.honeypotcrafts.co.uk!
Showing posts with label Cosmic Shimmer. Show all posts

Tuesday, 19 September 2017

Scribbled Craft Dies

Hello Crafters!

Here is a card made at our regular craft workshops.

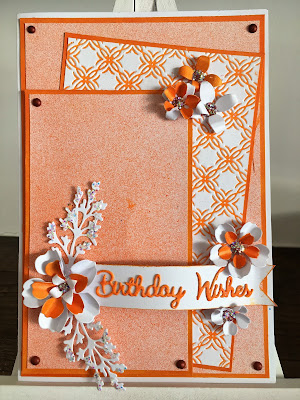
This card was made using Phill's Scribbled Craft Dies and coordinating Cosmic Shimmer colour collections.

We have also used Creative Expressions Embossing Folders and Sue Wilson Craft Dies; Succulent Garden and Maidenhair Fern.

The colour used on the main sample card is 'Tangy Tangerine' with the 'Birthday Wishes' Scribbled Craft die Collection.  As always we've included cards made using different colours. (all these cards have been made by crafters at our workshops)

Stage 1 - cut out all the card layers and die cuts needed for your project in Bright White Card.

  • Base Card - 21cm x 14.5cm
  • 1st Layer (Gilding Polish) - 20.5cm x 14cm
  • 2nd Layer (Ink Mister) - 20cm x 13.5cm
  • 3rd Layer (Gilding Polish) -  18cm x 11.5cm
  • 4th Layer (Embossed with Powder) - 17.5cm x 11cm
  • 5th Layer (Gilding Polish) - 16cm x 9.5cm
  • 6th Layer (Ink Mister) - 15.5cm x 9cm
  • Banner - 2.5cm x 12cm

Stage 2 - choose your Cosmic Shimmer Colour collection with coordinating products; Gilding Polish, Ink Mister and Embossing Powder

Stage 3 - Ink Mist the appropriate two layers and leave to dry. 


Stage 4 - Gilding Polish to edges of the three appropriate layers and also your flowers as you wish


Stage 5 - Use Perfect Medium and a Speedball Bayer to ink up the rough side of an Embossing Folder.  Here we have used Aztec Flowers. Make sure you apply lots of Anti-Static Dust to your white card layer before you put through the machine.  When the layer is embossed the sticky Perfect Medium will have been pressed into the de-bossed side of the pattern.  Then you can cover with Embossing Powder, remove them excess and heat with a heat tool from underneath.

(TIP - you can feel which side to use as it feels scratchy and rough under your fingers)


Stage 6 - using the same Embossing Powder and Perfect Medium.  Press the Die Cut sentiment 'right-side' down into the Perfect Medium.  Cover with Embossing Powder, remove the excess and heat.  Repeat this at least twice to give a full, shiny coverage on your Die Cut sentiment.  Glue the sentiment to your banner using Cosmic Shimmer Dries Clear  PVA Glue or highlighter glue.


Stage 7 - stick all your coordinating  layers together and shape your flowers and glue together.

Stage 8 - assemble the full card, using foam tape where you wish to add dimension to your layers.  Add some bling if you wish.  Here we have also used Pearl PVA Glue to create interest on the corners and also in the centre of the flowers.

The Full Card


Here's what we used with links to our website ......
Other colour samples......


Precious Metals Copper and Copper Gilding Polish


Precious Metals Titanium and Silver Chrome Golding Polish

Carnival Colours Purple Paradise


Carnival Colours Lush Pink

Frosty Heather and Heather Gilding Polish


Remember - we are more than happy for you to replicate our cards in your own style! :-)

(Links below)


    Sunday, 17 July 2016

    New Look Blog and a Silver on White Snowflake Card...

    Hello Crafters,

    So, it's been an age since I last posted on my Blog so I thought, new look, more posts!

    Hope you like how it looks, it took me 4 hours to get it right!

    Lot's to tell you before I get on to the card, as you may or may not know, I opened my second Honeypot Crafts store in Sheffield in April this year (which is why I was busier than usual since February really), there was alot to do to get the shop right, decorating, buying new units and getting the look and feel right and, of course, stocking it with all our favourite crafty products too!

    I couldn't have done it without my sister, Karen, who is managing this shop for me (thank you!)(and doing a grand job too!), I'm going to see if I can get her to do a post on here with before and after photos etc,..

    We have been running workshops in the Sheffield store too (as well as my Nottingham one) so do have a look at the relevant tabs on my website if these would interest you :-)

    I've updated the info on the side bars on the blog with my upcoming HOCHANDA shows, Craft Shows I will be exhibiting at and our Craftathons,

    If you didn't catch the launch on HOCHANDA of my new 2016 Snowflakes collection, (it sold out!) I will be back with the rest of the collection on July 25th at 8pm (with two brand new paper pads too!)
    I absolutely love these stamps, but I am biased as I love snowflake themes for Christmas cards :-)

    Here's a quick link to my website for you to see the whole collection: Sentimentally Yours Snowflakes

    This is one of my sample cards from the launch show (I did demo it too, but in gold and landscape, still looked gorgeous!)

    This is what I used:- (with links to them on my www too)
    Double Pierced Rectangle Dies by Sue Wilson
    Snowflakes Dies by Sue Wilson
    Frosty Swirls Embossing Folder by Sue Wilson
    Sentimentally Yours Snowflake Sentiment Borders Stamps
    Sentimentally Yours Snowflake Icons Stamps
    Sentimentally Yours Large Rectangle Snowflake Frame Stamp
    Cosmic Shimmer Glitter Jewels - Iced Snow
    Cosmic Shimmer Detail Embossing Powder - Silver Shine
    (As always, I only ever use Cosmic Shimmer dries clear PVA glue and Perfect Medium for embossing)

    The Full Card
    Close Up Of The Details
    Anyhoo, I think I have rattled on for long enough!

    I hope you like the new look blog and I hope you love my Snowflakes stamps as much as I do!

    I will be posting again tomorrow, with a chance to win one of my sample cards from my Christmas shows :-)

    Happy Crafting!

    PS - Don't forget to 'like' my Facebook page and follow me on Twitter to keep in touch!


    Wednesday, 11 November 2015

    Frosty Mink - Christmas Greetings

    Good afternoon everyone,

    I hope for those of you who have  been fortunate enough to watch Phill's live shows on HOCHANDA today have enjoyed them so far.

    The next show is 4.00pm and the last show for today is 7.00pm


    Today's card is one from the show, which Phill did a variation of for one of his demo's.

    For those of you who wish to replicate this, listed below are all the products used which can all be found on Phill's Website    www.honeypotcrafts.co.uk

    8 x 8 Card Blank
    White Card Stock
    Frosty Mink P.V.A.
    Frosty Mink Twinkles
    Frosty Mink Gilding Wax
    Frosty Mink Sparkle Texture Paste
    Christmas Holly Sentiment Border Stamps
    Cosmic Shimmer Ancient Copper Embossing Powder
    Dazzlers
    Cosmic Shimmer Glacier Ice
    Tracery 6 x 6 Mask
    Sue Wilson Dies - Classic Poinsettia
    Sue Wilson Dies - Mosaic Poinsettia
    Sue Wilson Dies Portuguese Collection - Lisbon
    Sue Wilson Snowflake Lattice Embossing Folder


    This is how I created it:-

    Because of the drying time I started by using the Tracery Mask and Frosty Mink Texture Paste, as this needed about 2 hours to dry.

    8 x 8 Card Blank
    The first layer I cut to 7.75 square and edged it with Frosty Mink Gilding Wax and attached flat to the card.
    The next layer I cut to 7.5 square and embossed it with the Snowflake Lattice Embossing Folder, and attached flat to the card.


    Sentiment

    Making sure the texture paste was completely dry I then cut this out using the Lisbon Die and attached to the card using foam pads.

    Next I  cut a strip of white card to 1.5" wide and stamped the Sentiment using one of the Border Stamps and heat embossed it with Ancient Copper Embossing Powder before embossing it with the Snowflake Lattice Embossing Folder to match the background. Than added this to the card.


    Finishing Touches

    Next I cut the Poinsettias out and shaped these before attaching to the card. I then edged the petals with Cosmic Shimmer Glue and Glacier Ice, and finished with a Dazzler to the centres.
     Frosty Mink Twinkles were then used around the small die in the centre .
    Finally I used Frosty Mink P.V.A. in the centres of each snowflake.

                                                                      Happy Crafting

              
                  www.honeypotcrafts.co.uk


    Tuesday, 20 October 2015

    Graceful Peach - By Barb - Just For You

    Good Morning Everyone,

    Once again thank you so much for your lovely comments on my previous post.

    Today's card is one I created using the Lovely Graceful Peach products all of which can be found on Phill's Website:-

    www.honeypotcrafts.co.uk

    Products Used:-

    8 x 8 White Card Blank
    White Card Stock
    Graceful Butterfly & Dragonfly Paper Pad
    Graceful Peach Twinkles
    Graceful Peach P.V.A.
    Graceful Peach Mica Powder
    Sentimentally Yours Bracket Everyday Sentiment Stamps
    Sue Wilson Noble Dies - Classic Adorned Squares
    Sue Wilson Peony Dies
    Sue Wilson Petite Vinery
    Embossing Folder Leafy Montage
    Glamour Dust
    Dazzlers
    Perfect Medium
    Black Soot Distress Ink

    This is how I made it:-

    8 x 8 Card Blank
    First I embossed the front of the card using the Leafy Montage Embossing Folder. Then I used Perfect Medium and Peach Mica Powder to create the background.

    Next I cut a 7 x 7 Sq from the Peach Dragonfly Paper Pad and attached flat to the card.

    Using Plain White Card Stock and the Adorned Square Dies I cut this out and attached to the centre of the card using pads to give dimension.

    Then using the 2 inner dies I again cut out using White Card Stock and then backed it with Plain Peach from the pad, and attached again with pads.


    Sentiment

    Using The Bracket Everyday Sentiment Stamp I masked the brackets off and stamped with Black Soot Distress Ink. Then cut this out with a separate die before attaching to the card using pads.


    Finishing Touches

    Using Offcuts of paper left from the paper pad I cut out several flowers and leaves and attached to the card, than added dazzlers to the centre of the flowers.

    I used Glamour Dust to the centre of the
    Adorned Squares, and Peach Twinkles around the edges.

    Finally I cut out the Dragon Fly and added glamour dust to the wings and Peach P.V.A. Pearls to the tail.

                      Happy Crafting

                                                                              www.honeypotcrafts.co.uk


    Monday, 19 October 2015

    Black and Cream by Barb - Featuring The Bracket Birthday and Inspirational Stamps

    Good Morning Everyone,

    For those of you who went to Doncaster Dome yesterday I hope you managed to stop and say 'hello' to Phill and watch his demo's.


    Today's card is one of my favourites and was made as a sample for Phill's  HOCHANDA  show last week.


    Product Used:-
    which can all be found on Phill's Website:-  www.honeypotcrafts.co.uk

    8 x 8 Cream Card Blank
    Cream Card Stock
    Black Card Stock
    Sentimentally Yours Bracket Verse A5 Stamp Set
    Sentimentally Yours Inspiration A5 Stamp Set
    Black Soot Distress Ink Pad
    Cosmic Shimmer Glitter Jewels Glacier Ice
    Creative Expressions Finishing Touches Cream Pearls
    Sue Wilson Peony Dies
    Sue Wilson Petite Vinery Die
    Tartan Trellis Embossing Folder
    Spellbinder Bracket Border 2 Dies
    Spellbinders Flutters
    Dazzlers


    This is how I made it :-

    8 x 8  Cream Card Blank
     Black Card Stock cut to 7.75 sq and attached flat to the card blank.

    I then cut a piece of cream card stock to 5.75 x 6.5
    and black card stock to 5.5 x 6 and attached both of these flat to the card.

    Next I cut a piece of Cream card stock to 5.25 x 6
    and using the Border Die I placed this at an angle and cut it out.

    Using the Bracket Birthday Verse Stamp I stamped this using Black Soot Distress Ink, then used the Tartan Trellis Embossing Folder to emboss.

    I then trimmed this down to fit before attaching to the card using pads to give dimension.

    Next I cut a strip of Cream Card Stock to 5.75 x 1.25
    and Stamped this using a stamp from the Brackets of Inspiration. I then embossed it using the Tartan Trellis attached this to the card using pads.
    I then cut a strip of cream card to 7.5 x  1.75 and embossed before I attached to the right of the card  again using pads.


     Finishing Touches

    I added Cream Pearls to the edge of the border below the sentiment, and cut a butterfly from the Spellbinder Flutters die and used Glacier Ice Glitter Jewels on the wings. I also added a butterfly from a Sue Wilson Die.

    Using the Peony Die I cut several of these out, shaped and attached to the card, then added leaves from the Petite Vinery dies.

    I then added Glacier Ice to the petals and finally finished with a Dazzler to the centre of the flowers.

                          Happy Crafting.


                                                                        www.honeypotcrafts.co.uk


    Thursday, 10 September 2015

    Graceful Pink - Just For You

    Good Morning Everyone,

    Another lovely day is forecast, I do hope the weatherman is right.

    Once again thank you to everyone for your lovely emails and comments, its nice to know I give inspiration to lots of you, but then I am privileged to have one of the best teachers in the crafting world. :-)

    On with today's card:-

    Products used ( which are links to Phill's website) :-)

    8 x 8 Card Blank
    Plain White Card Stock
     Butterflies -in-flight Background Stamp
    Graceful Butterflies and Dragonflies Paper Pad
    Graceful Pink P.V.A.
    Graceful Pink Twinkles
    Graceful Pink Mica Powder
    Stickles
    Baroque Sentiments Collection A5 Stamps
    Sue Wilson Dies Spanish - Cordoba
    Sue Wilson Dies Petite Vinery
    Spell Binder Dies Enchanted Labels Twenty Eight
    Spell Binder Dies Bloom Four
    Small Dazzlers


    8 x 8 Card Blank
    1st layer White Card Stock cut to 7.75 sq,
    I pierced around the edge and then attached flat to the card blank.

    Next layer I cut a piece of White Card stock  to 6,75 sq then using the Graceful Pink Mica Powder and the Butterflies in Flight Background Stamp I created the background.


    Sentiment :-   

    Using the outer Cordoba Die I cut out a Plain White and a Graceful Pink, then layered these together and attached to the card using pads.

    Using the middle die from Labels Twenty Eight I cut this out in Plain White and attached to the card again using pads.

    Then using a Spell Binder Die ( the name escapes me at the moment, but I will post later) I cut out and stamped the Sentiments from the Baroque Sentiment Collection and attached to the card using pads.


    To create the flowers I cut out 8 using the two smallest dies and scraps of paper from the graceful pink, moulded and curled the petals then glued together.

    Next I cut out 2 fronds using Petite Vinery and attached all these to the card.
      
    Finishing Touches   

    Using Graceful Pink P.V.A.   added pearls to the centre middle die and Graceful Pink Twinkles around the sentiment. I then added a small Dazzler to each flower and finally added Stickles to the petals.

                                                                                      Happy Crafting


    Monday, 7 September 2015

    Giveaway Card - Birthday Wishes in Chic Moss

    Good Afternoon Everyone

    So,.. here I am, with enough time to actually do a Blog post and I thought, it's been a while since I did a card giveaway,so .. here you go :-)

    I'll just say a big thank you to Barb too, she's doing a grand job keeping you inspired with some of her cards she's made for me for samples.. Thanks Barb!

    This is an 8x8 card I made using some of my Chic Moss collection of Cosmic Shimmer products (a colour that I absolutely love!)

    To be in with a chance to win this card, signed by lil ole me, please just ensure you are following my Blog and leave a comment on this post..
    I'll draw a winner randomly next Monday morning (14th) and notify you here :-)

    Here's what I used (and, surprisingly, I've made the list links to the items on my website too (well, it does make it easier for you to swish over and buy them lol)

    Sentimentally Yours Dragonfly Retreat A6 Background Stamp
    Sentimentally Yours Scribbled Frame Sentiments Stamp Set (must have set in my humble opinion)
    Chic Moss : Colour Cloud, Ink Mister and PVA Glue
    Sue Wilson Delicate Fronds Die Set
    Sue Wilson Delicate Daisies Complete Petals Die Set (must have set in my humble opinion)
    Sue Wilson Ornamental Corners Die Set
    Sue Wilson Pierced Tags Die Set
    Sue Wilson A4 Leafy Montage Embossing Folder
    Creative Expressions Self Adhesive Pearl Strips - Double Row White
    Creative Expressions Smoothies


    And here's what I did... 

    I embossed an A4 piece of white cardstock with the lovely Leafy Montage embossing folder, (important to do this before trimming it down as embossing cardstock alters the dimensions slightly) I then trimmed it to 19.5cm x 19.5cm.

    I then cut the aperture to the left side of my embossed cardstock and I did this with one of Sues' Striplet dies as most have the plain outer edge (you can, of course, use your craft knife)
    I positioned the aperture onto my card blank as if I was going to stick it and made a pencil mark around all four corners (this gave me a a guide with which to stamp within)

    Using the fabulous Smoothies and my even more fabulous Dragonfly Retreat background stamp, I applied Chic Moss Colour Cloud directly to the stamp and stamped within the pencil lines.

    At this point, you may find it easier to apply the self adhesive pearls around the aperture (I do it at the end so I don't have them where they don't need to be, but it is trickier trying to navigate them under flowers etc) The single row was created by simply cutting a strip of the double row pearls in half :-)

    I then used foam tape on this piece, for dimension, then stuck it to my card blank.

    I then did all my die cutting, which was:-
    4 x daisies x 2
    2 x Ornate Corners
    2 x Delicate Fronds
    2 x Pierced Tags

    The ornate corners, one of the pieced tags and a selection of the delicate daisies were popped into my ink misting box and misted all in one go with the Chic Moss Ink Mister.

    The flowers were shaped and stuck together with my trusty Cosmic Shimmer PVA Glue and finished off in the centre with a good blob (very technical lol) of the Chic Moss Pearl PVA Glue.

    I then stamped my 'Birthday Wishes' from my Scribbled Frame Stamps (these are a fabulous smaller size to my other sentiments so work perfectly on these tags)

    Last but not least, I assembled it all together as you see in the photo and finished with the double row white pearls around the open edges.

    Here's a bigger photo :-)


    Don't forget my very first shows on Hochanda are:-

    Tuesday 15th September at 8pm
    Wednesday 16th September at 9am, 10am, 12noon, 4pm and 7pm

    I hope you will join me!!
    Remember, if you don't have Sky or Freeview/Freesat you can watch in High Definition on their website


    Happy Crafting!


    Wednesday, 18 February 2015

    A little bit 'Decadent' :-)

    Good Afternoon Everyone

    Well, I've just spent a hectic 3 days at the NEC for our trade show, with the rest of the Creative Expressions team,.. launching all our brand new products (exciting times!), it's so nice to get to spend time with everyone as usually it's a phone call, text or an email!
    And, of course, we are never at Create & Craft at the same time so no chance to catch up in the green room...

    It's also been lovely meeting and chatting with all the craft shop owners who stock my products.

    Here we all are :-)

    So, with all the 'newness' in mind,.. I wanted to tell you about my next shows on Create & Craft, which are next Tuesday, 24th February at 10am and 3pm, where I will be launching my new range of Cosmic Shimmer products, in 6 brand new colours, which I have called 'Decadent', with more products added to the line up,.. one of which is our brand new blending ink, called colour cloud, and (as you'd expect from me), it will be available in my 6 new colours,.. I absolutely love this product and I can't wait to show you!!!

    There will also be 9 brand new Decadent Damask sets of stamps, a brand new co-ordinating 8x8 paper pad and a brand new addition to the paper pad range (can't wait to show you this too!)

    I don't want to say too much as it will spoil the excitement for showing you on TV next week, but I will tell you the new colours, which are:

    Decadent Teal
    Decadent Oak
    Decadent Grape
    Decadent Wine
    Decadent Denim
    Decadent Bamboo

    These new colours are very different from the Graceful Collection and I love them!!

    Anyhoo,.. I've rattle on long enough! So, here's a big card I made using some of the Decadent Teal products and one of the sentiment stamps from the Decadent Damask range :-)

    Hope you like it..


    See you on C & C next Tuesday,..


    Sunday, 8 February 2015

    Graceful Mustard... Just For You! :-)

    Good Afternoon Everyone

    It's a lovely, sunny, Sunday afternoon so I thought I would share this lovely, sunny card with you :-)
    This is the card we did at my workshops this week,.. it was also re-created in other colours from my Graceful collection of Cosmic Shimmer products by some of the class and, I have to say, they all looked equally beautiful!

    What I Used:
    A4 White Cardstock
    My Graceful Mustard Ink Mister
    My Graceful Mustard Pearl PVA
    My Graceful Mustard Mica Powder
    Sentimentally Yours Baroque Sentiments Stamps
    Sentimentally Yours Leafy Background Stamp
    Sea Garden A4 Embossing Folder by Sue Wilson
    Scandinavian Collection Corner, Border & Tag Die Set by Sue Wilson
    Large, Big and Super Daisy Punches by Woodware
    Cosmic Shimmer Sparkle Star Twinkles


    The card was created using 1 sheet of A4, cut in half, scored at 2.5cm and glued at the top, using the fold as a guide,.. this is one of my favourite shapes as you can add the little fancy decoration above the score line :-)

    The top half of the main part was misted (lightly) with the mustard mister, left to dry and then embossed with the beautiful Sea Garden embossing folder... it creates a lovely, tonal effect and the embossing brings some texture.

    The bottom half was stamped using my Leafy Background stamp, the 'ink' was created using a few mists from the mustard ink mister, then a tiny amount of the mustard mica powder mixed into the ink, this gives you a beautiful, pearlescent, mustard 'ink' that you can apply direct to the stamp with a piece of cut and dry foam. (you can't tell from the photo, but the pattern is pearlescent when the light catches it)
    I also used the 'ink' that was left on the foam to finish off the very edge of the top of the card too :-)

    The flowers were created using the varying sizes of daisy punches, some misted with the mustard
    mister, some left white,.. each was finished with a good squeeze of the mustard pearl pva glue, which, once it dries, gives you a really pretty centre to your flowers,.. in (as you'd expect from me) a completely co-ordinated colour scheme :-)

    The sentiment was stamped in black soot distress ink (must have!) using my Baroque Sentiments Stamps and by masking off the detailed designs on the stamp with removable tape.
    Anyhoo,.. I hope you like it,..
    If you have any of my Graceful Cosmic Shimmer products, have a go at this card,.. :-)

    Happy Crafting!


    Tuesday, 25 November 2014

    Mintylicious......

    Good Morning Everyone

    It's a little nippy outside so, I've made myself a cuppa and thought I'd show you one of my sample cards that I made using my latest range of stamps and cosmic shimmer products in more detail.

    Ingredient List (with links to go get them from my wesbite :-)
    8x8 Card Blank
    Graceful Butterflies & Dragonflies 8x8 Paper Pad
    Graceful Mint Embossing Powder
    Graceful Mint Twinkles
    Graceful Mint Pearl PVA Glue
    Elegant Milestone Birthdays Stamps
    More Scribbled Sentiments Stamps
    A4 Climbing Vines Embossing Folder
    Dies by Sue Wilson French Collection - Provence
    Dies by Sue Wilson Finishing Touches - Delicate Daisies (Full Petals)


    This is quite an easy card to put together,.. there are just lots of components to create before assembly, but, the pleasure is in the creation of the components and then, when you see it all together, you think,... yep,.. it was worth it! lol

    8x8 cards are a great size to work with,.. plenty of space to decorate without being overpowering and not too expensive to post (if you use the right adhesives!.. I try to stick to Cosmic Shimmer acrylic glue and foam pads where possible as some of the glue gels can be heavy if you use lots on your card)

    I started, as I always do, by deciding which colour scheme I wanted, with 6 lovely new colours in my Cosmic Shimmer range, that wasn't as easy as I thought! I opted for the Graceful Mint :-)

    I die cut several of the delicate daisies from the reverse of a couple of sheets of the mint papers from the Graceful Butterflies & Dragonflies paper pad, ensuring I got two different shades of mint. The tips of some of the flowers were then pushed onto my perfect medium pad, then embossed with the Graceful Mint Lustre Embossing Powder. I didn't pay much attention to how neat they were, as the overall effect was to be random, but how lovely does the pearlescent finish of the embossing powder look on those petals? It was worth the time!


    I then cut a piece of white card to 16cm x 16cm and cut an aperture in the centre, the 'frame' was then embossed with the beautiful Climbing Vines embossing folder.

    I cut one of the plain shapes from the Provence dies, stamped the sentiment from the Elegany Milestone Birthdays Stamps (black soot distress ink) and then decorated the top, bottom and corners with the Graceful Mint Pearl PVA Glue and put this to one side to allow them to dry.

    I created two smaller layers than the card, one with a sheet from the Graceful Butterflies & Dragonflies paper pad and one from plain white card.
    I stamped the sentiment from the More Scribbled Sentiments Stamps on all four sides and added a cheeky '50' in each corner lol
    The two layers were then stuck onto my card blank.

    I cut another piece of paper from the pad, the beautiful lacy mint one, to 16cm x 16cm then, using foam pads, I stuck this together with the embossed frame,.. this is a great way to create interest to frames/apertures too,.. the pretty paper makes a lovely backdrop to the frame. This was then stuck onto the centre of the card.


    Now, the fun (and easiest) part, the assembly!
    Once the frame and layers are on your card, it really is just a matter of popping the die cut shape with the sentiment onto some foam pads and putting it in the centre of the frame (make sure your pearls have dried, we don't want flat pearls lol)
    Then, just arrange your flowers as you wish, I used Cosmic Shimmer Acrylic glue to fix them as it dries quickly and doesn't leave a mess!
    The centre of the smaller flowers was then filled with the Graceful Mint Twinkles and the larger ones had a mini dazzler :-)

    It probably took me about an hour to do this card, the embossing of the flower petals takes a while to do, but the lustre and pearly finish create a beautiful effect once it's all together.

    Anyhoo, I hope you like this card,.. why not try it in one of the other lovely colours in the paper pad and co-ordinating Cosmic Shimmer products :-)

    All the goodies I've used are available on my website, just use the links on the ingredient list to take you there and if you treat yourself to one of the paper pads and you'd like me to sign it for you, just email me, I'm happy to! :-)

    Happy Crafting!


    Sunday, 23 November 2014

    I'm feeling....... good! :-)

    Good Afternoon Everyone,..

    OK, I'm the worst blogger ever! lol

    It's only because I'm busy designing new crafty loveliness for you :-)

    I have to just say thank you to you all too,.. my latest range of Stamps, Paper Pad and Cosmic Shimmer products have been flying off shelves everywhere, to the point that even I have struggled to keep my stock maintained in my own shop! lol

    If you've bought your goodies already, I hope you have been making fabulous things with them!

    My aim is to bring you great quality products that work well on their own, together, or with all the crafty stash you already have,..

    This is why I always give you the Cosmic Shimmer Range in co-ordinating colours to the paper pads,.. and stamp sets that work well on their own or when combined with others (like the Elegant Alphabet & Numbers set,.. perfect on its' own or with the Scribbled Sentiments as it's the same font!) the hard work is done, which means you get to have the fun part, creating great cards and crafty projects without worrying about matching colours and products etc

    If you haven't seen the latest range yet (or treated yourself to any), here are a couple of photos with links to the relevant section on my website for you to get them :-)

    The Stamps


    The Paper Pad & Cosmic Shimmer Range


    Anyhoo, enough rattling on,..

    I wanted to give you something,.. a freebie,.. a 'Thank You' of sorts, for all your support and for trusting me and my designs enough to spend your hard earned crafty cash on them!

    So, here's a lovely 8x8 paper, designed by myself,.. it was meant to be a part of the new Graceful Butterflies & Dragonflies Paper Pad that I launched a few weeks ago, but I decided on a softer colour scheme... but, I also love monochrome so didn't want to waste it!
    Feel free to save this paper, print it and use it as much as you want (all I ask is that you don't sell is as a printed sheet and please tell people it's my design (if they ask!)


    Happy Crafting!


    Monday, 29 September 2014

    Time for a cuppa anyone?

    Good Afternoon Everyone,..

    Now I'm on a Blog Roll (so to speak), I thought I'd share one last sneaky peek of one of my card samples for my shows on Create & Craft tomorrow :-)

    It's another biggy! 21cm x 15.5cm :-)

    If you know me, you will know that this is the perfect card for me,.. there are tea bags, tea cups and more on here!

    This is one of my brand new stamp sets, aptly named 'Time For A Cuppa' and it's a montage set,.. I adore the montage sets because there is so much you can do with them!
    Of course, I 'had' to create a background stamp to go with this set too, so I could get my fave tea brand on it :-) lol

    I think there is something that just about every tea or coffee lover will like about these stamps!

    Anyhoo, here it was I used:-

    White cardstock (lots of!)
    Creative Expressions A4 Sea Garden Embossing Folder
    Sue Wilson Californian Collection Dies (Hollywood and Frames Set A)
    Gathered Twigs Distress Ink Pad
    Sentimentally Yours Time For A Cuppa Montage Stamps
    Sentimentally Yours Tea & Coffee Background Stamp
    Sentimentally Yours Baroque Sentiments 2 Stamps
    Cosmic Shimmer White Pearl PVA Glue
    Cosmic Shimmer Choco Brown Pearl PVA Glue
    Square Dazzler
    Brown Seam Binding Ribbon
    Couple of Pearl Hatpins

    Remember, my show times are 8am and 3pm tomorrow.

    You can pre order all of my new stamps sets and most of the goodies I have chosen to go with them on my show directly from my website here

    Hope you like it, I love this card :-)

    Happy Crafting!