What's New

My Brand New Sentimentally Yours 2017 Xmas Stencils are now available at www.honeypotcrafts.co.uk!
Showing posts with label Dazzlers. Show all posts

Monday, 28 March 2016

Decadent Denim Featuring the New Timleless Collection Stamps

Good Afternoon Everyone,

It has been a while since the blog has been updated, as you are all aware Phill has been very busy not only designing new products for us all but also preparing for the opening of his NEW SHOP in Sheffield, which is opening on 17th April.

Phill has also had quite a few shows on Hochanda recently which means that I have been busy designing sample cards for his demonstrations.

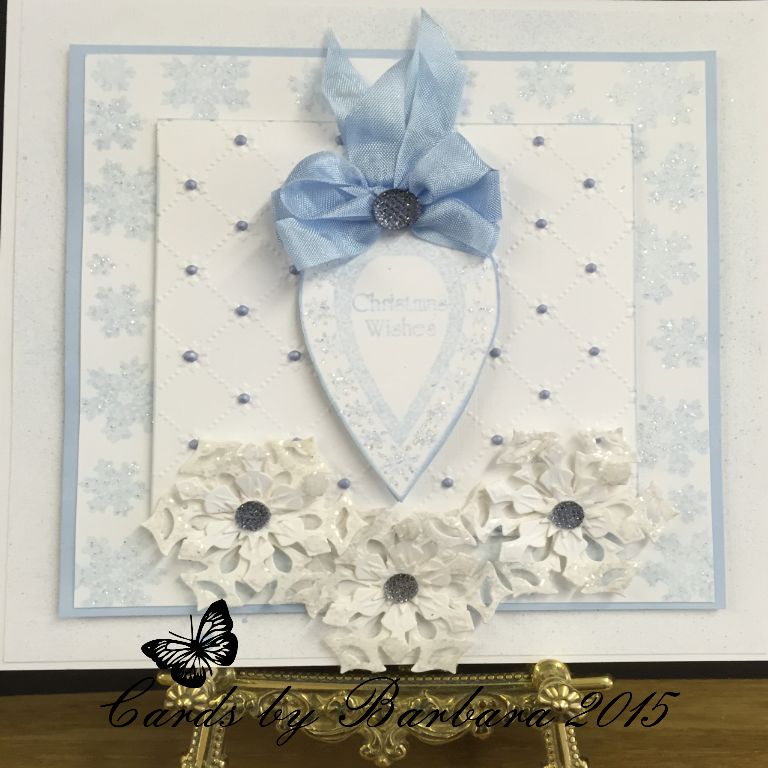
Well on with today's card which features the first card Phill demonstrated on his show for the Launch of the New Timeless Collection Stamps.


Products used:- which are all available on Phills website:-
www.honeypotcrafts.co.uk


White Card Stock
Timeless Corner Sentiment Stamps A5
Timeless Small Square Frame Stamp A6
Decadent Denim Gilding Wax
Decadent Denim Pearl P.V.A. Glue
Cosmic Shimmer Acrylic Glue
Perfect Medium
Bright Gold Embossing Powder
Creative Expressions Dazzler
Sue Wilson Embossing Folder - Tartan Trellis
Sue Wilson Dies - New York Collection Herald Square
Sue Wilson Dies -  Delicate Fronds
Sue Wilson Dies - Orange Blossom Open Petals


Card Front 

Using plain white card stock I cut the layers as follows

1st layer 8 x 7
2nd layer 7.75 x 6.75
3rd layer 7.5 x 6.5
4th layer 7.5 x 2.5
5th layer 7.25 x 2.25

Taking the 2nd layer I used  Decadent Denim Gilding Wax around the edges then attached to the 1st layer using Cosmic Shimmer Glue.

Next with the 3rd layer I stamped the corners of the card using gold embossing powder and a sentiment from the Corner Stamps. I then embossed this using the Tartan Trellis embossing folder, and attached to the card.

For the panel I edged around the largest piece with Gilding Wax, then embossed the smallest one and attached both to the card.


Sentiment

Using the Herald Square Die I cut this out in plain white card.

I chose the 'With Best Wishes' stamp and heat embossed using the gold embossing powder.
I then attached this to the panel using pads to give dimension.

Finishing Touches

I cut out the fronds and petals from scraps of white card
(nothing gets wasted) then shaped and attached to the sentiment.
Finally I used Decadent Denim Pearl P.V.A. on the fronds  and added a dazzler to the centre of each flower.

                                                 Happy Crafting


Thursday, 11 February 2016

Blue & White - Featuring the Retirement Verse Collection Stamps

Good Morning Everyone,

Once again a very big thank you to all of you who have taken the time to comment and message me on my previous blog.

Last Monday I posted a card on the blog and was asked to make a 'Retirement' card based on the same design.

Today I would like to share my creation with you, to show how different variations can be created using the same products but with a few changes.

All the products used to create this card are available on Phill's website:-

www.honeypotcrafts.co.uk

A4 White Card Blank
Royal Blue Card Stock
White Card Stock
Sentimentally Yours Retirement Verse Collection A5 Stamps Set
Decadent Denim Colour Cloud Blending Inks
Silver Embossing Powder
Glossy Accents
Dazzlers
Creative Expressions Pearl Strips
Sue Wilson Dies - Austrian Collection - Innsbruck
Sue Wilson Canadian Corner Border & Tag Dies
Sue Wilson Peony Complete Petals/ Open Petals
Sue Wilson Laurel Leaves
Sue Wilson Embossing Folder Lattice Hearts
Glamour Dust
Cosmic Shimmer Acrylic Glue


This is what I did:-

The measurements for this  are exactly the same as the one I posted on Monday.

Sentiment

Using the 2 largest dies from the Austrian Innsbruck dies I cut this out using White Card and backed it with Blue Card.

I chose a Verse from the Retirement Verse Collection Stamps and heat embossed using Silver Embossing Powder.

I then attached this to the card using pads to give dimension.

Flowers
The flowers are the same as previous blog


Finishing Touches

I added a butterfly to this card (instead of the dragonfly) which I cut out using Blue Card Stock, I then used Glossy Accent on the wings and edged them with glamour dust.

Finally I added 2 hearts to the top corners again cutting them out in blue card and using glossy accents to give dimension.

I hope you like this card and can see what a difference a few alterations can make.

                                                         Happy Crafting


Friday, 22 January 2016

Frosty Sky and White - Especially For You

Good Morning Everyone,

Thank you all for your lovely comments on my previous post.

Today's card is an 8 x 8 but works just as nice on smaller cards.

All the products I used can be found on Phill's Website:-

www.honeypotcraft.co.uk


This is what I used:-

8 x 8 Card Blank
Plain White Card Stock
Sentimentally Yours Chic Floral Occasions Sentiment Stamps
Frosty Sky Pearl P.V.A.
Frosty Sky Colour Cloud
Frosty Sky Gilding Wax
Frosty Sky Mister Spray
Silver Shine Embossing Powder
Sue Wilson Dies - Noble Double Pierced
Sue Wilson Dies - Caribbean Collection - St Barts
Sue Wilson Dies - Faux Quilled Blooms
Dazzlers
Glacier Ice Glitter Jewels
Cosmic Shimmer Glue

This is how I created it:-

8 x 8 White Card Blank

Using Plain White Card Stock I cut a 7.75 square and used Frosty Sky Gilding Wax around the edges then attached flat to the card using Cosmic Shimmer Glue.

For the frame I used the 3 largest Noble Pierced Square Dies and Plain White Card Stock.

I then inked the border with Frosty Sky Colour Cloud before removing from the die.
Then attached flat to the card.


Sentiment

Using Plain White Card Stock and the St Bart's Die I cut this out and again using the colour cloud I inked the edges before removing from the die. Once dry I attached to card using pads to give dimension.

I chose a Sentiment from the Chic Floral Occasion Stamps and Embossed this with Silver Embossing Powder.


Finishing Touches

I sprayed a sheet of white card stock with Frosty Sky Mister Spray, then when dry ( a couple if minutes) I cut several flowers from the Faux Quilled Blooms Die, shaped and glued together before attaching to the card. I then added Glacier Ice Glitter Jewels to the petals and small Dazzlers to the centres.

Finally using Frosty Sky P.V.A. glue I added pearls around the edge of  the card surrounding the sentiment.

                           
                       Happy Crafting


Wednesday, 11 November 2015

Frosty Mink - Christmas Greetings

Good afternoon everyone,

I hope for those of you who have  been fortunate enough to watch Phill's live shows on HOCHANDA today have enjoyed them so far.

The next show is 4.00pm and the last show for today is 7.00pm


Today's card is one from the show, which Phill did a variation of for one of his demo's.

For those of you who wish to replicate this, listed below are all the products used which can all be found on Phill's Website    www.honeypotcrafts.co.uk

8 x 8 Card Blank
White Card Stock
Frosty Mink P.V.A.
Frosty Mink Twinkles
Frosty Mink Gilding Wax
Frosty Mink Sparkle Texture Paste
Christmas Holly Sentiment Border Stamps
Cosmic Shimmer Ancient Copper Embossing Powder
Dazzlers
Cosmic Shimmer Glacier Ice
Tracery 6 x 6 Mask
Sue Wilson Dies - Classic Poinsettia
Sue Wilson Dies - Mosaic Poinsettia
Sue Wilson Dies Portuguese Collection - Lisbon
Sue Wilson Snowflake Lattice Embossing Folder


This is how I created it:-

Because of the drying time I started by using the Tracery Mask and Frosty Mink Texture Paste, as this needed about 2 hours to dry.

8 x 8 Card Blank
The first layer I cut to 7.75 square and edged it with Frosty Mink Gilding Wax and attached flat to the card.
The next layer I cut to 7.5 square and embossed it with the Snowflake Lattice Embossing Folder, and attached flat to the card.


Sentiment

Making sure the texture paste was completely dry I then cut this out using the Lisbon Die and attached to the card using foam pads.

Next I  cut a strip of white card to 1.5" wide and stamped the Sentiment using one of the Border Stamps and heat embossed it with Ancient Copper Embossing Powder before embossing it with the Snowflake Lattice Embossing Folder to match the background. Than added this to the card.


Finishing Touches

Next I cut the Poinsettias out and shaped these before attaching to the card. I then edged the petals with Cosmic Shimmer Glue and Glacier Ice, and finished with a Dazzler to the centres.
 Frosty Mink Twinkles were then used around the small die in the centre .
Finally I used Frosty Mink P.V.A. in the centres of each snowflake.

                                                                  Happy Crafting

          
              www.honeypotcrafts.co.uk


Wednesday, 21 October 2015

Graceful Mint - Happy Anniversary

Good Morning Everyone

Not a very nice day here in Nottingham, but we have to make the most of it and 'Carry On Crafting'

Today's card is one I created using  Graceful Mint - I hope you like it.

Products Used:- Which can all be found on Phill's Website - www.honeypotcrafts.co.uk

8 x 8 Cream Card Blank
Cream Card Stock
Graceful Butterfly & Dragonfly Paper Pad
Graceful Mint Twinkles
Graceful Mint P.V.A.
Graceful Mint Mister Spray
Sentimentally Yours Bracket Everyday Sentiments A5 Stamps
Tartan Trellis Embossing Folder
Sue Wilson Dies - Petite Vinery
Sue Wilson New York Collection - Madison Square
Spellbinder Blooms
Spellbinder Bracket Borders 2
Spellbinder Flutters
Cosmic Shimmer Glue
Silver Embossing Powder

This is how I made it:-
8 x 8 Card Blank

1st layer -  Graceful Mint Paper cut to 7.75 sq

2nd layer - Cream Card Stock cut to 7.5 sq which I sprayed with Mint Mister Spray and then embossed using the Tartan Trellis Embossing Folder.

I then attached both layers flat to the card.

Using a sheet of Cream Card Stock and 2 Bracket Dies.
I lined these up each side and cut each one separate.
I then backed this with Mint Paper and attached to the card using pads to give dimension.


Sentiment 

Using the Madison Square Die I cut out in Cream Card stock and backed with Graceful Mint Paper. I then cut the centre square out and using the Everyday Sentiment I heat embossed using Silver Embossing Powder, then attached all these to the card using pads.


Flowers

Using Spellbinders Blooms 3 I cut out 2 sets using Cream Card offcuts and Graceful Mint Paper, then attached to the card, and also added the leaves.

Final Touches 

I used Cosmic Shimmer Glue on the petals and leaves, then sprinkled with Glacier Ice and added a dazzler to the centres.

Next I added Graceful Mint Twinkles to the edges of the large centre die cut and Graceful Mint P.V.A. to the outer edge of the sentiment square.

Finally I cut the butterfly out in Graceful Mint Paper and sprinkled the wings with Glacier Ice.

                                                                    Happy Crafting
www.honeypotcrafts.co.uk


Tuesday, 20 October 2015

Graceful Peach - By Barb - Just For You

Good Morning Everyone,

Once again thank you so much for your lovely comments on my previous post.

Today's card is one I created using the Lovely Graceful Peach products all of which can be found on Phill's Website:-

www.honeypotcrafts.co.uk

Products Used:-

8 x 8 White Card Blank
White Card Stock
Graceful Butterfly & Dragonfly Paper Pad
Graceful Peach Twinkles
Graceful Peach P.V.A.
Graceful Peach Mica Powder
Sentimentally Yours Bracket Everyday Sentiment Stamps
Sue Wilson Noble Dies - Classic Adorned Squares
Sue Wilson Peony Dies
Sue Wilson Petite Vinery
Embossing Folder Leafy Montage
Glamour Dust
Dazzlers
Perfect Medium
Black Soot Distress Ink

This is how I made it:-

8 x 8 Card Blank
First I embossed the front of the card using the Leafy Montage Embossing Folder. Then I used Perfect Medium and Peach Mica Powder to create the background.

Next I cut a 7 x 7 Sq from the Peach Dragonfly Paper Pad and attached flat to the card.

Using Plain White Card Stock and the Adorned Square Dies I cut this out and attached to the centre of the card using pads to give dimension.

Then using the 2 inner dies I again cut out using White Card Stock and then backed it with Plain Peach from the pad, and attached again with pads.


Sentiment

Using The Bracket Everyday Sentiment Stamp I masked the brackets off and stamped with Black Soot Distress Ink. Then cut this out with a separate die before attaching to the card using pads.


Finishing Touches

Using Offcuts of paper left from the paper pad I cut out several flowers and leaves and attached to the card, than added dazzlers to the centre of the flowers.

I used Glamour Dust to the centre of the
Adorned Squares, and Peach Twinkles around the edges.

Finally I cut out the Dragon Fly and added glamour dust to the wings and Peach P.V.A. Pearls to the tail.

                  Happy Crafting

                                                                          www.honeypotcrafts.co.uk


Monday, 19 October 2015

Black and Cream by Barb - Featuring The Bracket Birthday and Inspirational Stamps

Good Morning Everyone,

For those of you who went to Doncaster Dome yesterday I hope you managed to stop and say 'hello' to Phill and watch his demo's.


Today's card is one of my favourites and was made as a sample for Phill's  HOCHANDA  show last week.


Product Used:-
which can all be found on Phill's Website:-  www.honeypotcrafts.co.uk

8 x 8 Cream Card Blank
Cream Card Stock
Black Card Stock
Sentimentally Yours Bracket Verse A5 Stamp Set
Sentimentally Yours Inspiration A5 Stamp Set
Black Soot Distress Ink Pad
Cosmic Shimmer Glitter Jewels Glacier Ice
Creative Expressions Finishing Touches Cream Pearls
Sue Wilson Peony Dies
Sue Wilson Petite Vinery Die
Tartan Trellis Embossing Folder
Spellbinder Bracket Border 2 Dies
Spellbinders Flutters
Dazzlers


This is how I made it :-

8 x 8  Cream Card Blank
 Black Card Stock cut to 7.75 sq and attached flat to the card blank.

I then cut a piece of cream card stock to 5.75 x 6.5
and black card stock to 5.5 x 6 and attached both of these flat to the card.

Next I cut a piece of Cream card stock to 5.25 x 6
and using the Border Die I placed this at an angle and cut it out.

Using the Bracket Birthday Verse Stamp I stamped this using Black Soot Distress Ink, then used the Tartan Trellis Embossing Folder to emboss.

I then trimmed this down to fit before attaching to the card using pads to give dimension.

Next I cut a strip of Cream Card Stock to 5.75 x 1.25
and Stamped this using a stamp from the Brackets of Inspiration. I then embossed it using the Tartan Trellis attached this to the card using pads.
I then cut a strip of cream card to 7.5 x  1.75 and embossed before I attached to the right of the card  again using pads.


 Finishing Touches

I added Cream Pearls to the edge of the border below the sentiment, and cut a butterfly from the Spellbinder Flutters die and used Glacier Ice Glitter Jewels on the wings. I also added a butterfly from a Sue Wilson Die.

Using the Peony Die I cut several of these out, shaped and attached to the card, then added leaves from the Petite Vinery dies.

I then added Glacier Ice to the petals and finally finished with a Dazzler to the centre of the flowers.

                      Happy Crafting.


                                                                    www.honeypotcrafts.co.uk


Wednesday, 14 October 2015

Graceful Lilac & Cream - On Your Wedding Day

Good Morning Everyone,

Thank you all so much for your lovely comments on my previous blog.

I hope you all enjoyed watching Phill's demo's on Hochanda, he had an amazing day with a 'Sell Out'
in the first 2 hours. Not really surprised though as I'm sure you will agree  all his stamps are amazing!

On with today's card, one which I really enjoyed creating :-

Products used:-  which can all be found on Phill's website ...... www.honeypotcrafts.co.uk

8 x 8 Cream Card Blank
Cream Card Stock
Graceful Butterflies and Dragonflies paper pad
Graceful Lilac P.V.A.
Graceful Lilac Mister Spray
Bracket Icon A6 Stamps
Bracket Occasion A5 Stamps
More Bracket Sentiments A5 Stamps
Bracket Words of Inspiration Stamps
Sue Wilson Peony Die
Sue Wilson Petite Vinery Die
Sue Wilson Ornate Pierced Rectangles
Creative Expressions Dazzlers
Creative Expressions Pearls
Silver Embossing Powder


To create this card 

I started with a cream 8 x 8 Card Blank and cut the first layer to 7.75 sq in cream card stock , then sprayed it with Graceful Lilac Mister Spray and attached to the main card using Cosmic Glue

Next I cut a 7.5 sq in cream, then using the More Bracket Sentiments I chose the ''On Your Wedding Day''stamp and embossed it with Silver Embossing Powder.


Then using a Stamp from 'Words of Inspiration' I stamped the sentiment at the bottom , again with Silver Embossing Powder. I then attached this to the main card.

Using the largest of the  Pierced Rectangle Dies I  cut this out using Cream Card, then I cut the next size out and backed it with Graceful Lilac from the Paper pad, and attached flat to the card.

Next I cut out the small die and embossed using the Bracket Icon Stamps and Bracket Words of Inspiration Stamps. I then attached this to the card using pads to give dimension.


Finishing Touches

Next I cut the flowers using Petite Vinery and Peony Open & Closed Petals. Once these were shaped I added small Lilac Dazzlers to the centres.

I then added pearls around the edges of both of the pierced rectangles, and finally added 3 P.V.A. pearls to each corner,


                                          Happy Crafting


www.honeypotcrafts.co.uk


Monday, 21 September 2015

Frosty Sky - Christmas Wishes

Good Morning Everyone,

Thanks you all for your lovely comments on my previous post .

I hope all  who went To Ally Pally at the weekend had a wonderful time, and got the chance to meet Phill.

Today's card : 8 x 8 Christmas Card in Frosty Sky.

Products used ( which are all links to Phill's website) :-)

8 x 8 Card Blanks
White Card Stock
Frosty Sky Mister Spray
Frosty Sky Colour Cloud Ink
Frosty Sky Twinkles
Frosty Sky P.V.A. Glue
Sentimentally Yours Christmas Stamps - Bauble Opulence Collection
Spell Binder Dies Create-a-Flake Three
Seam Binding
Glacier Ice Glitter Jewels
Dazzlers
Sue Wilson Snowflake Lattice Embossing Folder


To create this card first  I cut a 7.75 sq from  A4 White Card Stock and used Frosty Sky Mister Spray. Once this was dry (a couple of minutes) I attached to main card blank, using Cosmic Shimmer Glue.

Next I cut a piece of White Card Stock to 6.75 sq and edged it with Frosty Sky Colour Cloud Blending Ink, and again attached flat to card.

The next layer I cut to 6.5 sq and using the Snowflakes from the Bauble Opulence Collection Stamps I created the background using Frosty Sky, then attached flat to the card.


 Next I cut a piece of white card stock to 5.5 sq and embossed it with the Snowflake Lattice Embossing Folder
and attached this to the card using pads.

Using the Bauble Opulence Collection Stamps I stamped 2 baubles using Frosty Sky Colour Cloud Blending Ink. Then stamped the Sentiment in the centre of the bauble. Once these were dry I cut them out and glued back to back, inserting a very narrow strip of acetate to the top and attached to the card.


Using the  Spellbinder Create -a -Flake Three I cut several of these out and shaped these,glued together and attached to the card.


Finishing Touches

Once all this was assembled I used Frosty Sky P.V.A. Glue to add pearls to the Snowflake Lattice. Then I used Glacier Ice Glitter Jewels to the tips of the snowflakes and also to snowflake background and snowflakes on the bauble.

I then added Frosty Sky Twinkles around the edge of the bauble.

Using Seam Binding, I made a triple bow and tails to add to the top of the bauble.

Finally I added Dazzlers to the centre of the snowflakes and also the centre of the bow.

                                       
                                                                   Happy Crafting


Friday, 18 September 2015

Black and White - Happy New Year

Good Morning Everyone,

It was lovely to read all your comments on my last posting, thank you all so much.

Phill's shows on HOCHANDA went down a storm with everyone enjoying his demo's.

Keep watching his Facebook page and his Blog as all the cards he made are being given away, details will be posted very soon.

Today's card: 8 x 8 New Year Card in Black & White

Products used: (which are links to Phill's website )  :-)


8 x 8 Card Blank
Plain White Card Stock
Plain Black Card Stock
Plain White Vellum
Sentimentally Yours Bauble Elegant Collection A5 Stamps
Sentimentally Yours Festive Border Collection Stamp A5
Dazzlers
Seam Binding
Silver Embossing Powder
Glacier Ice Glitter Jewels
Cosmic Shimmer Acrylic Glue
Perfect Medium
Spell Binder Dies - Grand Nestabilities
Spell Binder Dies -Create -A-Flake Three
Sue Wilson Embossing Folder - Swirling Holly


First I cut a piece of Black Card to 7.75 sq and attached flat the the main card blank, then I cut a piece of white card stock to 7.5 sq . Using the Swirling Holly Embossing Folder I embossed this and attached flat to the card.

Next I cut out the frame using Black Card Stock, and my Grand Nestabilities Dies. I then chose my border from the Festive Border Collection Stamps. Using Silver Shine Embossing Powder and Perfect Medium I embossed around the frame, then attached to the card using pads to give dimension.


Sentiment

To create the sentiment I used the Bauble Elegant Collection Stamp.

I stamped two of these and again used Silver Shine Embossing Powder.

I then added the sentiment and again embossed it.

Next I cut them both out and glued them back to back inserting a very thin strip of acetate into the top of the bauble, which I then attached under the frame.

(The back of the bauble could be left blank to insert a personal message)


Snowflakes

Using Create-a-Flake Three dies I cut several of these out using white vellum. I shaped and glued together and attached to the card, using Cosmic Shimmer glue.

Finishing Touches

I added Cosmic Shimmer Glue to the edges of the snow flakes and then added Glacier Ice,
then added a small dazzler to the centre,

Finally I made a triple bow using Black Seam Binding and attached to the top of the bauble and added a medium sized dazzler.

                                                     Happy Crafting


.


Thursday, 10 September 2015

Graceful Pink - Just For You

Good Morning Everyone,

Another lovely day is forecast, I do hope the weatherman is right.

Once again thank you to everyone for your lovely emails and comments, its nice to know I give inspiration to lots of you, but then I am privileged to have one of the best teachers in the crafting world. :-)

On with today's card:-

Products used ( which are links to Phill's website) :-)

8 x 8 Card Blank
Plain White Card Stock
 Butterflies -in-flight Background Stamp
Graceful Butterflies and Dragonflies Paper Pad
Graceful Pink P.V.A.
Graceful Pink Twinkles
Graceful Pink Mica Powder
Stickles
Baroque Sentiments Collection A5 Stamps
Sue Wilson Dies Spanish - Cordoba
Sue Wilson Dies Petite Vinery
Spell Binder Dies Enchanted Labels Twenty Eight
Spell Binder Dies Bloom Four
Small Dazzlers


8 x 8 Card Blank
1st layer White Card Stock cut to 7.75 sq,
I pierced around the edge and then attached flat to the card blank.

Next layer I cut a piece of White Card stock  to 6,75 sq then using the Graceful Pink Mica Powder and the Butterflies in Flight Background Stamp I created the background.


Sentiment :-   

Using the outer Cordoba Die I cut out a Plain White and a Graceful Pink, then layered these together and attached to the card using pads.

Using the middle die from Labels Twenty Eight I cut this out in Plain White and attached to the card again using pads.

Then using a Spell Binder Die ( the name escapes me at the moment, but I will post later) I cut out and stamped the Sentiments from the Baroque Sentiment Collection and attached to the card using pads.


To create the flowers I cut out 8 using the two smallest dies and scraps of paper from the graceful pink, moulded and curled the petals then glued together.

Next I cut out 2 fronds using Petite Vinery and attached all these to the card.
  
Finishing Touches   

Using Graceful Pink P.V.A.   added pearls to the centre middle die and Graceful Pink Twinkles around the sentiment. I then added a small Dazzler to each flower and finally added Stickles to the petals.

                                                                                  Happy Crafting


Monday, 7 September 2015

Black & Cream - Season's Greetings

Good Morning Everyone,

A chilly but dry morning here in Nottingham, a nice day for crafting!

Thank you all for your lovely comments on my previous posting.

Today's card:-

Products used: (which are links to Phill's Website) :-)

8 x 8 Card Blank
Cream Card Stock
Black Card Stock
Swirling Holly Embossing Folder
Christmas Holly Corners, Border & Icon Stamp Set A5
Christmas Holly Decorative Frame - Snow 
Glacier Ice Glitter Jewels
Spellbinder Dies - Layered Poinsettia
Black Soot Distress Ink
Assorted Dazzlers
Gold Embossing Powder


 First I cut the layers as follows:-

 Cream card Stock cut to 7,75 square and attach flat to card blank

Next layer black card stock cut to 7.5 square and attach flat to card

3rd layer cream card stock cut to 7.25 square.

Using the third layer and the corner stamps I stamped each corner using Black Soot Distress Ink,
I then embossed this using Swirling Holly Embossing Folder. Next I attached it flat to the card


Sentiment


Using the Decorative Holly Frame I heat embossed this, then cut out the centre using my craft knife.
I then attached the frame to the card using pads.

Next I cut a piece of cream card to fit the centre square, and stamped the Sentiment onto it before adding to the card.


Finishing Touches

Using scraps of black and cream card I cut several of the Poinsettias out then used Glacier Ice Glitter Jewels to add sparkle, then I moulded the petals, glued them together and attached to the card.

Finally I added Dazzlers to the centre of each flower.


                                       Happy Crafting


Wednesday, 2 September 2015

Graceful Lilac - Birthday Wishes

Good Morning Everyone,

Its been a busy time these last few days, Phill's Craftathon was  a great success, many thanks to all who attended, judging by the comments on the day, you all enjoyed yourselves.


Today's card 8 x 8

Products Used:- ( which are also links to Phill's Website) :-)


8 x 8 Card Blank
Graceful Butterflies and Dragonflies Paper Pad
Dragonfly Days Background Stamp
Sentimentally Yours Baroque Sentiments 2 Collection Stamps
Lilac Card Stock
White Card Stock
Graceful Lilac Mister Spray
Graceful Lilac Mica Powder
Graceful Lilac P.V.A
Graceful Lilac Twinkles
Seam Binding
Medium Dazzlers
Spell Binder Dragon Delight Dies
Sue Wilson French Collection Provence Dies


The first thing I did before cutting out was to colour the Seam Binding with Graceful Lilac Mister Spray. ( needs time to dry)

1st Layer Lilac Paper from Paper pad cut to 7.75 square.
I then cut a strip of the coloured Seam Binding and attached it to the 7.75 square before attaching to the main card.

Next I cut the layers:-

2 pieces of plain white card stock

1st layer - 7 x 4.25
2nd layer - 7 x 2.25

I then inked the edges and attached flat to the main card.

Using the Lilac Card Stock I cut 2 pieces

1st - 6.75 x 4"
2nd - 6.75 x 2"
and attached to the card using pads.

I then cut 2 more pieces of white card

1st - 6.5 x 3.75
2nd - 6.5 x 1.75

Using a small amount of Mica Powder and Mister Spray I blended these together to use as ink, then using the Dragonfly Days Background Stamp I randomly stamped. Once dried I attached to the card using pads to give dimension.


Sentiment

I cut out the centre feature using white and lilac card stock, and the Provence Die.

I chose a Sentiment from the Baroque Collection and then attached to to the card.


Finishing Touches
Using White and Lilac Card I cut out the Dragonflies and attached to the card. I then added the P.V.A. and Glamour Dust.

I added Graceful Lilac Twinkles around the edge of the sentiment.


Finally with the remaining Seam Binding I made a double bow and swags, then finished  off with a Whie  medium size Dazzler.


                                  Happy Crafting


-


Friday, 28 August 2015

Chic Floral - Just For You

Good Morning Everyone,

Only 2 days left until Phill's Craftathon where 50 lucky crafters will have a wonderful day making cards with Phill and Julia Watts.

I will be there helping out and look forward to meeting you all, either again or for  the first time.


Today's card is something different from the last few days but I will be back with Christmas Cards soon as I am getting a little obsessed with all the lovely New Stamps, Colour Cloud, Paper pads etc that Phill has brought out for us all.

Here we go then with today's card, its an A4

Products used: ( which are links to Phill's website too) :-)

A4 Card White Card Blank
A4 Green Card stock
A4 White Card stock
Chic Floral Everyday Sentiment Collection A5 Stamps
Chic Floral Corner, Border & Icon A5 Stamp Set
8 x 8 Snakeskin Embossing Folder
Chic Floral Paper pad
Sue Wilson French Collection Corner, Border & Tag Dies
Sue Wilson French Collection Provence Dies
Sue Wilson Finishing Touches Petite Vinery Dies
Spell Binder Blooms Three
Stick Pins
Dazzlers
Seam Binding


1st layer
Green card stock cut to 20 cm x 29 cm and attach to main card.

2nd layer
Plain white card stock cut to 19 cm x 28 cm I then used a stamp from the Corner Border & Icon stamps and Chic Moss Mister Spray to create the background, then attached to main card.

Using a piece of plain white card I cut to 17 cm x 18 cm and embossed it using the Snakeskin Embossing Folder, then pierced around the edges. I then cut across the bottom diagonally.

Next I cut out the border die and stamped the top of it using the Border Stamp and then attached it to the 17 x 18 card.

Using the plain side of Chic Floral Moss paper I embossed again using the Snakeskin Folder. I then attached both pieces to the main card.


Sentiment

Using the French Collection Provence Die I cut this out using  plain white card, then stamped the Sentiment from Chic Floral Everyday Collection Stamps.

Then using the Provence die I cut out a piece of Chic Floral Moss paper and attached the Sentiment to it using pads, and attached this to card again using pads.


Flowers

To create the flowers I used Spell Binder Blooms Three and Sue Wilson Petite Vinery.
I cut out the bloom using plain white card and also left over chic floral paper, then used Chic Moss Mister Spray on the white ones, after shaping these I attached to the main card along with the Vinery.

Butterfly

For this I used a Spellbinder Butterfly Die and cut it out using scraps of Chic Floral Moss plain and patterned paper, and attached to card.


Finishing Touches

I edged around the Sentiment with Chic Moss Twinkles, and also used this on the butterfly wings.
The triple bow and swags were made using seam binding, Finally I added Stick pins and Medium Dazzler to the bow and small dazzlers to the flowers.

                                                                  Happy Crafting