What's New

My Brand New Sentimentally Yours 2017 Xmas Stencils are now available at www.honeypotcrafts.co.uk!
Showing posts with label Giveway Card. Show all posts

Monday, 14 September 2015

Birthday Wishes in Chic Moss Giveaway Card ... The winner is.........

Good Morning Everyone

Thank you so much for all your lovely comments on the blog, for both my own projects and Barbs,.. I hope you're getting lots of inspiration from them :-)

Anyhoo,.. the winner of my Chic Moss Birthday Wishes card is....

Linda Norris!

Well Done Linda!!
Can you please email me your address etc to phill@honeypotcrafts.co.uk and this little lovely will be winging its way to you when I get back from my HOCHANDA shows on Thursday :-)

I'm in a good mood, so I will do another Giveaway card post later today :-)


Happy Crafting!


Monday, 7 September 2015

Giveaway Card - Birthday Wishes in Chic Moss

Good Afternoon Everyone

So,.. here I am, with enough time to actually do a Blog post and I thought, it's been a while since I did a card giveaway,so .. here you go :-)

I'll just say a big thank you to Barb too, she's doing a grand job keeping you inspired with some of her cards she's made for me for samples.. Thanks Barb!

This is an 8x8 card I made using some of my Chic Moss collection of Cosmic Shimmer products (a colour that I absolutely love!)

To be in with a chance to win this card, signed by lil ole me, please just ensure you are following my Blog and leave a comment on this post..
I'll draw a winner randomly next Monday morning (14th) and notify you here :-)

Here's what I used (and, surprisingly, I've made the list links to the items on my website too (well, it does make it easier for you to swish over and buy them lol)

Sentimentally Yours Dragonfly Retreat A6 Background Stamp
Sentimentally Yours Scribbled Frame Sentiments Stamp Set (must have set in my humble opinion)
Chic Moss : Colour Cloud, Ink Mister and PVA Glue
Sue Wilson Delicate Fronds Die Set
Sue Wilson Delicate Daisies Complete Petals Die Set (must have set in my humble opinion)
Sue Wilson Ornamental Corners Die Set
Sue Wilson Pierced Tags Die Set
Sue Wilson A4 Leafy Montage Embossing Folder
Creative Expressions Self Adhesive Pearl Strips - Double Row White
Creative Expressions Smoothies


And here's what I did... 

I embossed an A4 piece of white cardstock with the lovely Leafy Montage embossing folder, (important to do this before trimming it down as embossing cardstock alters the dimensions slightly) I then trimmed it to 19.5cm x 19.5cm.

I then cut the aperture to the left side of my embossed cardstock and I did this with one of Sues' Striplet dies as most have the plain outer edge (you can, of course, use your craft knife)
I positioned the aperture onto my card blank as if I was going to stick it and made a pencil mark around all four corners (this gave me a a guide with which to stamp within)

Using the fabulous Smoothies and my even more fabulous Dragonfly Retreat background stamp, I applied Chic Moss Colour Cloud directly to the stamp and stamped within the pencil lines.

At this point, you may find it easier to apply the self adhesive pearls around the aperture (I do it at the end so I don't have them where they don't need to be, but it is trickier trying to navigate them under flowers etc) The single row was created by simply cutting a strip of the double row pearls in half :-)

I then used foam tape on this piece, for dimension, then stuck it to my card blank.

I then did all my die cutting, which was:-
4 x daisies x 2
2 x Ornate Corners
2 x Delicate Fronds
2 x Pierced Tags

The ornate corners, one of the pieced tags and a selection of the delicate daisies were popped into my ink misting box and misted all in one go with the Chic Moss Ink Mister.

The flowers were shaped and stuck together with my trusty Cosmic Shimmer PVA Glue and finished off in the centre with a good blob (very technical lol) of the Chic Moss Pearl PVA Glue.

I then stamped my 'Birthday Wishes' from my Scribbled Frame Stamps (these are a fabulous smaller size to my other sentiments so work perfectly on these tags)

Last but not least, I assembled it all together as you see in the photo and finished with the double row white pearls around the open edges.

Here's a bigger photo :-)


Don't forget my very first shows on Hochanda are:-

Tuesday 15th September at 8pm
Wednesday 16th September at 9am, 10am, 12noon, 4pm and 7pm

I hope you will join me!!
Remember, if you don't have Sky or Freeview/Freesat you can watch in High Definition on their website


Happy Crafting!


Wednesday, 22 July 2015

Gold Embossed Season's Greetings - Giveaway Card

Good Morning Everyone

I'll be heading off to Creative Expressions HQ today for a retailer demonstration day with my colleagues from Creative Expressions,..

I'll be demonstrating my new Christmas Holly Collection of stamps, paper pads and my 6 new Cosmic Shimmer colours .. should be fun!
(you'll be able to get the paper pads and cosmic colours from my website this week)

Anyhoo,..
I've been so busy these last few weeks that I haven't done a giveway card (shocking, I know), so, I am going to give away one of my favourite new samples of a card I made using my new Christmas Holly Decorative Frame and Insert Frame stamps,..

Now, this 8x8 card took me a fair bit of time, what with all the embossing and glittering and I'm heading off soon so I won't give details of how I made it today, I'll do that over the next few days,..

I'll tell you what I used though...
(they are all links to the products on my www to, in case you 'need' to purchase them) :-)

Sentimentally Yours Christmas Holly Flourishes A5 Stamp Set
Sentimentally Yours Christmas Holly Decorative Frame  Stamp - Lattice
Sentimentally Yours Insert Frame Stamp - Season's Greetings
Cosmic Shimmer Detail Embossing Powder - Gold
Sue Wilsons' Stick Pin Elements
Creative Expressions Dazzlers


And here's the card :-)


And here's a little close up of the lovely lattice in the stamps :-)


To be in with a chance of winning this card, you must be a follower of my Blog and leave a comment on this post,.. The draw will close at 9am next Monday (27th July) and I will choose a winner randomly at that time.

Suzanne - I haven't forgotten you, just been really busy! I'll get your winning card off to you tomorrow :-)

Remember: you can 'Pin' any of these photos to your own Pinterest Boards (or Facebook etc),.. just hover your mouse over the photo's and it gives you little buttons with various options of places to share the photos etc 

Good Luck!

Happy Crafting!


Tuesday, 14 July 2015

And the winner of my Decadent Wine Card is......

Good Morning Everyone

As always, thank you so much for taking the time to leave comments on my Blog, I appreciate it!

Anyhoo,
The winner of my Decadent Wine Card is...

Suzanne Corker!!

Suzanne, can you please email me your address etc to phill@honeypotcrafts.co.uk and this 'not so' little lovely will be dropping through your letterbox :-)


BridgetCG, I still haven't had an email with your address to send my Chic Aubergine card,.. please email to the same address,.. if you haven't sent it by next Monday (20th), I will have to redraw for that card...

I'm late with this weeks giveaway card, but I will put the post on asap, so pop back and check if I've done it :-)


Happy Crafting!


Monday, 6 July 2015

Decadent Wine,... With Love...

Good Morning Everyone

It's Monday!

Which means it's a brand new week and I have a brand new card to give away!

I love my range of Ink Misters and love that you can take a plain ole piece of cardstock and make it priddy with just a teeny bit of ink from the misters,.. I also love that you can die cut your favourite embellishments in the exact same colour!

It's also a bit of a bonus for me as I create the colours I want and then Creative Expressions develop the lovely products for me in completely co-ordinating colours,.. for a co-ordination freak like me, it's perfect!

It's something I've always wanted to do,.. reduce the stress for us crafters and maximise crafting time,.. no more searching for different products in colours that may or may not match,.. mine do!

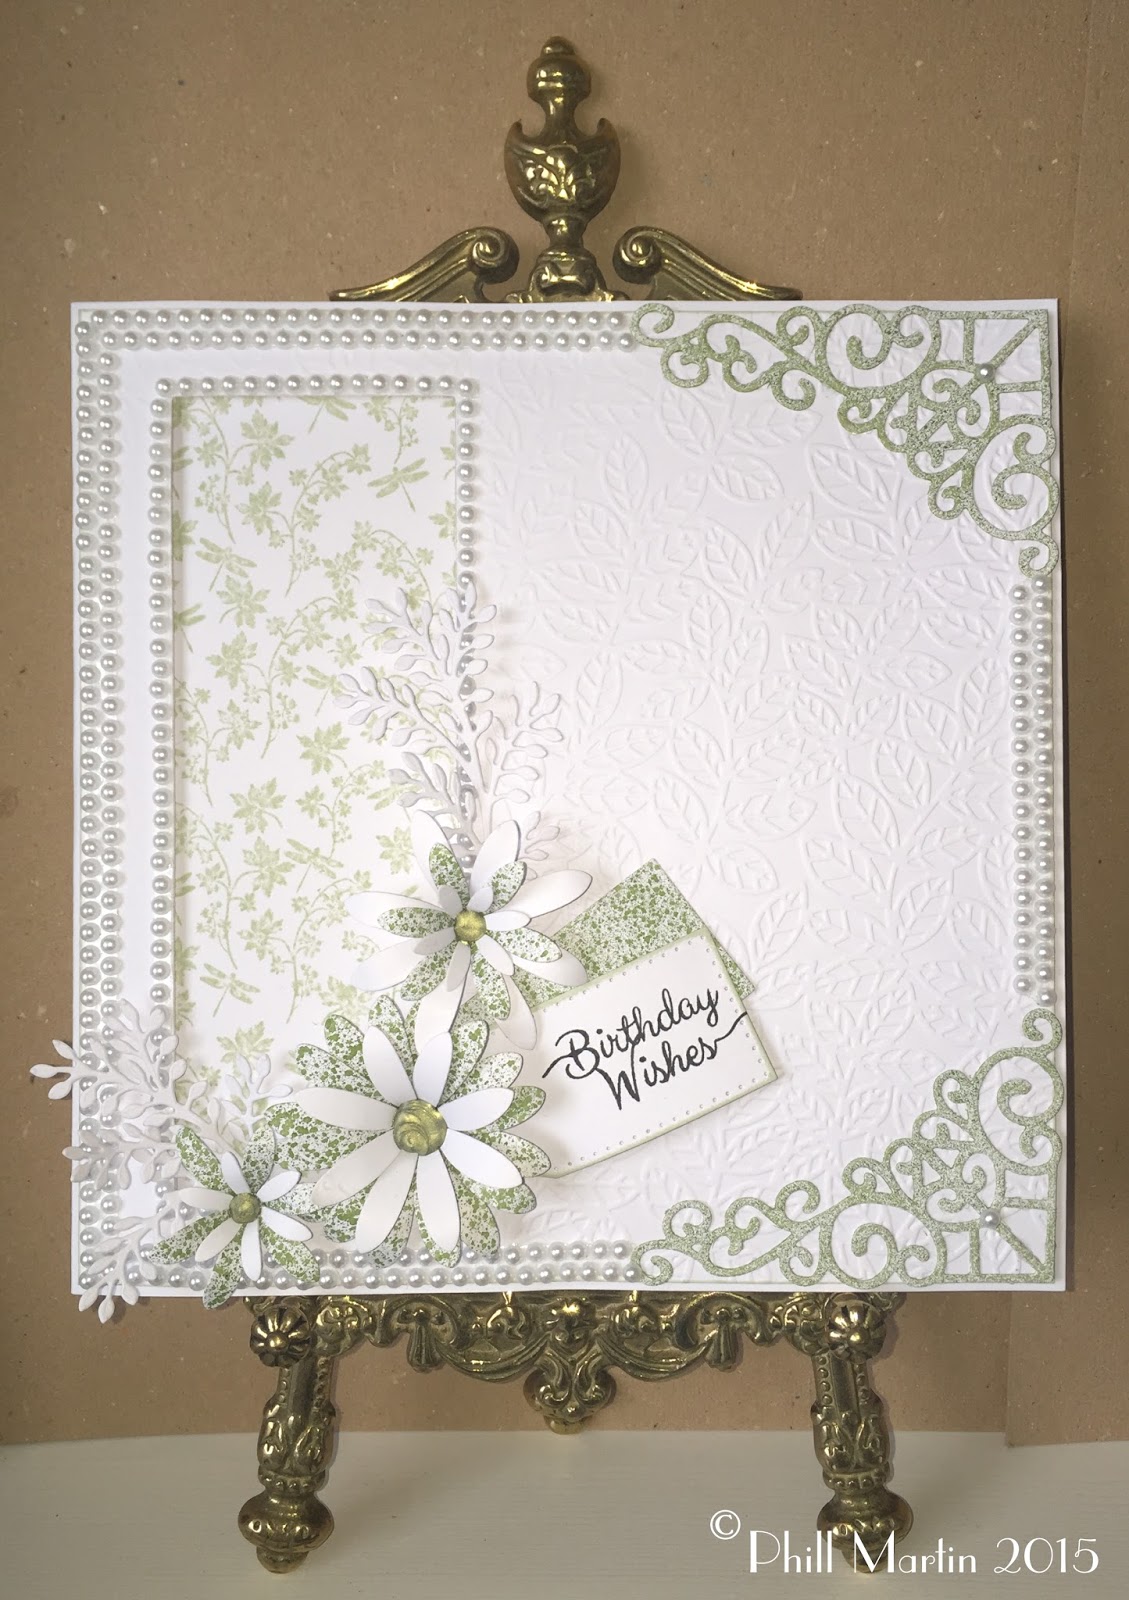
Anyhoo,.. here's this weeks giveaway card... it's a big one,.. 18cm x 24cm to be precise!

This is what I used 
(as always, the list is also a link to the product on my website, just in case you 'need' to purchase any of the items I've used :-)

Coconut White Foundations Cardstock
Tartan Trellis A4 Embossing Folder
Decadent Wine Complete Cosmic Shimmer Kit
Sentimentally Yours Scribbled Frame Sentiments Stamps
Sentimentally Yours Rose Montage Stamps
Aged Mahogany Distress Ink Pad
Bundled Sage Distress Ink Pad
Dies by Sue Wilson Gemini PYXIS Die
Dies by Sue Wilson Austrian Collection - Innsbruck
Dies by Sue Wilson Austrian Collection - Salzburg
Dies by Sue Wilson - Finishing Touches - Faux Quilled Blooms

And here's what I did

I trimmed 2 pieces of Coconut White cardstock to 18cm x 24cm and on one of them I scored down 2.5cm on the short side (this just creates a 'fold' so the card stands)
Layer 1 is 17.5 x 23.5cm and this was embossed with the lovely (one of my faves) Tartan Trellis Embossing folder in my Grand Calibur, the edges were inked using the Aged Mahogany Distress Ink Pad.

I cut two pieces of card using the Pyxis die, both pieces are 17.5 cm wide and they were trimmed so that one overlaps the other slightly.
The larger of the two was given the Decadent Wine Ink Mister treatment (as was the waste bit from this piece, which was used at the top of my card)
The smaller piece was stamped on the bottom corners with one of the roses from my Rose Montage stamps, 2 in first generation and 1 second generation in the centre, Leaves were stamped either side using second generation Bundled Sage.
These pieces were then stuck to the bottom of the embossed piece with Cosmic Shimmer glue, as was the waste piece that was ink misted and then this lot was stuck to the card itself with Cosmic Shimmer glue.

I added the peals using the Decadent Wine Pearl PVA Glue and set this all to one side to dry.

In the meantime, I die cut the layers from the Innsbruck and Salzburg dies from Coconut White Foundations Cardstock, the bottom (full) layer from each set was ink misted and the smaller oval on top was given a stamped edge using the beautiful Rose Montage stamps (top tip - do the leaves first), you can see that I did the same on the oval, 2 first generation and 1 second generation. Stamping my montage stamps 'off the edge' of toppers really makes the topper priddy :-) I stamped my new Scribbled Frame Sentiment into the centre using the Aged Mahogany Distress Ink.
All these layers are on foam tape for definition.

I used some of the ink misted cardstock that was left and die cut 2 butterflies, placing one either side of my toppers.

As a finishing touch, I die cut 3 flowers from the Faux Quilled Blooms in the same size and some leaves.
These were stuck onto the card using Cosmic Shimmer Glue and I added a large pearl using the Decadent Wine PVA Glue,.. brilliant that we can make these any size!!


Finally, I added one of my signature triple upside bows (link to my YouTube Video showing you how to make them) using some co-ordinating seam binding ribbon and the extra tails, with a lovely heart dazzler in the centre (use Cosmic Shimmer glue for sticking the dazzlers too, sticks like a dream onto seam binding!)

Anyhoo, I hope you like this card,.. I really enjoyed making it (so much so, I'm re-creating it as a Christmas card with my new stamps as we type,.. well, I will be finishing it once I've finished this post lol)

To be in with a chance of winning this card, simply leave a comment (you must be following my Blog too) and the winner will be chosen at random next Monday (13th) morning.

Don't forget I will be at Summer Crafting in Doncaster this weekend!!
My stand is D13, hope to see some of you there!!

Good Luck!

Happy Crafting!


And the winner of the Chic Aubergine card is.....

Good Morning Everyone

Again, thank you so much for all your lovely comments on my cards (and Barbs'),..
I appreciate you taking the time out :-)

Anyhoo,
The winner of my Chic Aubergine card is....

BridgetCG!!

Bridget, can you please email me your address to phill@honeypotcrafts.co.uk and I'll sign the card and get it posted off to you...

Look out for this little lovely (not that's it little, it's an 8x8!) coming through your letterbox!

It's Monday morning, so that means there will be a brand new card giveaway shortly!

Keep an eye on my Blog,.. the card will be on shortly!


Happy Crafting!


Friday, 3 July 2015

And the winner of the Decadent Denim card is....

Good Morning Everyone

Thank you so much for all your lovely comments on my Blog,..

The winner of my Decadent Denim card is.....

Angela Allen!!

Angela, can you please email me your address etc to phill@honeypotcrafts.co.uk and I'll sign the card and get it posted to you!

This little (well, it's an 8x8) lovely will be on its' way to you soon!


Remember everyone -
There is still another one of my cards up for grabs and the winner for this one will be drawn next Monday (6th) at 9am
Just make sure you are following my Blog and leave a comment on the card post :-)

Here's your link to the post with the card on my Blog:-

Chic Aubergine Card Giveaway

And just to remind you,.. this is the card :-)


Good Luck!

Happy Crafting!


Monday, 29 June 2015

Chic Aubergine and,... plain cream cardstock!

Good Morning Everyone

So, I've gone from hardly ever posting on my Blog, to Blog 'mania' ha ha, but I am determined to make use of this Blog to show you all I've been up to, all I'm up to and the occasional sneaky peek into what I have coming for you :-)

With this in mind, and with me having so many things on the go all at once, I have to be realistic,.. I needed help,.. and I knew just who to ask,..

I asked Barb, who is a friend of mine who helps make some of the lovely samples you have seen on my Create & Craft shows and at the Craft shows around the country,.. some of you will have met Barb too, as she helps on my stand at the shows... naturally, she's had amazing teaching (from me ha ha), but she has an incredible eye for detail, colour and a love of all the products I bring to you.

Barb will post on my Blog a couple of times a week, showcasing either one of her samples that she's made for me using my products or one of my cards from my workshops in my shop.

Her first post will be this Wednesday so please be gentle with her :-)

OK,..
Now, are you ready for this,.. I am already giving away the Decadent Denim version of the card I made in 3 colourways on Friday, (remember to go and comment on that post to be in with a chance), but how about this,.. I promised I'd start this Monday with a giveaway card each week and here it is,.. that's two chances this week to win one of my cards,.. as usual, you need to be a follower of my blog and leave a comment on this post and I will notify the winner via the Blog next Monday (when the new giveaway starts) :-)

This is what I used: (with links to the products on my www for you)
Chic Aubergine Ink Mister
Chic Aubergine Twinkles
Chic Aubergine PVA Glue
Sentimentally Yours Baroque Sentiments Stamps
Sentimentally Yours Vintage Sheet Music Background Stamp
Dies by Sue Wilson Camellia Complete Petals
Fine Finials A4 Embossing Folder
Spellbinder Border Dies

This is an 8x8 card, made from lots of plain cream cardstock!

I created two layers for the background of the card, the largest was misted with the Chic Aubergine Ink Mister and the second was stamped with the Vintage Sheet Music stamp in Dusty Concorde distress ink (it's a good match for the aubergine)

The top three layers were cut from cream cardstock, the top one having the die cut border, at an angle and the top edge finished with some Chic Aubergine Twinkles, the next layer was embossed with the beautiful new Fine Finials embossing folder, the third layer was left cream, but the edges were inked with the Dusty Concorde to give it some definition.

These top 3 layers are on foam tape, for dimension, the Vintage Sheet Music stamped layer is also on foam tape for extra height and the edges have been given the Chic Aubergine Twinkles treatment! (this won't be a cheap one to post! ha ha) and the ink misted layer is on flat with cosmic shimmer glue.

The flowers have been cut from the Camellia dies in cream cardstock and I did use a small woodware punch for the 'in between' sizes,.. I stamped the Vintage Sheet Music Stamp onto a couple of the flowers with the Dusty Concorde distress ink.

The two ovals are woodware punches, the largest was ink misted and the top one stamped with the Baroque Sentiments Stamps (one of my favourite sets!)
The two ovals are on foam tape and the flowers stuck with cosmic shimmer glue in (as close as I could get it) opposite formations of each other, all finished of in the centre with the Chic Aubergine Twinkles.

Last, but not least, just two pearls in the bottom corners using the Chic Aubergine PVA glue.


I love the Chic Aubergine range, it's a really beautiful shade and looks amazing on white and cream cardstock alike.

Anyhoo, enough rattling on!

Good Luck!

Happy Crafting!


Friday, 26 June 2015

Part 2 of ... It all starts with plain white cardstock!

Good Evening Everyone

Remember the post I did a few days ago, where I showed you the 2 versions of the cards I made, all from plain white cardstock,.. 1 with my Chic Pumpkin Range of Cosmic Shimmer Products and the other with my Decadent Bamboo range of Cosmic Shimmer Products?..

Well, I told you I'd done a third version in Decadent Denim, but I had to leave it at the shop as the pearl PVA glue hadn't dried,... here it is!

This is the first ever card that I will give away from my Blog (copying my partners in craft, Julia Watts & Sue Wilson) lol, and I will do this every week, but it will start again next Monday, and be every Monday thereafter,..

I'll draw a name at random on Friday, next week (4th July) for someone to win this Decadent Denim version of my card and I will notify you via a post on the Blog.

Simply leave a comment below (all nice, of course) lol

(you must also be a follower of my Blog to be eligible)(if you are not sure how to do this, just click the 'Join This Site' button, which is on the right side of the Blog page, about halfway down)

Anyhoo,.. here are the photos of the Decadent Denim version of my card,.. hope you like it :-)

I know I like a card if I have taken the time to replicate it in three colourways! ha ha

Happy Crafting and Good Luck!!