What's New

My Brand New Sentimentally Yours 2017 Xmas Stencils are now available at www.honeypotcrafts.co.uk!
Showing posts with label Distress Inks. Show all posts

Tuesday, 19 September 2017

Festive Berries Stamp Collection

Hello crafters!

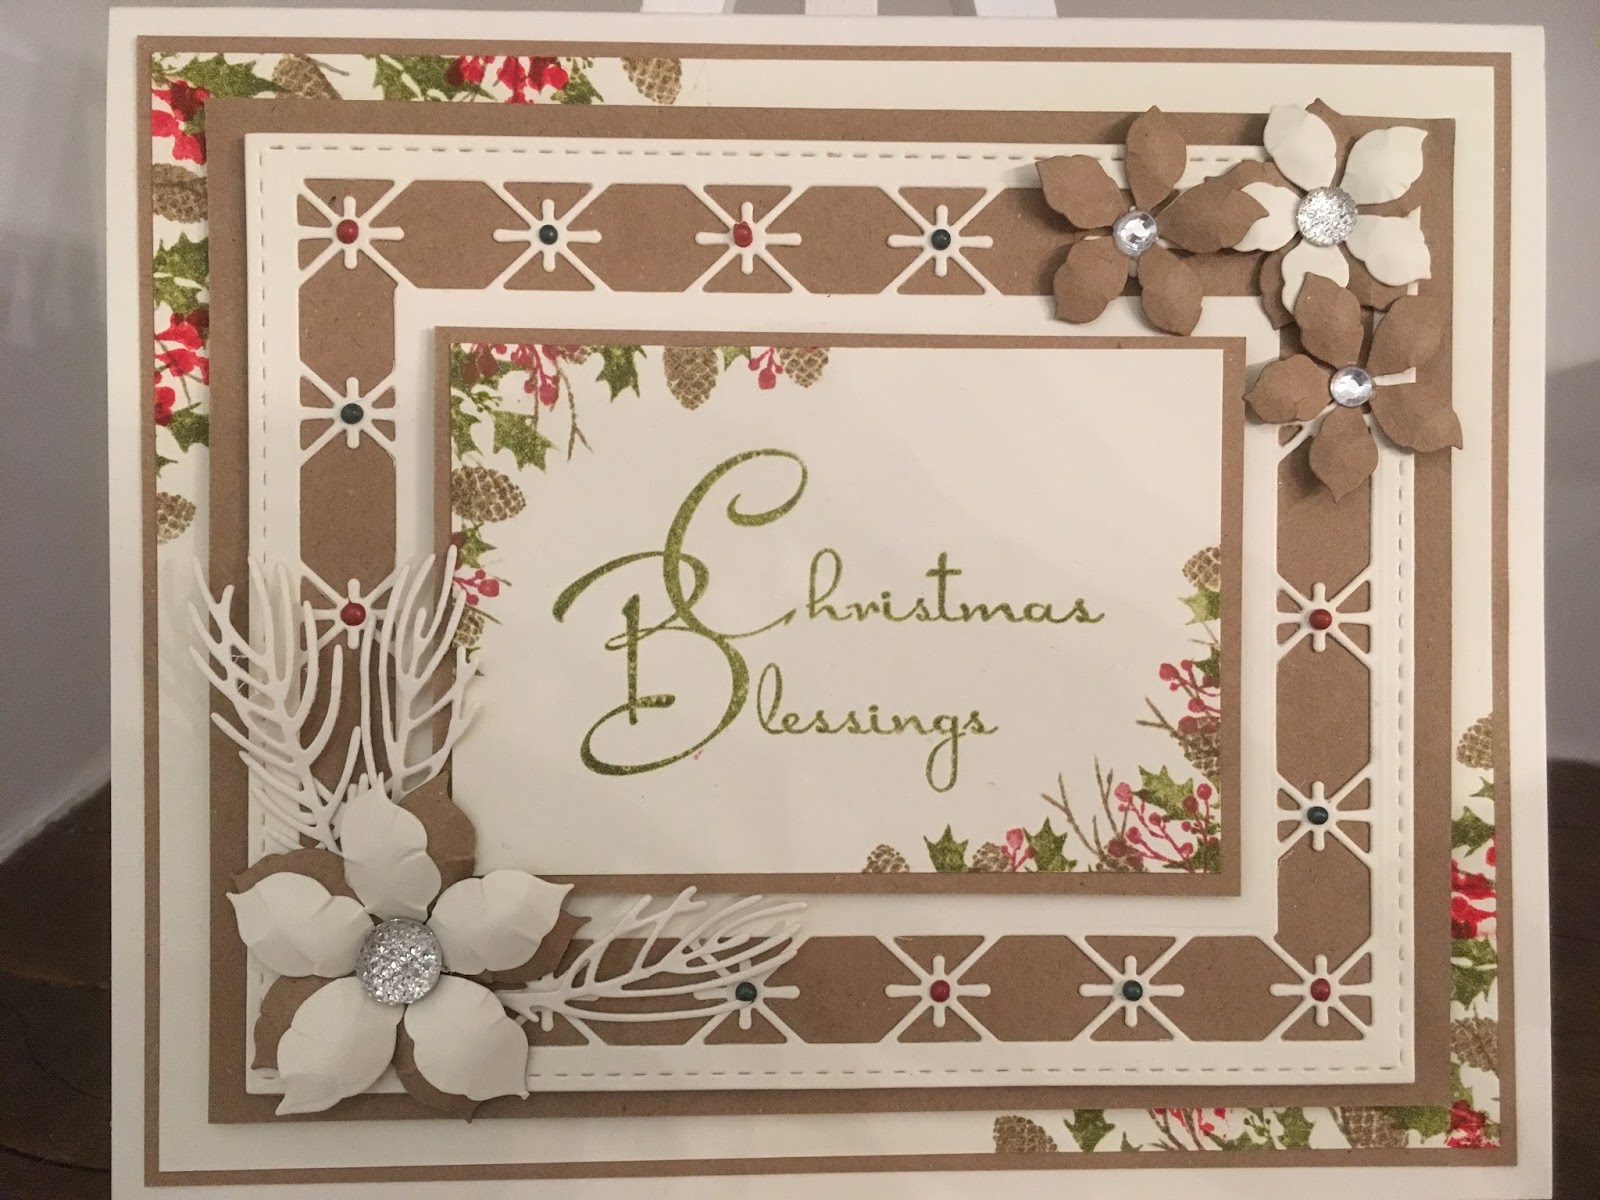
Here is a fabulous Christmas card made at our regular craft workshops.

This card was made using Phill's Sentimentally Yours 'Festive Berries' Stamp Collection.

We have also used Memento Inks, Distress Inks, Archival Inks or Distress Oxides.  The Sue Wilson craft dies are: Poinsettia Additions, Twinkle Star Frame and Pine Cone & Greenery.

Stage 1 - cut out all the layers and die cuts needed for your card

  • Base Card - 21cm x 17.5cm
  • 1st Layer (Kraft Card) - 20cm x 16.5cm
  • 2nd Layer (Cream) - 19.5cm x 16cm
  • 3rd Layer (Kraft Card) - 17.5cm x 14.5cm
  • TWINKLE STAR FRAME (CREAM)
  • 4th Layer (Kraft Card) - 11.5cm x 8cm
  • 5th Layer (Cream) - 11cm x 7.5cm
Stage 2 - using three different ink colours from the same brand (e.g. Memento in brown, red and green) create your Festive Montage on the corners of the Cream layers.  Build up the pattern with the 'Festive Berries Flourishes A5 Stamp Set.

Stage 3 - choose your sentiment for your topper.  Here we have used the 'Festive Berries Elegant A5 Stamp Set'.  If you wish to use clear embossing over your sentiment then you need to use a Distress Oxide Ink Pad.  Otherwise use your chosen colour.

Stage 4 - Assemble your card layers, using foam tape where you wish.  Add your Poinsettia Flowers and Pine Cone/Greenery.

Stage 5 - add some bling if you wish!  Here we have also used Pearl PVA on the Twinkle Star Frame in Berry Red and added some twine to match the Kraft Card.

 The Full Card


Here's what we used with links to our website....
Other cards ...


Remember - we are more than happy for you to replicate our cards in your own style! :-)

Wednesday, 18 January 2017

Baroque Collection - Distress Ink with Embossing Folder


Hello crafters!

Here is a 7x7 card made at our workshops recently.

This card is a sample made using the Sentimentally Yours 'Baroque Stamp Collection', Sue Wilson Pacific Ocean Die 'Bora Bora' and Distress Inks with Embossing Folders.

The colour we have used on the main sample card is peeled paint, but as always we have included other samples made with different colours.

Stage 1 - cut out all the die cuts shapes needed for the card.  Here we have used 'Bora Bora' for the main centre piece, Perfect Peony Complete Petals and Delicate Fronds.

Stage 2 - cut out the layers needed for the card.  For the embossed layer we used a piece of card larger than needed and trimmed it down after to make sure it was the correct size.  We did this as we used the Gemini Machine to ensure we got a really deep embossed finish, as we wanted to ink over the pattern.  If we had cut the layer the correct size to start with, sometimes it can shrink when put through an embossing machine.

Stage 3 - we inked all the layers and die cut shapes using distress inks and smoothies.  Remember, you only need to colour the bits you will actually see; so don't colour all the card and save time!  It's worth practising with the distress inks first to gauge how much colour you want to add.  You can always add more, but you cannot take away!

Stage 4 - we used a 'Speedball Brayer' to apply the distress inks over the embossing folder pattern.  Load up the brayer with a good amount of ink and then lightly roll over the raised embossed pattern.  You will need to apply the ink a few times and in different directions to get an even coverage.

Stage 5 -  stamp your chosen Sentiment; here we have used 'Baroque Mini Sentiments'.  Then shape your flowers, assemble all the layers and add some bling!

Here is the list of what we used with links to the www:


The Full Card


Close Up


Close Up


Different Colour Samples


Peacock Feathers

Squeezed Lemonade

Iced Spruce

Victorian Velvet

Remember -We are more than happy for you to replicate our cards in your own style :-)

Happy Crafting!


PS - Don't forget to 'like' Phill's Facebook page and follow him on Twitter to keep in touch, you can also find him on Pinterest and Instagram for ideas and inspiration :-)

(Links below)


Thursday, 3 November 2016

Scribbled Christmas - Distress Ink and Embossing Folder

Hello Crafters!

Here is another beautiful card made at our regular card making workshops.

This card is a sample made using the 'Scribbled Christmas Collection' and applying 'Distress Inks' with a 'Speedball Brayer' to an embossing folder.  I am sure you agree, it creates a stunning effect and allows you complete colour co-ordination!  This colour is Victorian Velvet, but I have also attached some other examples made by the lovely ladies in our Sheffield workshops.

To apply the Distress Ink we have rolled the Speedball Brayer over the over the ink pad until it was fully covered.  Then we lightly rolled the brayer on the rough side of the embossing folder, checking that it was evenly covered.  To ensure we didn't smudge the card, we placed the card stock vertically on the smooth/clean side of the embossing folder and lifted it together to close.  A bit of experimentation told us it was better to put the open end of the embossing folder through the machine first with the plain side facing up!

On this card I have used the A5 Scribbled Christmas Verse stamps for the main sentiment and added the snowflake flourish from the same set to help co-ordinate the look.   The sentiments on the oval frame are from the A5 Scribbled Christmas Sentiments stamps and they've  been curved on the acrylic block to allow us to stamp around the frame. 

The oval frame has been created using 2 dies from Sue Wilson's Double Pierced Oval Set A. The bit that comes out of the middle has been used for the sentiment. 

We have finished off the card with Sue Wilson dies: Holly Branch and Poinsettia Additions.

Here is what I used (with links to the WWW if you need them) 


Sentimentally Yours - Super Smooth Stamping Card in Cream
Sentimentally Yours Scribbled Christmas Collection - A5 Scribbled Christmas Verses 
Sentimentally Yours Scribbled Christmas Collection - A5 Scribbled Christmas Sentiments
Sue Wilson Dies - Double Pierced Ovals Set ASue Wilson Dies - Holly BranchSue Wilson Dies - Poinsettia AdditionsIcicle Sparkles - Cosmic Shimmer Glitter JewelsNordic Tiles - 8 x 8 Embossing Folder
Woodware - Speedball Brayer
Victorian Velvet - Distress Ink Pad

(As always, we only use Cosmic Shimmer dries clear PVA glue and Perfect Medium pad)


The Full Card


Close Up


Close Up


Close Up


Stormy Sky Example


Bundled Sage Example


Dusty Concord Example


Remember -We are more than happy for you to replicate our cards in your own style :-)

Happy Crafting!


PS - Don't forget to 'like' Phill's Facebook page and follow him on Twitter to keep in touch, you can also find him on Pinterest and Instagram for ideas and inspiration :-)

(Links below)


Wednesday, 27 January 2016

Black & Cream - Many Happy Returns

Good Morning Everyone,

Thank you all for your lovely messages and comments on my previous post, its nice to know you are enjoying the blog:-

Today's card is another small one :-

All the products used to create this are available on Phill's Website 

www.honeypotcrafts.co.uk

This is what I used :-

Cream Card Stock
Black Card Stock
Baroque Frame A6 Stamp Set
Mini Baroque Everyday Sentiment Stamps
Black Soot Distress Ink
Sue Wilson Noble Dies - Ornate Pierced Rectangles
Sue Wilson Camellia Open Petals
Sue Wilson Camellia Complete Petals
Creative Expressions Cream Pearl Strips
Cosmic Shimmer Glue

This is what I did :-

First I cut the card shape using Cream Card Stock and the largest of the dies, then cut another piece out and attached to the card blank.

Using the 2nd and 3rd largest dies I cut these out using Black Card and layered it onto cream card.

I then attached this to the main card using pads to give dimension.

Using the smallest pierced die I cut out in cream card to stamp the border. For this I used the Baroque Frame Stamp and Black Soot Distress Ink.
Then attached flat to the card.


Sentiment & Flowers

I cut a piece of Cream Card to 3.25 x 2.25 and chose a stamp from the Mini Baroque Everyday Sentiment Stamp Set, and used Black Soot Distress Ink.

This was then attached to the card using pads to give dimension.

To create the flowers I cut an assortment of these both in cream and black using offcuts of card.

I then shaped and assembled them and attached to card.


Finishing Touches

Finally I added cream pearls around the outer edge of the card and also to the centre of the flowers.

                                                Happy Crafting

Monday, 14 December 2015

Ultimate Baroque Collection - Have A Wonderful Birthday

Good Morning Everyone.

Another day closer to Christmas, so for those of you who have completed their cards I thought we would have a change and do a Birthday Card.

Today's card I created in Black & Cream. All the products I used can be found on Phill's Website -

www.honeypotcrafts.co.uk

This is what I used:-

Black Card Stock
Cream Card Stock
Sentimentally Yours Baroque Border Sentiment A5 Stamp Set
Sue Wilson Noble Dies - Ornate Pierced Rectangles
Sue Wilson Dies Laurel Leaves
Sue Wilson Dies Peony
Creative Expression Pearl Strips
Black Soot Distress Ink
Cosmic Shimmer Acrylic Glue


Using Black Card Stock I cut the shape of the card using the largest of the Pierced Rectangle Dies.

Then using the next 2 sizes down and Cream Card Stock I cut these out and attached to the main card (flat) using Cosmic Shimmer Glue.


Sentiment

Using Cream Card Stock and the smallest plain die I cut this out.

I then stamped across the centre using the Baroque Strip from the Border Sentiment Stamps and Black Soot Distress Ink.

Next I chose 'Have A Wonderful Birthday' from the Baroque Border Sentiments and stamped this again using Black Soot Distress Ink.
I attached to the card using pads to give dimension, then decorated the edges with Twinkles


Finishing Touches

I cut several flowers using The Complete Peony Dies and alternating with Black & Cream Card.

I then cut the Laurel Leaves using Cream Card, then while these were still in the die I used Black Soot Distress Ink to colour the leaves.

I then shaped these and attached to the card.
Finally I added Pearls around the edges of the Black Card and also the Cream layer, not forgetting the centre of each flower.

                                 Happy crafting


Tuesday, 20 October 2015

Graceful Peach - By Barb - Just For You

Good Morning Everyone,

Once again thank you so much for your lovely comments on my previous post.

Today's card is one I created using the Lovely Graceful Peach products all of which can be found on Phill's Website:-

www.honeypotcrafts.co.uk

Products Used:-

8 x 8 White Card Blank
White Card Stock
Graceful Butterfly & Dragonfly Paper Pad
Graceful Peach Twinkles
Graceful Peach P.V.A.
Graceful Peach Mica Powder
Sentimentally Yours Bracket Everyday Sentiment Stamps
Sue Wilson Noble Dies - Classic Adorned Squares
Sue Wilson Peony Dies
Sue Wilson Petite Vinery
Embossing Folder Leafy Montage
Glamour Dust
Dazzlers
Perfect Medium
Black Soot Distress Ink

This is how I made it:-

8 x 8 Card Blank
First I embossed the front of the card using the Leafy Montage Embossing Folder. Then I used Perfect Medium and Peach Mica Powder to create the background.

Next I cut a 7 x 7 Sq from the Peach Dragonfly Paper Pad and attached flat to the card.

Using Plain White Card Stock and the Adorned Square Dies I cut this out and attached to the centre of the card using pads to give dimension.

Then using the 2 inner dies I again cut out using White Card Stock and then backed it with Plain Peach from the pad, and attached again with pads.


Sentiment

Using The Bracket Everyday Sentiment Stamp I masked the brackets off and stamped with Black Soot Distress Ink. Then cut this out with a separate die before attaching to the card using pads.


Finishing Touches

Using Offcuts of paper left from the paper pad I cut out several flowers and leaves and attached to the card, than added dazzlers to the centre of the flowers.

I used Glamour Dust to the centre of the
Adorned Squares, and Peach Twinkles around the edges.

Finally I cut out the Dragon Fly and added glamour dust to the wings and Peach P.V.A. Pearls to the tail.

                  Happy Crafting

                                                                          www.honeypotcrafts.co.uk


Monday, 19 October 2015

Black and Cream by Barb - Featuring The Bracket Birthday and Inspirational Stamps

Good Morning Everyone,

For those of you who went to Doncaster Dome yesterday I hope you managed to stop and say 'hello' to Phill and watch his demo's.


Today's card is one of my favourites and was made as a sample for Phill's  HOCHANDA  show last week.


Product Used:-
which can all be found on Phill's Website:-  www.honeypotcrafts.co.uk

8 x 8 Cream Card Blank
Cream Card Stock
Black Card Stock
Sentimentally Yours Bracket Verse A5 Stamp Set
Sentimentally Yours Inspiration A5 Stamp Set
Black Soot Distress Ink Pad
Cosmic Shimmer Glitter Jewels Glacier Ice
Creative Expressions Finishing Touches Cream Pearls
Sue Wilson Peony Dies
Sue Wilson Petite Vinery Die
Tartan Trellis Embossing Folder
Spellbinder Bracket Border 2 Dies
Spellbinders Flutters
Dazzlers


This is how I made it :-

8 x 8  Cream Card Blank
 Black Card Stock cut to 7.75 sq and attached flat to the card blank.

I then cut a piece of cream card stock to 5.75 x 6.5
and black card stock to 5.5 x 6 and attached both of these flat to the card.

Next I cut a piece of Cream card stock to 5.25 x 6
and using the Border Die I placed this at an angle and cut it out.

Using the Bracket Birthday Verse Stamp I stamped this using Black Soot Distress Ink, then used the Tartan Trellis Embossing Folder to emboss.

I then trimmed this down to fit before attaching to the card using pads to give dimension.

Next I cut a strip of Cream Card Stock to 5.75 x 1.25
and Stamped this using a stamp from the Brackets of Inspiration. I then embossed it using the Tartan Trellis attached this to the card using pads.
I then cut a strip of cream card to 7.5 x  1.75 and embossed before I attached to the right of the card  again using pads.


 Finishing Touches

I added Cream Pearls to the edge of the border below the sentiment, and cut a butterfly from the Spellbinder Flutters die and used Glacier Ice Glitter Jewels on the wings. I also added a butterfly from a Sue Wilson Die.

Using the Peony Die I cut several of these out, shaped and attached to the card, then added leaves from the Petite Vinery dies.

I then added Glacier Ice to the petals and finally finished with a Dazzler to the centre of the flowers.

                      Happy Crafting.


                                                                    www.honeypotcrafts.co.uk


Tuesday, 13 October 2015

Good Morning Everyone,

Apologies for absence during the last couple of weeks, we have been extremely busy with the Harrogate Show, preparing samples and demo's for Hochanda not to mention all the NEW PRODUCTS Phill is working on !

Did you all enjoy last nights Launch of the Bracket Stamps on HOCHANDA?

Phill is demonstrating again today at 9.00 am, 12.00 noon, 4.00 pm   and 7.00 pm

On with today's card

These are the products used:-

8 x 8 Card Blanks
Black Card Stock
White Card Stock
Silver Embossing Powder
Black Soot Distress Ink Pad
Bracket Birthday Verse A5 Stamp Set
Bracket Icons A6 Stamp Set
Cosmic Shimmer Glue

All of which can be found on :- www.honeypotcrafts.co.uk


8 x 8 Card
The first layer is 7.75 sq cut in Black Card Stock.
Then using the Bracket Icon Stamps I stamped around the edge and used Silver Embossing Powder, and attached flat to the main card.

Next I cut a piece of White Card Stock to fit into the design and stamped around the edges with the Small Bracket from the Icon Set  using Black Soot Distress Ink and attached flat to the card.

Then I cut a piece of black card to fit and also white card for layering and attached both of these to the card using pads.

Finally I cut a piece of black card and using the Bracket Birthday Verse I stamped this and embossed it with Silver Embossing Powder, and attached to the card using pads.


Happy Crafting 

www.honeypotcrafts.co.uk


Wednesday, 23 September 2015

Royal Purple and White - Special Birthday Wish


Good Morning Everyone,

Phill is busy at Creative Expressions HQ today so I am doing today's blog. I hope you like it.

Products used: (which are all links to Phill's website) :-)

8 x 8 Card Blank
White Card stock
Centura Pearl Royal  Purple  Card Stock 
Dusty Concord Distress Ink
Frosty Heather Twinkles
Frosty Heather P.V.A.
Sentimentally Yours Scribbled Sentiments
Sentimentally Yours Elegant Milestone Birthday A5 Stamp Set
Spellbinder Dies Labels 47
Sue Wilson Dies Caribbean Collection Border, Accent & Tags
Sue Wilson Dies Perfect Peony Complete Petals
Sue Wilson Dies Perfect Peony Open Petals
Sue Wilson Dies Petite Vinery
Spellbinder Die D-Lites Flutter Flight
Cosmic Shimmer Acrylic Glue


To create this card I cut a 7.75 sq piece of Royal Purple Card and attached flat to the main card blank.

Next using Plain White Card Stock I cut a 7.5 sq and using the Accent Die I cut each corner.

Then using the Sentimentally Yours Scribbles Sentiments and Dusty Concord Distress Ink I stamped across the top . Then attached flat to the card,.


Using Plain White card Stock and Spellbinder Labels 47 I cut out the largest die and backed this onto a piece of Royal Purple card,

Then using the Elegant Milestone Birthday Stamps and Dusty Concord Distress Ink I stamped the sentiment and attached this to the card using pads to give dimension.

Next using both Complete and Open Petals of the Peony Dies I cut out several of these in scraps of lilac card, which I shaped and glued to the card using Cosmic Shimmer Acrylic Glue. I then cut out 2 of the Petite Vinery Dies using scrap pieces of white card, and attached to the card.

I then cut out the butterfly and attached to the card.

Finally I added Frosty Heather Twinkle to the wings of the Butterfly, and Frosty Heather Pearl P.V.A. to the centre of the flowers.

                                                               Happy Crafting


Friday, 4 September 2015

Graceful Mustard - Birthday

Good Morning Everyone,

I am overwhelmed with the lovely comments and emails I am receiving from so many of you, thank you all so much.

On with today's card which I hope you will like.

Products Used: (which are also links to Phill's Website) :-)


8 x 8 Card Blank
White Card Stock
Brown Card Stock
Graceful Butterflies & Dragonflies Paper Pad
Graceful Mustard Twinkles
Graceful Mustard P.V.A.
Graceful Mustard Gilding Wax
Sentimentally Yours Birthday Verse 2 Collection Stamps A5
Sue Wilson Die - Classic Rose
Sue Wilson Die - Austrian Collection - Innsbruck
Spellbinder Die Dragon Delight
Walnut Stain Distress Ink


 Using a sheet of Mustard Dragonfly paper from the paper pad I attached this to front of the card blank.

Then using the Rose Dies I cut the apertures in the top left hand corner. Next I used Mustard Twinkles around the edges of the apertures.

I then cut out the Dragonflies using off cuts of brown and white card, and attached these to the card.
Then added Mustard Twinkles and Mustard P.V.A. to decorate.


Sentiment

Using the two largest  Innsbruck Dies and Brown Card stock I cut the dies out.

Then using the smallest plain oval die cut out using  White Card Stock.
Using Walnut Stain Ink I stamped the Birthday Verse Sentiment.
I then edged this with Mustard Gilding Wax, and Mustard Twinkles to the brown oval.


Using a sheet of plain white card stock I sprayed it with Mustard Mister Spray and then cut several of the roses out, I also used scraps of Graceful Mustard paper.

I made the roses up, then closing the card I lined the roses up attached to the inside of the card, (through the aperture)

I cut 3 triangles from the paper pad and added these to the corners of the inside of the card, and finally finished with a dragonfly.


                               Happy Crafting


Thursday, 27 August 2015

Black & Cream - Joy

Good Morning Everyone,

Once again thank you all for your lovely comments on my previous blog.


Today's card is created in the ever popular black & ivory

Products used: (which are also links to Phill's website) :-)

8 x 8 Ivory Card Blank
Ivory Card stock
Black Card stock
Christmas Holly Flourishes Stamps A5
Christmas Holly Decorative Sentiment Stamps A5
Sue Wilson Noble Dies Ornate Pierced Rectangles
Sue Wilson Festive Collection Holly Accessory Kit Dies
Swirling Holly Embossing Folder
Black Soot Distress Ink
Black Seam Binding
Black P.V.A.


First Layer  - Black card stock cut to 7.75 square
Second layer  - Ivory card stock cut to 7.5 square
Third layer Black card stock cut to 7.25 square
Then attach all three layers to main card blank.

Next I cut a piece of Ivory card to 7" square and using one of the Christmas Holly Flourish stamps and Black Soot Distress Ink I created the background. Next I embossed this using the Swirling Holly Embossing Folder.I then attached to card.


Sentiment
Using the 2nd and 3rd size Ornate Pierced Rectangle dies I cut this out using cream card and also a larger piece in black to back it onto.
Then I stamped the sentiment using Black Soot Distress Ink, adding these to the card using pads to give dimension.


Finishing Touches

I used Black Pearl P.V.A.around the edge of the centre die to embellish the sentiment.
Using the Holly Die and scraps of Ivory & Black card I cut out a few holly leaves and added these to the card.
Finally I made a triple bow using Black Seam Binding and added this along with a medium Dazzler.

                                                                     Happy Crafting


Saturday, 1 August 2015

Christmas Wishes - To The Best Husband - Featuring the NEW Christmas Holly Collection

Good Morning Everyone

Once again I would like to thank you all for your lovely comments on the cards I post, I really appreciate you taking the time to look and comment.

Today's card is another 8 x 8 which is my favourite size, although this can be adapted for smaller cards,and looks equally as nice.

It is also straightforward and an easy one to make.

Products Used:- (which are also links to Phill's Website too) :-)


8 x 8 Cream Card Blank
Christmas Holly Relatives A5 Stamps
Christmas Holly More Relatives A5 Stamps
Christmas Holly Sentiment Borders A5 Stamps
Christmas Holly Decorative Frame Single Stamp Lattice
A4 Snowflake Lattice Embossing Folder
Dazzlers
Creative Expressions PVA Black Pearl
Black Soot Distress Ink Pad
Gold Embossing Powder


Matting & Layering

1st Layer Black Card cut to 19.5cm sq.

2nd layer Cream Card cut to 19cm. sq.

3rd Layer Black Card cut to 14.5cm sq.

4th Layer Cream Card cut to 14cm. sq.

5th Layer Black Card cut to 12cm. sq

For the Sentiment I cut :-                                  
Cream Card 6.5 cm. sq
Black Card 6 cm. sq
Cream Card 5.75 cm


The 19.5 sq. black card I left plain and attached this to the Base Card.

Next with the 19 cm.sq Cream Card and the Sentiment Border Stamps I stamped around the edge of the card using two different Sentiments and Black Soot Distress Ink.

Next lining up the 14.5 cm sq Black Card I attached this to the card using pads.
The next layer 14 cm sq Cream Card I Embossed and attached this flat to the card.


Next using the 12 cm, sq  Black Card and the Christmas Holly Decorative Frame Lattice Stamp I heat embossed this with Gold Embossing Powder, and attached to the card using pads.


Sentiment
Using the smallest layer of Cream Card I stamped the Sentiment and then attached all three layers flat to the card.

Finally I added  Pearl PVA to each corner of the Sentiment and Dazzlers to the corners of the main card.


                                                             Happy Crafting