What's New

My Brand New Sentimentally Yours 2017 Xmas Stencils are now available at www.honeypotcrafts.co.uk!
Showing posts with label Dies by Sue Wilson. Show all posts

Tuesday, 19 September 2017

Festive Berries Stamp Collection

Hello crafters!

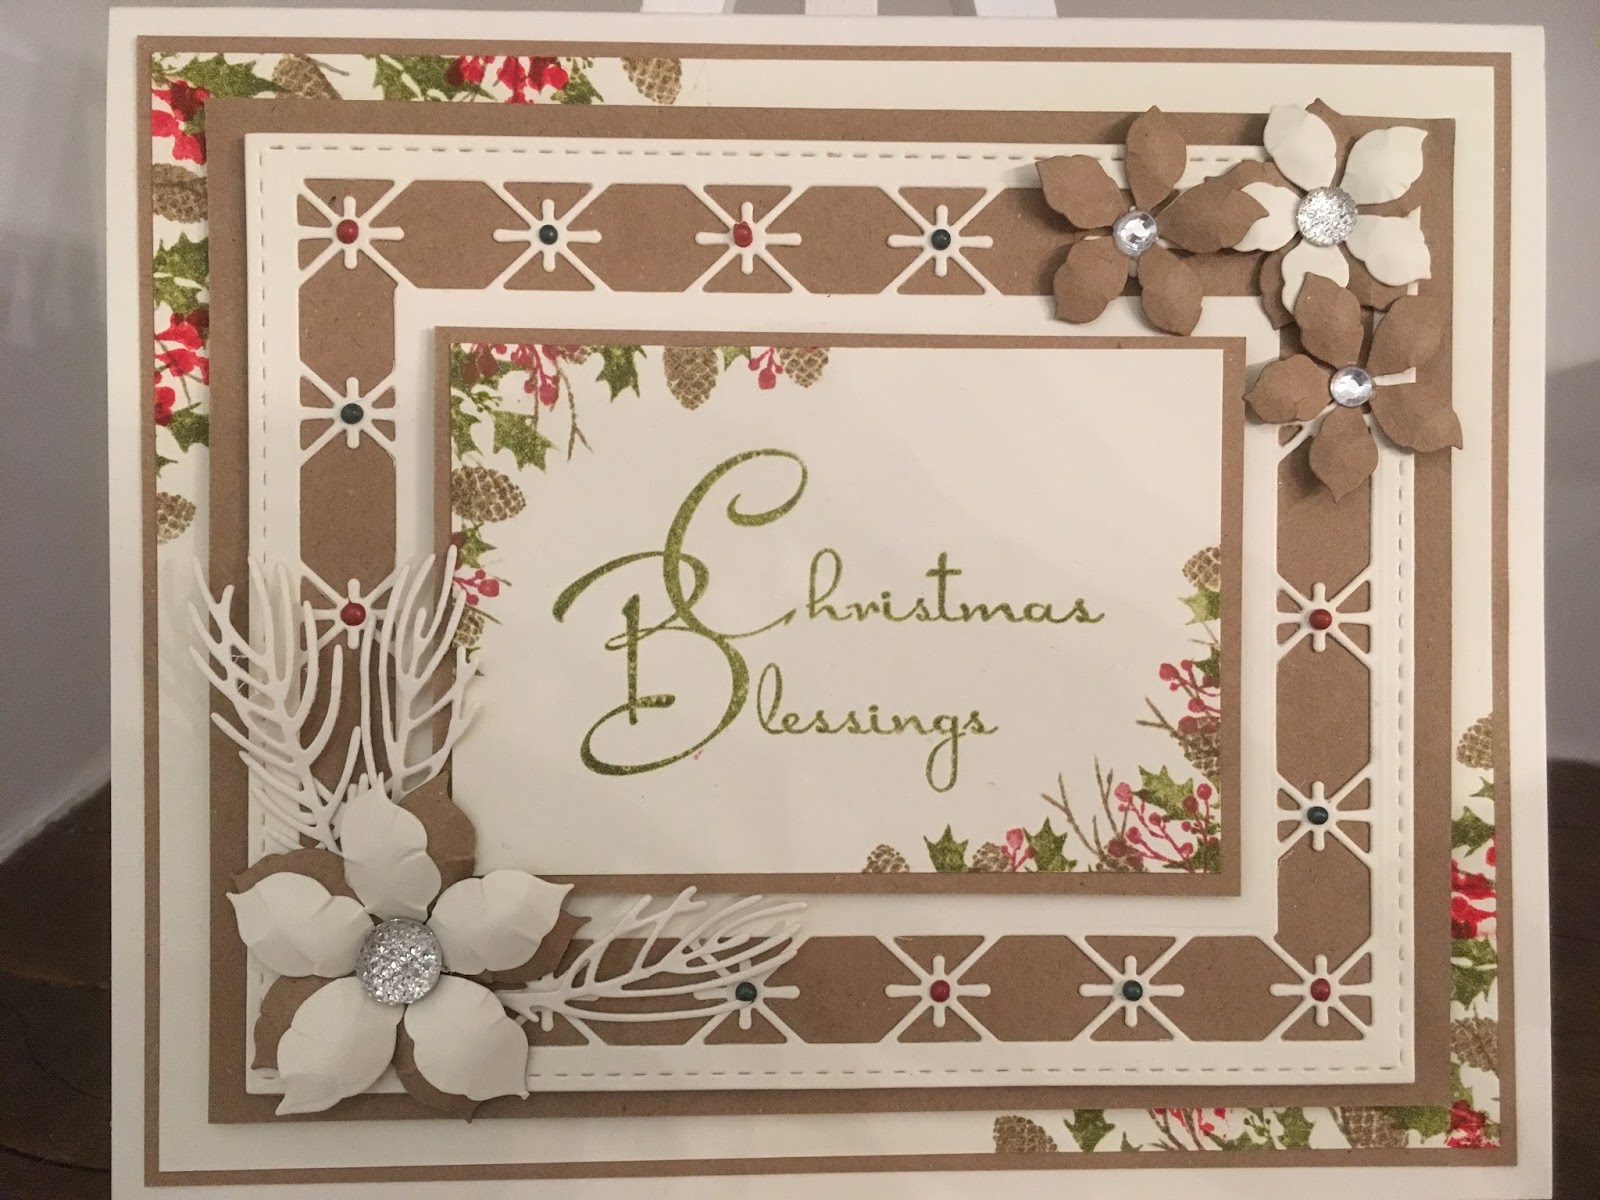
Here is a fabulous Christmas card made at our regular craft workshops.

This card was made using Phill's Sentimentally Yours 'Festive Berries' Stamp Collection.

We have also used Memento Inks, Distress Inks, Archival Inks or Distress Oxides.  The Sue Wilson craft dies are: Poinsettia Additions, Twinkle Star Frame and Pine Cone & Greenery.

Stage 1 - cut out all the layers and die cuts needed for your card

  • Base Card - 21cm x 17.5cm
  • 1st Layer (Kraft Card) - 20cm x 16.5cm
  • 2nd Layer (Cream) - 19.5cm x 16cm
  • 3rd Layer (Kraft Card) - 17.5cm x 14.5cm
  • TWINKLE STAR FRAME (CREAM)
  • 4th Layer (Kraft Card) - 11.5cm x 8cm
  • 5th Layer (Cream) - 11cm x 7.5cm
Stage 2 - using three different ink colours from the same brand (e.g. Memento in brown, red and green) create your Festive Montage on the corners of the Cream layers.  Build up the pattern with the 'Festive Berries Flourishes A5 Stamp Set.

Stage 3 - choose your sentiment for your topper.  Here we have used the 'Festive Berries Elegant A5 Stamp Set'.  If you wish to use clear embossing over your sentiment then you need to use a Distress Oxide Ink Pad.  Otherwise use your chosen colour.

Stage 4 - Assemble your card layers, using foam tape where you wish.  Add your Poinsettia Flowers and Pine Cone/Greenery.

Stage 5 - add some bling if you wish!  Here we have also used Pearl PVA on the Twinkle Star Frame in Berry Red and added some twine to match the Kraft Card.

 The Full Card


Here's what we used with links to our website....
Other cards ...


Remember - we are more than happy for you to replicate our cards in your own style! :-)

Wednesday, 18 January 2017

Baroque Collection - Distress Ink with Embossing Folder


Hello crafters!

Here is a 7x7 card made at our workshops recently.

This card is a sample made using the Sentimentally Yours 'Baroque Stamp Collection', Sue Wilson Pacific Ocean Die 'Bora Bora' and Distress Inks with Embossing Folders.

The colour we have used on the main sample card is peeled paint, but as always we have included other samples made with different colours.

Stage 1 - cut out all the die cuts shapes needed for the card.  Here we have used 'Bora Bora' for the main centre piece, Perfect Peony Complete Petals and Delicate Fronds.

Stage 2 - cut out the layers needed for the card.  For the embossed layer we used a piece of card larger than needed and trimmed it down after to make sure it was the correct size.  We did this as we used the Gemini Machine to ensure we got a really deep embossed finish, as we wanted to ink over the pattern.  If we had cut the layer the correct size to start with, sometimes it can shrink when put through an embossing machine.

Stage 3 - we inked all the layers and die cut shapes using distress inks and smoothies.  Remember, you only need to colour the bits you will actually see; so don't colour all the card and save time!  It's worth practising with the distress inks first to gauge how much colour you want to add.  You can always add more, but you cannot take away!

Stage 4 - we used a 'Speedball Brayer' to apply the distress inks over the embossing folder pattern.  Load up the brayer with a good amount of ink and then lightly roll over the raised embossed pattern.  You will need to apply the ink a few times and in different directions to get an even coverage.

Stage 5 -  stamp your chosen Sentiment; here we have used 'Baroque Mini Sentiments'.  Then shape your flowers, assemble all the layers and add some bling!

Here is the list of what we used with links to the www:


The Full Card


Close Up


Close Up


Different Colour Samples


Peacock Feathers

Squeezed Lemonade

Iced Spruce

Victorian Velvet

Remember -We are more than happy for you to replicate our cards in your own style :-)

Happy Crafting!


PS - Don't forget to 'like' Phill's Facebook page and follow him on Twitter to keep in touch, you can also find him on Pinterest and Instagram for ideas and inspiration :-)

(Links below)


Monday, 8 February 2016

Burgundy & Cream - On Your Special Day- Showcasing The Brand New Dies 'From The Heart Collection'

Good Morning Everyone,

I can't begin to tell you how honoured I am to have Phill's New 'From The Heart' Collection Dies to work with. They are absolutely amazing, and cut first time every time.

For those of you who know Phill you will know what he's like for attention to detail. Well I can say he has certainly excelled himself with the launch of his New Dies.

I absolutely loved creating the samples, and hope these will give you inspiration.

Today's Card:-

All the products used to create this card are available on Phill's Website:-

www.honeypotcrafts.co.uk

This is what I used:-
A4 Card Blank
Burgundy Card Stock
Cream Card Stock
Phill Martin Dies From The Heart Collection - On Your Special day
Sue Wilson Dies Austrian Collection - Innsbruck
Sue Wilson Peony Dies
Sue Wilson Laurel Leaves
Sue Wilson Canadian Collection Border, Corner & Tags
Sue Wilson Embossing Folder Lattice Hearts
Spellbinder Dragon Delight
Creative Expression Pearl Strips
Glossy Accents
Diamond Sprinkles
Cosmic Shimmer Glue


This is what I did:- 

First I cut the layers:-
2 pieces of burgundy  card cut to 8 x 12.5 and 7.5 x 12
2 pieces of cream card cut to 7.75 x 12.25 and 7.25 x 11.75
then using the Lattice Hearts Embossing Folder I embossed the  smallest cream card.
 Placing the corner tag at an angle I carefully cut this out,then added all the layers to the base card.


Sentiment

Using the  Austrian Collection  Innsbruck Dies
I cut these out using Cream Card and mounted this onto Burgundy card, then attached to the main card using pads to give dimension.

Then using burgundy card stock I cut out the Sentiment 'On Your Special Day' from  the New 'From The Heart ' Collection.
I then attached this flat to the centre.


Flowers

Using the Peony Dies I cut a selection of flowers out using scraps of burgundy card stock, then shaped and glued these together before adding to the card.

I then cut out the Laurel Leaves again using burgundy card, and added to the card.


Finishing Touches  
 
 I added the Dragonfly using the Dragon Delight Die and Burgundy Card stock, before adding Diamond Sprinkles to the wings, and also to the flowers and leaves.

I then added pearl strips across the top of the border die.

I attached a couple of hearts to the top corners of the card.

Finally I added Glossy Accents to the Hearts of the Sentiment and corners.
                                               Happy Crafting
                                  

Monday, 14 December 2015

Ultimate Baroque Collection - Have A Wonderful Birthday

Good Morning Everyone.

Another day closer to Christmas, so for those of you who have completed their cards I thought we would have a change and do a Birthday Card.

Today's card I created in Black & Cream. All the products I used can be found on Phill's Website -

www.honeypotcrafts.co.uk

This is what I used:-

Black Card Stock
Cream Card Stock
Sentimentally Yours Baroque Border Sentiment A5 Stamp Set
Sue Wilson Noble Dies - Ornate Pierced Rectangles
Sue Wilson Dies Laurel Leaves
Sue Wilson Dies Peony
Creative Expression Pearl Strips
Black Soot Distress Ink
Cosmic Shimmer Acrylic Glue


Using Black Card Stock I cut the shape of the card using the largest of the Pierced Rectangle Dies.

Then using the next 2 sizes down and Cream Card Stock I cut these out and attached to the main card (flat) using Cosmic Shimmer Glue.


Sentiment

Using Cream Card Stock and the smallest plain die I cut this out.

I then stamped across the centre using the Baroque Strip from the Border Sentiment Stamps and Black Soot Distress Ink.

Next I chose 'Have A Wonderful Birthday' from the Baroque Border Sentiments and stamped this again using Black Soot Distress Ink.
I attached to the card using pads to give dimension, then decorated the edges with Twinkles


Finishing Touches

I cut several flowers using The Complete Peony Dies and alternating with Black & Cream Card.

I then cut the Laurel Leaves using Cream Card, then while these were still in the die I used Black Soot Distress Ink to colour the leaves.

I then shaped these and attached to the card.
Finally I added Pearls around the edges of the Black Card and also the Cream layer, not forgetting the centre of each flower.

                                 Happy crafting


Wednesday, 21 October 2015

Graceful Mint - Happy Anniversary

Good Morning Everyone

Not a very nice day here in Nottingham, but we have to make the most of it and 'Carry On Crafting'

Today's card is one I created using  Graceful Mint - I hope you like it.

Products Used:- Which can all be found on Phill's Website - www.honeypotcrafts.co.uk

8 x 8 Cream Card Blank
Cream Card Stock
Graceful Butterfly & Dragonfly Paper Pad
Graceful Mint Twinkles
Graceful Mint P.V.A.
Graceful Mint Mister Spray
Sentimentally Yours Bracket Everyday Sentiments A5 Stamps
Tartan Trellis Embossing Folder
Sue Wilson Dies - Petite Vinery
Sue Wilson New York Collection - Madison Square
Spellbinder Blooms
Spellbinder Bracket Borders 2
Spellbinder Flutters
Cosmic Shimmer Glue
Silver Embossing Powder

This is how I made it:-
8 x 8 Card Blank

1st layer -  Graceful Mint Paper cut to 7.75 sq

2nd layer - Cream Card Stock cut to 7.5 sq which I sprayed with Mint Mister Spray and then embossed using the Tartan Trellis Embossing Folder.

I then attached both layers flat to the card.

Using a sheet of Cream Card Stock and 2 Bracket Dies.
I lined these up each side and cut each one separate.
I then backed this with Mint Paper and attached to the card using pads to give dimension.


Sentiment 

Using the Madison Square Die I cut out in Cream Card stock and backed with Graceful Mint Paper. I then cut the centre square out and using the Everyday Sentiment I heat embossed using Silver Embossing Powder, then attached all these to the card using pads.


Flowers

Using Spellbinders Blooms 3 I cut out 2 sets using Cream Card offcuts and Graceful Mint Paper, then attached to the card, and also added the leaves.

Final Touches 

I used Cosmic Shimmer Glue on the petals and leaves, then sprinkled with Glacier Ice and added a dazzler to the centres.

Next I added Graceful Mint Twinkles to the edges of the large centre die cut and Graceful Mint P.V.A. to the outer edge of the sentiment square.

Finally I cut the butterfly out in Graceful Mint Paper and sprinkled the wings with Glacier Ice.

                                                                    Happy Crafting
www.honeypotcrafts.co.uk


Monday, 19 October 2015

Black and Cream by Barb - Featuring The Bracket Birthday and Inspirational Stamps

Good Morning Everyone,

For those of you who went to Doncaster Dome yesterday I hope you managed to stop and say 'hello' to Phill and watch his demo's.


Today's card is one of my favourites and was made as a sample for Phill's  HOCHANDA  show last week.


Product Used:-
which can all be found on Phill's Website:-  www.honeypotcrafts.co.uk

8 x 8 Cream Card Blank
Cream Card Stock
Black Card Stock
Sentimentally Yours Bracket Verse A5 Stamp Set
Sentimentally Yours Inspiration A5 Stamp Set
Black Soot Distress Ink Pad
Cosmic Shimmer Glitter Jewels Glacier Ice
Creative Expressions Finishing Touches Cream Pearls
Sue Wilson Peony Dies
Sue Wilson Petite Vinery Die
Tartan Trellis Embossing Folder
Spellbinder Bracket Border 2 Dies
Spellbinders Flutters
Dazzlers


This is how I made it :-

8 x 8  Cream Card Blank
 Black Card Stock cut to 7.75 sq and attached flat to the card blank.

I then cut a piece of cream card stock to 5.75 x 6.5
and black card stock to 5.5 x 6 and attached both of these flat to the card.

Next I cut a piece of Cream card stock to 5.25 x 6
and using the Border Die I placed this at an angle and cut it out.

Using the Bracket Birthday Verse Stamp I stamped this using Black Soot Distress Ink, then used the Tartan Trellis Embossing Folder to emboss.

I then trimmed this down to fit before attaching to the card using pads to give dimension.

Next I cut a strip of Cream Card Stock to 5.75 x 1.25
and Stamped this using a stamp from the Brackets of Inspiration. I then embossed it using the Tartan Trellis attached this to the card using pads.
I then cut a strip of cream card to 7.5 x  1.75 and embossed before I attached to the right of the card  again using pads.


 Finishing Touches

I added Cream Pearls to the edge of the border below the sentiment, and cut a butterfly from the Spellbinder Flutters die and used Glacier Ice Glitter Jewels on the wings. I also added a butterfly from a Sue Wilson Die.

Using the Peony Die I cut several of these out, shaped and attached to the card, then added leaves from the Petite Vinery dies.

I then added Glacier Ice to the petals and finally finished with a Dazzler to the centre of the flowers.

                      Happy Crafting.


                                                                    www.honeypotcrafts.co.uk


Monday, 7 September 2015

Giveaway Card - Birthday Wishes in Chic Moss

Good Afternoon Everyone

So,.. here I am, with enough time to actually do a Blog post and I thought, it's been a while since I did a card giveaway,so .. here you go :-)

I'll just say a big thank you to Barb too, she's doing a grand job keeping you inspired with some of her cards she's made for me for samples.. Thanks Barb!

This is an 8x8 card I made using some of my Chic Moss collection of Cosmic Shimmer products (a colour that I absolutely love!)

To be in with a chance to win this card, signed by lil ole me, please just ensure you are following my Blog and leave a comment on this post..
I'll draw a winner randomly next Monday morning (14th) and notify you here :-)

Here's what I used (and, surprisingly, I've made the list links to the items on my website too (well, it does make it easier for you to swish over and buy them lol)

Sentimentally Yours Dragonfly Retreat A6 Background Stamp
Sentimentally Yours Scribbled Frame Sentiments Stamp Set (must have set in my humble opinion)
Chic Moss : Colour Cloud, Ink Mister and PVA Glue
Sue Wilson Delicate Fronds Die Set
Sue Wilson Delicate Daisies Complete Petals Die Set (must have set in my humble opinion)
Sue Wilson Ornamental Corners Die Set
Sue Wilson Pierced Tags Die Set
Sue Wilson A4 Leafy Montage Embossing Folder
Creative Expressions Self Adhesive Pearl Strips - Double Row White
Creative Expressions Smoothies


And here's what I did... 

I embossed an A4 piece of white cardstock with the lovely Leafy Montage embossing folder, (important to do this before trimming it down as embossing cardstock alters the dimensions slightly) I then trimmed it to 19.5cm x 19.5cm.

I then cut the aperture to the left side of my embossed cardstock and I did this with one of Sues' Striplet dies as most have the plain outer edge (you can, of course, use your craft knife)
I positioned the aperture onto my card blank as if I was going to stick it and made a pencil mark around all four corners (this gave me a a guide with which to stamp within)

Using the fabulous Smoothies and my even more fabulous Dragonfly Retreat background stamp, I applied Chic Moss Colour Cloud directly to the stamp and stamped within the pencil lines.

At this point, you may find it easier to apply the self adhesive pearls around the aperture (I do it at the end so I don't have them where they don't need to be, but it is trickier trying to navigate them under flowers etc) The single row was created by simply cutting a strip of the double row pearls in half :-)

I then used foam tape on this piece, for dimension, then stuck it to my card blank.

I then did all my die cutting, which was:-
4 x daisies x 2
2 x Ornate Corners
2 x Delicate Fronds
2 x Pierced Tags

The ornate corners, one of the pieced tags and a selection of the delicate daisies were popped into my ink misting box and misted all in one go with the Chic Moss Ink Mister.

The flowers were shaped and stuck together with my trusty Cosmic Shimmer PVA Glue and finished off in the centre with a good blob (very technical lol) of the Chic Moss Pearl PVA Glue.

I then stamped my 'Birthday Wishes' from my Scribbled Frame Stamps (these are a fabulous smaller size to my other sentiments so work perfectly on these tags)

Last but not least, I assembled it all together as you see in the photo and finished with the double row white pearls around the open edges.

Here's a bigger photo :-)


Don't forget my very first shows on Hochanda are:-

Tuesday 15th September at 8pm
Wednesday 16th September at 9am, 10am, 12noon, 4pm and 7pm

I hope you will join me!!
Remember, if you don't have Sky or Freeview/Freesat you can watch in High Definition on their website


Happy Crafting!


Friday, 21 August 2015

Christmas Card Featuring The New Frosty Mink

Good Morning Everyone,

Thank you for your lovely comments on my previous post.

Today's card is a Christmas  8 x 8

 I made this using the New Frosty Mink


Products Used:-  (which are also links to Phill's Website) :-)

8 x 8 Card Blank
Phill Martin Frosty Mink Gilding Wax
Phill Martin Frosty Mink Twinkles
Phill Martin Frosty Mink 
Frosty Christmas Holly Paper Pad
Christmas Holly Verse Stamp
Christmas Holly Background Stamp A6
Frosty Mink Colour Cloud Blending Ink
Seam Binding
Dazzlers
White Crochet Ribbon
Sue Wilson Noble Dies - Ornate Pierced Design


First I cut 2 pieces of plain white card stock,
1st  7.75 square
2nd  7.5 square

I edged the first layer using Frosty Mink Gilding Wax then used Frosty Mink Mister Spray on the second layer, and attached these to the main card  blank.

3rd Layer is Frosty Mink Paper cur to 7" square and add to card.

Next I cut a piece of plain white card to 7.75 x 2" and stamped this using Frosty Mink Colour Cloud Ink and the Christmas Holly Background Stamp. Once this was dry I used White Crochet Ribbon and attached this to the card.


Sentiment:

Using the die I cut this out and stamped the top layer with a Verse from the New Christmas Verse Stamps.
I heat embossed this in gold, then attached to card using pads


Finishing Touches:

I edged around the outer die using Frosty Mink Twinkles and Frosty Mink P.V.A. around the inner die.
I then made a triple bow using white seam binding which I had previously coloured with Frosty Mink Colour Cloud Blending Ink, adding Dazzlers to finish.

                                                     
                                                      Happy Crafting


Friday, 31 July 2015

Decadent Damask Teal - Just A Note

Good Morning Everyone,

Thank You all for your lovely comments on my previous blog.

As I enjoyed making the last card so much and the products are still out on my craft desk I decided to create a slightly different version but using the lovely Decadent Teal.

I Hope you like this one as much as I do:-

Products Used:- (which are also links to Phill's Website too) :-)


8 x 8 Cream Card Blank
Cream Card Stock
Sentimentally Yours Decadent Damask Occasions A5 Stamps
Decadent Teal Colour Cloud
Phill Martin Decadent Teal PVA
Phill Martin Decadent Teal Twinkles
Phill Martin Decadent Teal Ink Mister
Decadent Damask Paper Pad
Sue Wilson Caribbean Collection Border, Accent & Tag Dies
Spell Binder Decorative Labels Twenty Eight


Matting & Layering

8 x 8 Card Blank

1st layer cream card cut to 7.75 x 7.75

2nd layer Cream Card cut to 7.5 x 7.5

3rd layer Decadent Damask Teal Paper cut to 7.25 x 7.25

4 pieces of cream card....... 2 cut to 2 x 7.75  and 2 cut to 1.5 x 7.75

Taking the 7.75 square cream card I used the NEW  Decadent Teal Colour Cloud to ink the edges. Then attached all 3 layers to the base card.

Next I took a piece of 2 x 7.75 and 1.5 x 7.75 cream card and using the Inner Border Die I cut both out, then attached the 2 together - repeat this with the remaining 2 pieces, then attach both to the card lining up with the inner cream layer and the outer teal layer.


Sentiment

Using Spellbinder Labels Twenty Eight I cut the largest three out.
I then sprayed the largest with Decadent Teal Mister Spray.

Then with the smallest of the three I stamped this using the New Decadent Teal Colour Cloud and the Decadent Damask Occasion Stamp.

I attached the largest one to the card flat using Cosmic Shimmer Glue, the second two I attached with pads to give dimension.


Finishing Touches

I added Twinkles to the edges of the Border Dies and also around the edge of the second largest Label Die.
The topper i decorated with Pearl PVA.

Finally I made a triple bow using Seam Binding and added a large Dazzler.


Happy Crafting......


Thursday, 30 July 2015

Decadent Damask Oak - Best Wishes

Good Morning Everyone,


Thank you all very much for such lovely comments on my previous blog.


Today's card is an 8 x 8
 I particularly enjoyed creating this card, its so nice to be able to colour match everything, and I love the NEW Colour Cloud Blending Inks.

Products Used:- (which are also links to Phill's Website too) :-)

8 x 8 Cream Card Blank
Cream Card
Decadent Damask Border & Icon Collection A6 stamps
Decadent Damask Everyday Sentiments A5 stamps
Decadent Damask Paper Pad
Phill Martin Cosmic Shimmer Ink Mister Spray Decadent Oak
Phill Martin Cosmic Shimmer PVA Pearl Decadent Oak
Phill Martin Cosmic Shimmer Twinkles Decadent Oak
Decadent Oak Colour Cloud ,
Sue Wilson Caribbean Collection Border, Accent & Tag Dies
Spellbinder Decorative Labels Twenty Eight Dies
Seam binding
Dazzlers


Matting & Layering

8 x 8 Card Blank

1st layer Cream Card cut to 7.75 x 7.75
2nd layer Decadent Oak Patterned Paper cut to 7.5 x 7.5

4 pieces of cream card
1st cut to 4.5 x 7.75
2nd cut to 4 x 7.75
3rd cut to 3.5 x 7.75
4th cut to 3.5 x 7.75

Starting with the 7.75 square cream card I used the NEW Decadent Oak Colour Cloud to ink around the edges of the card. I then attached this and the patterned Decadent Damask paper to the base card.

Next taking the 4 pieces of cream card and the Inner Border Tag I cut each piece of card, Once this was complete I used the smallest and medium size stamps from the Decadent Damask Border & Icon Collection and randomly stamped the smallest piece of card using first and second generation.
Once this was dry I attached all the layers together, then added a strip of seam binding securing this on the reverse before attaching this to the main card.


Sentiment

Using Spellbinders Labels Twenty Eight and the second largest die I cut this out and then sprayed it with Decadent Oak  Mister Spray. While this was drying which is only a couple of minutes, I cut the third largest die. I then stamped this using the Decadent Oak Colour Cloud and the Decadent Damask Everyday Sentiment Stamps.
These were then attached to the card using pads on both to give dimension


Finishing Touches

I made a triple bow and swags and attached to the seam binding strip, then added a matching Dazzler.

Then to the Decorative Border edges I added the the Twinkles - once this was dry I curled each layer.

Finally I added Decadent Oak PVA to the sentiment.


                     Happy Crafting


Tuesday, 7 July 2015

Special Friend - Sent with Love - Using the New Scribbled Corner Stamps


Good Morning Everyone, thank you all for your lovely comments on my previous post.

Today's card is an 8 x 8 in Cream & Magenta

Products Used: (which are links to items on Phill's Website too) :-


Cream Cardstock
Decadent Damask 8x8 Paperpad
Sentimentally Yours Scribbled Corner Stamps
Sentimentally Yours Baroque Sentiments
Creative Expressions 8x8 Snakeskin Embossing Folder
Sue Wilson Finishing Touches-Delicate Fronds
Sue Wilson Finishing Touches Delicate Daisies Complete Petals
Chic Magenta Cosmic Shimmer Mister Spray
Chic Magenta Cosmic Shimmer Twinkles
Chic Magenta Cosmic Shimmer Gilding Wax
Chic MagentaCosmic Shimmer P.V.A.Glue
Spellbinder Dies Curved Border One


Matting & Layering

 8 x 8 Cream Card Blank

 1st layer Decadent Damask paper cut to 20 cm x 20 cm

2nd layer Cream Card cut to 18.5 cm x 18.5 cm

3rd layer Cream Card cut to 17 cm x 17 cm

4th layer Decadent Damask cut to 15 cm x 15 cm

5th layer Cream Card cut to 14.5 cm x 16 cm


Taking the 2nd layer I sprayed this with Mister Spray, and while it was drying (which is only a few seconds) I embossed the 3rd layer. I then attached these to the card using pads on the 2nd layer to give dimension.
I then did the die cutting on the 5th layer and trimmed it down to leave a small border.


Using the lovely New Scribbled Corner Stamps 
I stamped the top 2 corners then attached both of these layers to the card, using pads on the burgundy layer. I then added P.V.A. around the curve.  
For the Topper I used an off cut from the Decadent Damask  Paper.
The Sentiment was stamped using Distress Ink


Flowers


Again using off cuts I cut out the fronds and daisies.            
I added Gilding Wax to the centre of the daisies before
shaping and gluing. Once I was happy with the shape I
added them to the card and finally added the Twinkles.


                                              Happy Crafting 
                       

Friday, 3 July 2015

A4 White & Silver Embossed Wedding Card

Good Morning Everyone,

Todays card is a Wedding Day Card in White and Silver Embossed  A4 format.

I have had lots of 'likes' and comments on this both on my Facebook page and at Phill's Shows.
I hope you all like it too.


Products Used (which are links to the items on Phill's Website too)

Plain White Cardstock
Decadent Damask Occasions Stamps
Decadent Damask Corners Stamps
Sentimentally Yours Lacy Rectangles
Sue Wilson Camellia Open Petals
Sue Wilson Camellia Complete Petals
Cosmic Shimmer Silver Embossing Powder
Seam Binding
Dazzlers & Stick Pins
Crystal Stickles
Sue Wilson Heart Lattice Embossing Folder
Spellbinders Flutters Die


For the Base
1x A3 Plain White Card Stock folded in half (21 x 29.5)
Then cut 2 layers - first layer 20.5 x 29
second layer 20 x 28.5
Cut 2 strips for centre panel 6.5 x 28.5 and 4.5 x 28.5

Matt and Layer

The first layer I left plain.
Second layer I stamped the corners and heat embossed, then used the embossing folder. Add both layers to the card.
For the centre panel I used one of the long stamps and heat embossed along the edges. The second strip I put through the embossing folder.

Focal Point
Using a plain piece of card, stamp and heat emboss using the rectangle stamp, then cut this out. Cut a rectangle using the die, then stamp sentiment and heat emboss. These are then added to the card using pads to give dimension.


Flowers   

I cut a large amount of flowers using offcuts of white card and moulded these before gluing together.
Once dry I added twinkles around the edges of the petals
and a gem to the centre.
The butterfly I layered and added twinkles.

Finally to finish the card I made a bow using Seam Binding (no prizes for guessing who taught me lol) and added a gem and stick pins.


Happy Crafting ......