What's New

My Brand New Sentimentally Yours 2017 Xmas Stencils are now available at www.honeypotcrafts.co.uk!

Wednesday 27 September 2017

New Blog Home

Hello Everyone

I have moved my blog over to a new home..

Please click the link below to take you to my new Blog and remember to follow :-)

https://phillmartin.wordpress.com/

See you there!

Happy Crafting!


Tuesday 19 September 2017

Festive Berries Stamp Collection

Hello crafters!

Here is a fabulous Christmas card made at our regular craft workshops.

This card was made using Phill's Sentimentally Yours 'Festive Berries' Stamp Collection.

We have also used Memento Inks, Distress Inks, Archival Inks or Distress Oxides.  The Sue Wilson craft dies are: Poinsettia Additions, Twinkle Star Frame and Pine Cone & Greenery.

Stage 1 - cut out all the layers and die cuts needed for your card

  • Base Card - 21cm x 17.5cm
  • 1st Layer (Kraft Card) - 20cm x 16.5cm
  • 2nd Layer (Cream) - 19.5cm x 16cm
  • 3rd Layer (Kraft Card) - 17.5cm x 14.5cm
  • TWINKLE STAR FRAME (CREAM)
  • 4th Layer (Kraft Card) - 11.5cm x 8cm
  • 5th Layer (Cream) - 11cm x 7.5cm
Stage 2 - using three different ink colours from the same brand (e.g. Memento in brown, red and green) create your Festive Montage on the corners of the Cream layers.  Build up the pattern with the 'Festive Berries Flourishes A5 Stamp Set.

Stage 3 - choose your sentiment for your topper.  Here we have used the 'Festive Berries Elegant A5 Stamp Set'.  If you wish to use clear embossing over your sentiment then you need to use a Distress Oxide Ink Pad.  Otherwise use your chosen colour.

Stage 4 - Assemble your card layers, using foam tape where you wish.  Add your Poinsettia Flowers and Pine Cone/Greenery.

Stage 5 - add some bling if you wish!  Here we have also used Pearl PVA on the Twinkle Star Frame in Berry Red and added some twine to match the Kraft Card.

 The Full Card


Here's what we used with links to our website....
Other cards ...


Remember - we are more than happy for you to replicate our cards in your own style! :-)

Scribbled Craft Dies

Hello Crafters!

Here is a card made at our regular craft workshops.

This card was made using Phill's Scribbled Craft Dies and coordinating Cosmic Shimmer colour collections.

We have also used Creative Expressions Embossing Folders and Sue Wilson Craft Dies; Succulent Garden and Maidenhair Fern.

The colour used on the main sample card is 'Tangy Tangerine' with the 'Birthday Wishes' Scribbled Craft die Collection.  As always we've included cards made using different colours. (all these cards have been made by crafters at our workshops)

Stage 1 - cut out all the card layers and die cuts needed for your project in Bright White Card.

  • Base Card - 21cm x 14.5cm
  • 1st Layer (Gilding Polish) - 20.5cm x 14cm
  • 2nd Layer (Ink Mister) - 20cm x 13.5cm
  • 3rd Layer (Gilding Polish) -  18cm x 11.5cm
  • 4th Layer (Embossed with Powder) - 17.5cm x 11cm
  • 5th Layer (Gilding Polish) - 16cm x 9.5cm
  • 6th Layer (Ink Mister) - 15.5cm x 9cm
  • Banner - 2.5cm x 12cm

Stage 2 - choose your Cosmic Shimmer Colour collection with coordinating products; Gilding Polish, Ink Mister and Embossing Powder

Stage 3 - Ink Mist the appropriate two layers and leave to dry. 


Stage 4 - Gilding Polish to edges of the three appropriate layers and also your flowers as you wish


Stage 5 - Use Perfect Medium and a Speedball Bayer to ink up the rough side of an Embossing Folder.  Here we have used Aztec Flowers. Make sure you apply lots of Anti-Static Dust to your white card layer before you put through the machine.  When the layer is embossed the sticky Perfect Medium will have been pressed into the de-bossed side of the pattern.  Then you can cover with Embossing Powder, remove them excess and heat with a heat tool from underneath.

(TIP - you can feel which side to use as it feels scratchy and rough under your fingers)


Stage 6 - using the same Embossing Powder and Perfect Medium.  Press the Die Cut sentiment 'right-side' down into the Perfect Medium.  Cover with Embossing Powder, remove the excess and heat.  Repeat this at least twice to give a full, shiny coverage on your Die Cut sentiment.  Glue the sentiment to your banner using Cosmic Shimmer Dries Clear  PVA Glue or highlighter glue.


Stage 7 - stick all your coordinating  layers together and shape your flowers and glue together.

Stage 8 - assemble the full card, using foam tape where you wish to add dimension to your layers.  Add some bling if you wish.  Here we have also used Pearl PVA Glue to create interest on the corners and also in the centre of the flowers.

The Full Card


Here's what we used with links to our website ......
Other colour samples......


Precious Metals Copper and Copper Gilding Polish


Precious Metals Titanium and Silver Chrome Golding Polish

Carnival Colours Purple Paradise


Carnival Colours Lush Pink

Frosty Heather and Heather Gilding Polish


Remember - we are more than happy for you to replicate our cards in your own style! :-)

(Links below)


    Thursday 3 August 2017

    Distress Oxides and Splatterlicious Stamps

    Hello crafters!

    Here is a card made at our regular workshops.

    This card was made using Phill's 'Splatterlicious' Stamp Collection with the Ranger Distress Oxide Ink Pads.

    We have also used Sue Wilson Dies; Succulent Garden and Bold Scrolled Vine.

    The colour on the main sample card is Iced Spruce with Broken China.  The Stamps used are; Splatterlicious 'A5 Inspirational Sentiments', 'Large Rectangle Frame and 'A5 Textures'.  As always we've included cards made using different colours and stamps. (all these cards have been made by crafters at our workshops!)

    Stage 1 - Cut all the layers and die cuts needed to make your card in Bright White card.

    • Base Card -19cm x 16.5cm
    • 1st Layer (inked) - 18.5cm x 16cm
    • 2nd Layer (stamped) - 17cm x 14.5cm
    • 3rd Layer (white) - 14cm x 11.5cm
    • 4th Layer (inked) - 12cm x 9.5cm
    • 5th Layer is the stamped rectangle frame cut out

    Stage 2 - Choose your two coordinating Distress Oxide Colours. There are so many gorgeous colours that blend and stamp beautifully!  Using a Smoothie apply your chosen colours to the edges of the layers as in the photo.  Here with have inked Layer 1 and 4 and used the opposite colour in opposite corners.

    Stage 3 - Stamp your chosen pattern onto the 2nd Layer.  Here our crafter has used a single stamp from the 'A5 Textures Stamp Set' and repeated the image around the edges.  The Rubber background stamps also work really well on this layer!


    Stage 4 - Colour the flower petals in the two coordinating colours.   Shape your flowers as you wish, assemble them and leave to dry. Add colour to the Bold Scrolled Vine leaves if you wish.

    Stage 5 - Stamp the Large Rectangle Frame onto a scrap piece of bright white card and cut.  Here our crafter has used both Distress Oxide Ink colours, which gives a stunning finish!

    Stage 6 - Stamp your chosen sentiment into the middle of the Large Rectangle Frame.  (You could also use a banner across the frame)


    Stage 7 - Assemble all the layers, using foam tape where you wish to lift the layers.   Place your leaves and flowers where you wish and add some bling!

    The Full Card


    Here is what our crafter used with links to the website......

     Other Colour samples.....

    Walnut Stain and Spiced Marmalade

    Worn Lipstick and Wilted Violet

    Iced Spruce and Spiced Marmalade

    Peeled Paint and Fossilized aAmber

    Worn Lipstick and Wilted Violet with a banner

    Remember - we are more than happy for you to replicate our cards in your own style! :-)
    can also find him on Pinterest and Instagram for ideas and inspiration :-)

    (Links below)


    Tuesday 25 July 2017

    Stencils with Ink Mister & Texture Paste

    Hello crafters!

    Here is a card made during our in-store workshops.

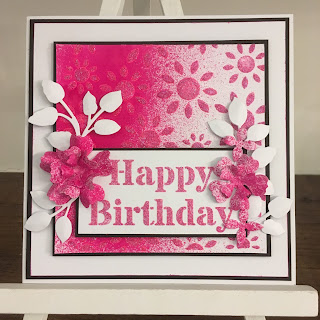
    This card was made using Phill's new A5 Stencils with his gorgeous 'Carnival Colours' (texture paste,  ink mister, colour cloud and gilding polish)

    We also used Sue Wilson dies; Succulent Garden and Orange Blossom Leaves.

    The colour on the main sample card is Tangy Tangerine and the stencils used are Grungy Dots and Birthday Sentiments. As always we've included examples made using the other Carnival Colours and stencils.  (all these cards have been made by crafters at our workshops)

    Stage 1 - Cut out the card layers needed for the card (and die cuts) in bright white and black foundation card.  Although, we have done a square card these stencils work well with A5 cards too!

    Card layers are:

    • Base Card - 17cm x 17cm
    • 1st layer in black - 16.5cm x 16.5cm
    • 2nd layer in white - 16cm x 16cm
    • 3rd layer in black - 13.5cm x 13.5cm
    • 4th layer in white - 13cm x 13xm
    • Banner black is 3cm x 12cm
    • Banner white is 2.5cm x 12
    Stage 2 - Ink Mist the smallest white layer (13cm x 13cm).  To get this graduated look, we ink misted the card from the side. By turning the box on it's side and aiming the spray at the very front edge of the card only. It will not take long for this to dry, but if you want to speed it up use a heat tool!


    Stage 3 - Texture Paste onto the Ink Mist layer.  This needs time to dry, so best to leave for about 1 hour.  Choose your A5 stencil and place over the Ink Mist layer about 3/4 way across from the heavy inked side.  Hold in place with Scotch Removable Tape on all sides. Using a spatula apply the Sparkle Texture Paste through the stencil with long strokes until all the gaps are filled.  Make sure you don't use lots of small strokes (like buttering bread) as this can cause the paste to seep under the gaps.   Scrape off any excess paste and put back in tub.


    Stage 4 - Texture Paste your Sentiment Banner.  Choose your sentiment and then place stencil over banner layer and hold in place with Scotch Removable Tape as before.  Make sure you tape over any exposed lettering of other sentiments.  This really will not take much Sparkle Texture Paste. 


    Stage 5 - Colour your flowers!  You can choose to colour your flowers with so many of the Carnival Colour products.  On our main card the flowers have been coloured with Tangy Tangerine Colour Cloud and then Ink Misted with Precious Metals New Gold to add extra sparkle!  We have also used the Tangy Tangerine Gilding Polish on some of the flowers for a lovely, pearly finish.  Shape your flowers as you wish and then stick together.


    Stage 5 - When all the layers are dry, you can start assembling your card.  Use foam tape to left layers where you wish and add glitter jewels for extra bling!

    The Full Card


    Close Up


    Here is what our crafter used, with links to the website......


    Other colour samples.....

    Lime Burst and Floraganxa stencil

    Purple Paradise and Star Grid stencil

    Lush Pink and Floraganza stencil

    Sunshine Yellow and Barcodes stencil
    Electric Blue and Doodle Hearts stencil 


    A5 Portrait in Sunshine Yellow and Butterfly Cascade stencil

    Remember - we are more than happy for you to replicate our cards in your own style! :-)

    Happy Crafting!
    PS - Don't forget to 'like' Phill's Facebook page and follow him on Twitter to keep in touch, you can also find him on Pinterest and Instagram for ideas and inspiration :-)

    (Links below)


    Wednesday 12 July 2017

    Festive Berries in Rich Red and Cream

    Hello Crafters

    I know, I know - don't fall off your chair as it's me doing the Blog post :-)

    My brand new Festive Berries Collection is on my website and available to order right now!

    I posted a photo of this card I made using my new collection on my Facebook page and have had so many people ask me what I used, I thought it was easier to do a Blog post, so, here I am,... sat with a cuppa, writing a post for you...

    What I used (with links to the products on my www if we have them)
    Sentimentally Yours Rambling Branch Background Stamp
    Sentimentally Yours Fancy Frame Stamp
    Sentimentally Yours Festive Berries Mini Sentiments Stamps
    8x8 Cream Card Blank
    Rich Red Foundations Card
    Cream Card
    Creative Expressions Twisting Holly Embossing Folder
    Fired Brick Distress Oxide Ink Pad
    Dies by Sue Wilson: Poinsettia Additions
    Dies by Sue Wilson: Holly Sprays
    Dies by Sue Wilson: Noelle Frame
    Cosmic Shimmer Detail Clear Embossing Powder


    The Fired Brick Distress Oxide is the perfect shade to compliment the Rich Red Card,.. add to that, the fact that you can emboss on top of Distress Oxides, I think they are brill!
    I have used Detail Clear Embossing Powder on top of the Fancy Frame stamp and it gives it a lovely glossy finish (not sure you can make it out on the photo)

    The Festive Berries Collection of stamps is so intricately detailed, from tiny pine cones, holly leaves and fir branches, to tiny berries...

    They stamp beautifully with ink pads and embossing powders too...

    I'm not going to bore you with how I made the card, as you can see where I have matted and layered, stamped etc,..

    I will tell you that I have designed some of these stamps to work in harmony with some of Sue's new Christmas Dies,.. the Noelle die, for example, will cut out my Fancy Frame stamps, leaving you a lovely, neat border :-)

    I adore detail in my stamps, in fact, I push the limits to what a clear stamp can do every time I design stamps,.. as, for me, it's all in the detail and this is why I love stamps!
    Hopefully, you can see the detail in these gorgeous festive Berries Mini Sentiments (I have embossed this the same way as the frame too!),.. lovely! and, more importantly, they will all fit within the frame,..

    Finishing touches that don't overpower your sentiment are key for me, you know I love flowers and any kind of decoration on my cards, but, always, the words are the most imoprtant part,.. this is why I make our own cards (for fun and to say something to those who matter to me, even if I'm rubbish at posting them ha ha),.. the decoration should be drawing attention to the sentiment, not taking over (hopefully I have managed this ha ha)

    Anyhoo, hope you like the card and the new Festive Berries Collection,.. I'll be launching the complete collection on TV on July 25th

    Pop on over to my website to see the whole collection :-)
    (ssshh there's a time limited cheeky 20% off the RRP on these stamps, be quick)

    Happy Crafting!


    Thursday 29 June 2017

    Stencils and Chalk Cloud

    Hello crafters!

    Here is a card made during our 'Make & Take' workshops at the Create It Events Show in Telford in June.

    The whole project was completed in under an hour!

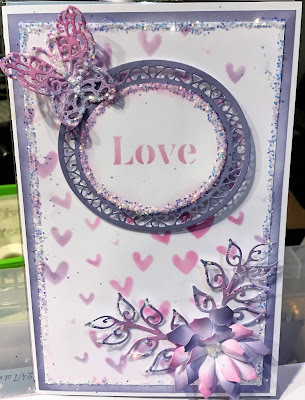
    This card was made using Phill's new A5 Stencils and the gorgeous new product 'Chalk Cloud'.  If you haven't used these yet, you will love them! Our crafters at Telford couldn't get enough of them!

    We also used Sue Wilson dies; Orange Blossom Complete Petals, Whimsical Leaves Magical Butterflies and Grace.

    The colours on the main sample card are Cozy Clay and Gentle Lavender.  The stencils used are Butterfly Cascade and Birthday.  We have included other samples made with other colours/stencils.
    (all these cards have been made by crafters at our workshop)

    Stage 1 - Cut out all the card layers and die cut shapes needed.  This card is A4 folded in half and then trimmed to 21cm x 14cm to make the layering easy to work out!  The first layer is 20.5cm x 13.5cm and the second layer is 19.5cm x 12.5cm.

    Stage 2 - Choose your two co-ordinating colours! The great thing we found about the Chalk Cloud was that all the colours went with each other, so it didn't matter which two our crafters chose!  Apply one of the Chalk Cloud colours to the first layer just around the edges with a Smoothie using circular actions.  Use this same colour on the lacy topper of the Grace die and also lightly on the Whimsical Leaves die.  Here our crafter has used Cosy Clay as the background colour and Gentle Lavender as the additional colour.

    Stage 3 - Choose your stencil background for your card.  Here our crafter has used the Butterfly Cascade stencil.  Place your background stencil over the next card layer and tape down the edges just a little with Scotch Tape to keep it place.  Use your two chosen colours with a smoothie to stencil the design onto the layer.

    Stage 4 - Choose your stencil sentiment for your card.   Here our crafter has used the 'Just For You' sentiment for the Birthday stencil. Place your background stencil over the plain oval topper from the Grace die and tape down the edges just a little with Scotch Tape to keep it place.  Make sure you also tape over any other parts of the stencil that might be exposed!!! Use your two chosen colours (or one colour if you wish) with a smoothie to stencil the design onto the topper.

    Stage 5 - Lay out the 4 Orange Blossom Petals largest (1) to smallest (4).  Use a smoothie to colour petals 1 and 3 in one colour and then petals 2 and 4 in the other colour.  (You could also use both colours on all the petals).   Shape the petals as you wish.

    Stage 6 - Assemble all your layers and die cuts pieces and add some bling!

    The Full Card


    Close up of petals


    Close up of topper


    Here is what our crafter used with link to the www.....


    Other samples

    Sweet Apple & Terracotta
    Gentle Lavender & Princess Pink


    Enchanted Blossom and Sweet Apple

    Remember - we are more than happy for you to replicate our cards in your own style! :-)

    Happy Crafting!
    PS - Don't forget to 'like' Phill's Facebook page and follow him on Twitter to keep in touch, you can also find him on Pinterest and Instagram for ideas and inspiration :-)

    (Links below)