What's New

My Brand New Sentimentally Yours 2017 Xmas Stencils are now available at www.honeypotcrafts.co.uk!

Tuesday, 30 June 2015

Black & White Best Wishes - with a new Scribbled Corner Stamp too!

Good Afternoon Everyone

I hope you're enjoying the lovely weather!

OK, so, I'm a little more than excited about the release of my brand new Scribbled Corner Stamps and Scribbled Frame Stamps,..
The Scribbled Sentiments stamps have been so popular and I have wanted to do corner sentiment stamps for ages,.. the Scribbled is a perfect style for this!

There are three new releases in the Scribbled range, Scribbled Corner Sentiments 'Everyday', Scribbled Corner Sentiments 'Occasions' and Scribbled Frame Sentiments,..

The Scribbled Frame Sentiments are amazing, there are two Scribbled frames, one that the sentiments actually 'attach' to the sides when you stamp them and the other enables you to create longer borders to sit your sentiments into!

Anyhoo, enough rattling on, they are available now on my website here:- New Scribbled Sentiment Stamps
(note that the stamps are listed alphabetically, so just scroll down until you find them)

Onto the card I made....
This is an A4 sized card and I wanted to show how the Scribbled Corner Stamps work effortlessly with the Scribbled Frame Stamps..especially as the frame sentiments are cutey, smaller ones :-)

This is what I used (and they are links to my website for you to go and purchase if you need to) :-)

Sentimentally Yours Scribbled Corner Sentiment Stamps 'Occasions'
Sentimentally Yours Scribbled Frame Sentiments
A4 Swirling Hearts Embossing Folder
Dies By Sue Wilson Portuguese Collection - Porto
Dies By Sue Wilson - Perfect Peony
Dies By Sue Wilson - Maidenhair Fern
Dies By Sue Wilson Portuguese Collection - Corner, Border & Tag
Cosmic Shimmer White Pearl PVA Glue
Creative Expressions Heart Dazzlers

This is really quite a straight forward card :-)

There are a few layers of matting and layering in alternate black and white, the largest white layer has been pierced all the way around and this, along with the slightly larger black layer have been stuck onto the card with Cosmic Shimmer glue (flat)

There are actually two white layers on the top, the top one has been die cut with the Portuguese border die, at an angle, to give me the shaped edge, this was them embossed with the pretty Swirling Hearts embossing folder.

I die cut an extra border in black card and this slotted into the space left on the shaped edge of the white piece (I attached it with cosmic shimmer glue on the very edges - patience required!) ha ha

The two black diagonal pieces were actually waste from my matting & layering so I put them to good use :-)


I stamped my fabulous Scribbled Corner Sentiment onto the next white layer and then attached to top white layer with foam tape, this was then stuck to the next black layer with Cosmic Shimmer Glue and then the whole caboodle was stuck onto the white pierced layer with foam tape.
** If you want your corner sentiments the 'right way up', stamp them in any top corner **


At this stage, I added the white pearls with the Cosmic Shimmer Pearl PVA glue and set aside to dry (we've all done that haven't we?.. accidentally put something on the top of still drying pearl pva!)

I love Sues' Portuguese collection,.. the border is amazing, the topper dies are lovely, with great variation too!

Anyhoo, you can see that I cut the two layers of the die in white and then the base layer die in black. I stuck the white, patterned layers onto the plain black layers and, using my quickie glue pen, filled in the gaps with glue, then dunked it into my iridescent glitter station (it's a fabulous effect on any colour cardstock) The centre of the dies is a pretty little circle and it's the perfect size for me to stamp my new Scribbled Frame Sentiments! The edges were then glued (pva for definition) and dunked into glitter.


Lastly, I die cut hundreds (it felt like it!) of the Peony flower die in black and white card,.. to create the shape I have, I literally just 'pinched' the petals in the middle and pushed down the centre with my flower shaping tool. Some had a pearl inside, some had the glitter inside,.. the bigger black flowers have either a stripe of glitter (I used my pva glue) or the edges glittered,.. it all adds interest :-)
I finished off my glittering two of the maidenhair ferns tat I die cut in white cardstock and poPped them under the flowers at the top :-)

Hope you like it,.. sadly, I won't be giving this card away as, well, it weighes a tonne! ha ha, but I'd still like to read your comments (nice ones anyway) lol

Thanks so much for dropping by,.. I hope I've given you a little inspiration :-)

Now go and get those Scribbled Corner Sentiment Stamps before they sell out :-)


Happy Crafting!!


Monday, 29 June 2015

Chic Aubergine and,... plain cream cardstock!

Good Morning Everyone

So, I've gone from hardly ever posting on my Blog, to Blog 'mania' ha ha, but I am determined to make use of this Blog to show you all I've been up to, all I'm up to and the occasional sneaky peek into what I have coming for you :-)

With this in mind, and with me having so many things on the go all at once, I have to be realistic,.. I needed help,.. and I knew just who to ask,..

I asked Barb, who is a friend of mine who helps make some of the lovely samples you have seen on my Create & Craft shows and at the Craft shows around the country,.. some of you will have met Barb too, as she helps on my stand at the shows... naturally, she's had amazing teaching (from me ha ha), but she has an incredible eye for detail, colour and a love of all the products I bring to you.

Barb will post on my Blog a couple of times a week, showcasing either one of her samples that she's made for me using my products or one of my cards from my workshops in my shop.

Her first post will be this Wednesday so please be gentle with her :-)

OK,..
Now, are you ready for this,.. I am already giving away the Decadent Denim version of the card I made in 3 colourways on Friday, (remember to go and comment on that post to be in with a chance), but how about this,.. I promised I'd start this Monday with a giveaway card each week and here it is,.. that's two chances this week to win one of my cards,.. as usual, you need to be a follower of my blog and leave a comment on this post and I will notify the winner via the Blog next Monday (when the new giveaway starts) :-)

This is what I used: (with links to the products on my www for you)
Chic Aubergine Ink Mister
Chic Aubergine Twinkles
Chic Aubergine PVA Glue
Sentimentally Yours Baroque Sentiments Stamps
Sentimentally Yours Vintage Sheet Music Background Stamp
Dies by Sue Wilson Camellia Complete Petals
Fine Finials A4 Embossing Folder
Spellbinder Border Dies

This is an 8x8 card, made from lots of plain cream cardstock!

I created two layers for the background of the card, the largest was misted with the Chic Aubergine Ink Mister and the second was stamped with the Vintage Sheet Music stamp in Dusty Concorde distress ink (it's a good match for the aubergine)

The top three layers were cut from cream cardstock, the top one having the die cut border, at an angle and the top edge finished with some Chic Aubergine Twinkles, the next layer was embossed with the beautiful new Fine Finials embossing folder, the third layer was left cream, but the edges were inked with the Dusty Concorde to give it some definition.

These top 3 layers are on foam tape, for dimension, the Vintage Sheet Music stamped layer is also on foam tape for extra height and the edges have been given the Chic Aubergine Twinkles treatment! (this won't be a cheap one to post! ha ha) and the ink misted layer is on flat with cosmic shimmer glue.

The flowers have been cut from the Camellia dies in cream cardstock and I did use a small woodware punch for the 'in between' sizes,.. I stamped the Vintage Sheet Music Stamp onto a couple of the flowers with the Dusty Concorde distress ink.

The two ovals are woodware punches, the largest was ink misted and the top one stamped with the Baroque Sentiments Stamps (one of my favourite sets!)
The two ovals are on foam tape and the flowers stuck with cosmic shimmer glue in (as close as I could get it) opposite formations of each other, all finished of in the centre with the Chic Aubergine Twinkles.

Last, but not least, just two pearls in the bottom corners using the Chic Aubergine PVA glue.


I love the Chic Aubergine range, it's a really beautiful shade and looks amazing on white and cream cardstock alike.

Anyhoo, enough rattling on!

Good Luck!

Happy Crafting!


Sunday, 28 June 2015

Craftathons are back!!

Good Afternoon Everyone

I have no idea where the sunshine went, but it certainly isn't here in Nottingham at the moment!

That said, it's given me an opportunity to catch up on things so,..

I'm so, so excited to tell you that (by persistent nagging), my Craftathons are back!

Craftathons are my all day workshops, now held in a brand new venue (5 mins from my shop), with loads of space, room to park and even space for me to set up a stand like I do at the craft shows :-)

It's probably easier to show you the flyer:--- here you go...
(click the picture to make it big enough to read)


I can tell you that only half of the spaces are left already, so if you want to join us, for what will, undoubtedly be, a fab day of crafting, tea (or coffee or juice lol) and fun, you need to be quick'ish :-)

I can't wait!

Hope to see some of you there!

Happy Crafting!


Friday, 26 June 2015

Part 2 of ... It all starts with plain white cardstock!

Good Evening Everyone

Remember the post I did a few days ago, where I showed you the 2 versions of the cards I made, all from plain white cardstock,.. 1 with my Chic Pumpkin Range of Cosmic Shimmer Products and the other with my Decadent Bamboo range of Cosmic Shimmer Products?..

Well, I told you I'd done a third version in Decadent Denim, but I had to leave it at the shop as the pearl PVA glue hadn't dried,... here it is!

This is the first ever card that I will give away from my Blog (copying my partners in craft, Julia Watts & Sue Wilson) lol, and I will do this every week, but it will start again next Monday, and be every Monday thereafter,..

I'll draw a name at random on Friday, next week (4th July) for someone to win this Decadent Denim version of my card and I will notify you via a post on the Blog.

Simply leave a comment below (all nice, of course) lol

(you must also be a follower of my Blog to be eligible)(if you are not sure how to do this, just click the 'Join This Site' button, which is on the right side of the Blog page, about halfway down)

Anyhoo,.. here are the photos of the Decadent Denim version of my card,.. hope you like it :-)

I know I like a card if I have taken the time to replicate it in three colourways! ha ha

Happy Crafting and Good Luck!!


Wednesday, 24 June 2015

Introducing...... 'Staged Sentiments'.....

Good Morning Everyone

I have some very exciting news for you...

My brand new product has now been 'officially' released!!

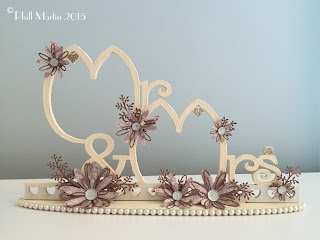
Staged Sentiments in mdf by Phill Martin

These are beautifully detailed, intricate, delicate laser cut mdf sentiments that slot into an oval base (the stage) so they stand upright.

Featuring a row of hearts on the base of the sentiment and 3 hearts within the sentiment itself, for that co-ordinated look :-)

I've designed these (as you would expect from me) to be detailed, in proportion and to be easy to post,.. they will fit into an A4 padded envelope, if you wish to send them as gifts etc, (just remember not to stick the sentiment into the base, so it stays flat, then the recipient can do that when they get it)

I am so excited about these and, if you've been to any of the big craft shows this year, you will have seen my samples in 'real life' and had to endure listening to me enthuse about them! ha ha

So easy to decorate too!,.. you can use all your favourite techniques to decorate them,.. inks, paints, crackle paints, gilding wax, gilding flakes,.. the list goes on and on...!

On the samples below, I have used Cosmic Shimmer Chalk Paint (for the base layer), Cosmic Shimmer Crackle Paint (for the top layer) and decorated with Creative Expressions Self Adhesive Pearl Strips (around the stage), then finished off by die cutting loads of flowers using the scraps of papers I have from my Decadent Damask and Chic Floral 8x8 Paper Pads...

I must say a special thank you to my sister, Mill (long story, but her real name is Karen) and my Aunty Sue (her real name is, er.... Aunty Sue) lol :-) who have helped make some of the samples below..


Dream Staged Sentiment 
Inspire Staged Sentiment
Special Couple Staged Sentiment
Happy Birthday Staged Sentiment
Create Staged Sentiment
Craft Staged Sentiment
Home Staged Sentiment
Love Staged Sentiment
Mr & Mr Staged Sentiment
Mrs & Mrs Staged Sentiment
Family Staged Sentiment
Mr & Mrs Staged Sentiment


Most of my Staged Sentiments are available now on my website here: Staged Sentiments in mdf by Phill Martin


Anyhoo, I really hope you like this fabulous new product,.. makes a great gift, makes a great piece of home decor for yourself and they really are something special :-) and, more to the point, they are designed with crafters in mind, so easy to do, fun to decorate and add your own style and finishing touches :-)

Remember: you can 'Pin' any of these photos to your own Pinterest Boards (or Facebook etc),.. just hover your mouse over the photo's and it gives you little buttons with various options of places to share the photos etc 
:-)

Happy Crafting!


Saturday, 20 June 2015

It all starts with,... plain white cardstock!

Good Afternoon Everyone

It's just started to rain (again), so, I've mashed myself a cuppa and thought I'd shock you all by writing a blog post :-)

If I'm honest, it's this weeks class project that has reminded me "I should use my blog more", as I absolutely loved making this card,.. so much so, that I made the same card in 3 different colour ways (Denim version is still drying at the shop... those pesky Pearl PVA glues,.. making me wait for drying time) ha ha

So, as you'd expect from me,. I start with plain white cardstock, then I decide which of my lovely Cosmic Shimmer sets to 'play' with, then it all goes from there,..

I always have a 'vague idea' of what I want to achieve, but (as most of us do), I change those ideas as I go!

I decided on Chic Pumpkin.. which is a lovely, burnt orange colour..

Here's what I used:

White Cardstock :-)
Decadent Damask Inspirational Phrases Stamp Set by, erm, me lol
Chic Pumpkin Ink Mister
Chic Pumpkin Gilding Wax
Chic Pumpkin Twinkles
Delicate Daisies Dies by Sue
French Collection Corner, Border and Tag Die Set by Sue
A4 Wild Roses Embossing Folder
St Kitts Die Set by Sue

And here's what I did:

This is an 8x8 card.
I cut two layers for the base of this card (one 19.5cm square, which I then pierced all the way around, then another, 18.5cm square, which I gave a light'ish misting with the Chic Pumpkin Ink Mister)

The narrowest piece of white card that was left over from the 19.5cm piece I cut was embossed with the beautiful Wild Roses embossing folder.

I cut two borders from the French Collection dies and these were stuck underneath the embossed piece and attached to the card using foam tape for dimension.

I cut the centre piece from the St Kitts die set, using the two larger dies together and then the larger die on its' own (this one was given the light'ish dusting of the Chic Pumpkin Ink Mister) and the two were stuck together with Cosmic Shimmer glue, I also cut the extra centre for the sentiment with the ST Kitts die set.

I stamped my sentiment from my lovely Damask Inspirational Phrases Stamp Set, using my Black Soot distress ink pad.

The edges of the sentiment area were inked using the Chic Pumpkin Ink Mister (just spray onto your craft sheet and pick some ink up with your Cut n Dry foam), this centre was attached to the topper with foam tape and the topper was attached to the card with a double layer of foam tape, for extra dimension.

The flowers were created using Sues' Delicate Daisies dies (complete petal), each flower was finished in the centre using the Chic Pumpkin Gilding Wax and a teeny drop of the Chic Pumpkin Twinkles.

I finished off by adding a couple of pearls using teh Chic Pumpkin Pearl PVA glue on the centre topper and on the four corners of the card.


I hope you like this card,.. I really enjoyed making it and, here's one of the other colour ways I did,..

This is the Decadent Bamboo version.. :-)


Happy Crafting!

Remember: you can 'Pin' any of these photos to your own Pinterest Boards (or Facebook etc),.. just hover your mouse over the photo's and it gives you little buttons with various options of places to share the photos etc 
:-)